How To Configure Services and Providers on SimplyBook.me

This post is also available in:
![]()
![]()
![]()
When you have signed up with SimplyBook.me, it is just the beginning of what could be a fabulously beneficial relationship. By signing up, you automatically create the bare-bones structure of your business’ booking management system. However, before you can start using your booking site, you need to configure the services you offer and the providers that make it happen. So today the featured video will show you how to configure services and providers in your booking system.
Defining Services and Providers
It might seem obvious, but if you have a service that has some ambiguity between a service and a provider, it could be a little confusing.
It’s perfectly normal that in a hair salon the stylist is the provider and any hair-related activities are the services. The same goes for lawyers and legal services, cleaners and cleaning, etc.
But what about other business types? These could be events, restaurants, and room and equipment hire, among several other things. These types of business don’t have the same simple definition of services and providers.
For example, if you run an escape room business, the “service” you provide is the thrilling escape room experience, but the “provider” is the physical room required for the occasion. On a similar note, if your business is in the equipment or room hire sector, there might be some confusion as to how you would arrange that as service and provider on your booking site.
There’s also the option to have a combination of defined class and group schedules as well as individual services.
In the case of rentals, the space you’re renting or the item that people might want to hire will be the “provider”, and the “services” would be of differing durations, whether that is for hours, days or weeks.
The same might also apply to quest and escape rooms, where the room is the provider, and the duration is a particular service.
Which should you do first, services or providers?
There is no predefined ideal for setting up services or providers first. You can do whichever one first or you can combine setting up specific services with a particular provider; it doesn’t matter.
In some instances, it might be easier to set up your providers first, especially in the case of rentals and experiences. You might find it easiest to input your services first and allocate providers later.
In both cases, you can allocate providers to services and vice versa.
Setting Up Providers
If you are just starting as a solopreneur, you will be the sole provider. If so, then setting yourself up first might be the wisest choice for you.
The video did a fabulous job of taking you through the service set up process, but if you want to set up a provider, I’ll give a little more detail.
If your providers are people providing a service, you probably want to give them names (whether real or work-based identities). However, you might not want to list full names on your booking website, for privacy.
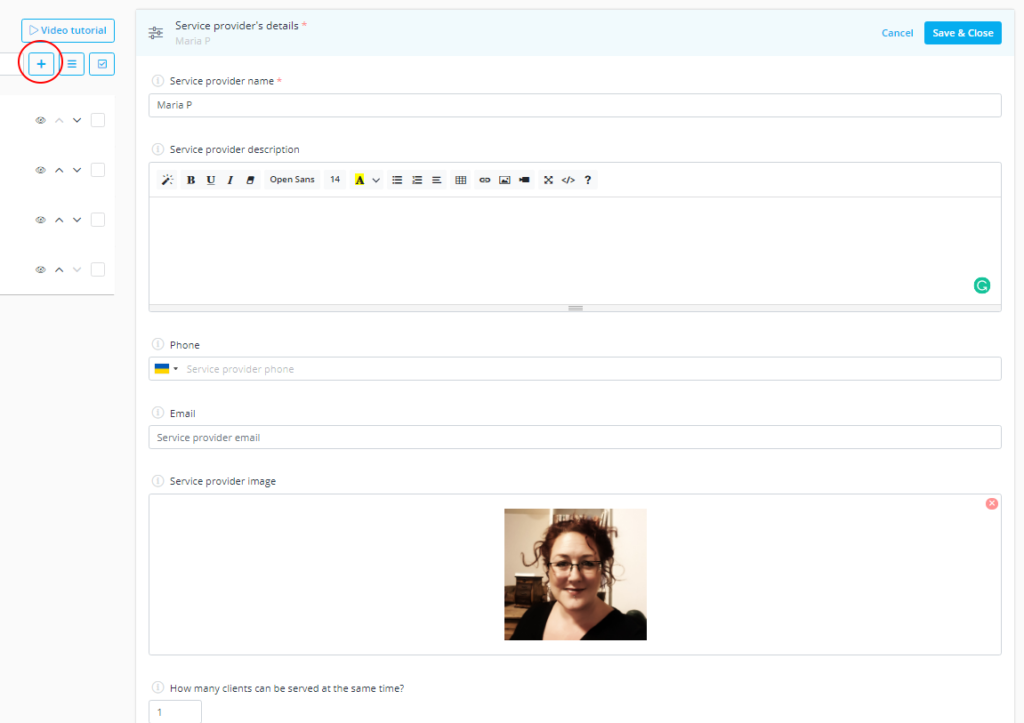
So setting up providers means you start from the menu at the left of your interface and choosing Manage >> Service Providers. To add a new provider from scratch, you click on the “+” button.
And we start by giving the provider a name.
Provider Set Up
My example provider is a person called Maria P, but you might have “Table 4” on a restaurant booking system. Alternatively, you could also have “Escape the Asylum” for an escape room or “Treble/Alto Recorder” if you hire out musical instruments. Whether your provider is a person, place or item, you need to ensure it is easily recognised, to avoid misunderstanding. If you don’t intend to allow clients to book to a specific provider, you can always just call them “Provider 1/2/3/4”
For greater clarity, you might also want to give a detailed description. For a person, you might want to give explicit details of their relevant experience, qualifications, and years in the business. Along with some personal and funny anecdotes, if appropriate, to humanise your provider.
If your “provider” is not a person, you’ll want to ensure you give enough description that people know what they are getting when they book.
If your “provider” is not a person, you will want to ensure you give enough description that people know what they are getting when they book. Using the restaurant example, you could describe “Table 4” as: “A circular table accommodating up to 6 diners. Situated by the french windows, looking out onto landscaped gardens.” An excellent description and the booking patrons know exactly what to expect.
And lastly, if you have an image of the experience, person or item that your customer has booked, show it. A picture of the person providing their massage, an image of the item they want to hire or the activity they want to experience are all great tools or engaging people in the service you offer.
Contact Details
Contact details are a requirement for all providers, whether they are human or not. No one expects tables or musical instruments to have email, but staff managing the schedule should.
If the provider is a person, they need to keep fully aware of their new bookings, cancellations and rescheduled appointments.
Setting Up Services
The video above was very detailed about how to set up new services and modify existing ones. For the most part, it is very similar to that of the provider set up. From the Left-hand menu go to Manage>>Services and to add a new service click the “+” button. After that, it’s a simple matter of giving the service a name, description and a picture. The same as we did for providers.
In the same manner that provider definition differs between different service types, so too does service definition.
While a hairstylist might provide an astounding array of hair related services, a restaurant only provides a dining experience, and a hire shop[ only has varying lengths of equipment hire. So while a salon might require the set up of a dozen different services with very different names and descriptions, a restaurant or hire shop can effectively duplicate their “sittings” and hire periods, changing only the pertinent details such as duration and price.
As standard, without the inclusion of any custom features, you will want to complete the following tabs:
- Service Details
- Time Details
- Service Providers
- Service Schedule
Time details will allow you to set the expected duration of service and add buffer time to travel or set up the service. Service Providers will allow you to allocate particular providers to specific services. The service schedule tab enables you to specify the availability of the services to their particular timetable. Just because your premises are open doesn’t mean everything is available at all times.
Customised Service Set-Up
Setting up services will depend very heavily on the custom features that you choose to use for your booking service. If you plan to accept online payments, you will need to input a price, and possibly even sales tax amounts. Likewise, you will also need to input deposit amounts if you want to take a confirmation payment for the booking.
Other options will allow you to add product add-ons to a particular service, and similarly with service add-ons.
If you have a broad range of services or even items to offer your clients, it might be easier to group things into categories. A beauty salon might separate hair face and body treatments. Alternatively, an instrument hire centre might separate by strings, brass, percussion and wind.
And there are so many more options, including video meetings, memberships, related resources, tickets, intake forms, and group bookings (to name a few).
Comments
2 comments