Tracking Events in SimplyBook.me

This post is also available in:
![]()
![]()
![]()
![]()
![]()
Using Google analytics to track visitors on your SimplyBook.me booking website is amazing to understand better the usage of your site and your website visitors. However some of the booking website layouts that SimplyBook.me provides and the SimplyBook.me widget that you can place on your own site use a single page booking process, meaning in layman’s terms that it may be difficult to track events/goals.
But don’t despair, there is a solution and it is simpler than you may think. Just follow the steps below and you can start tracking events such as successful bookings. In the text below, I assume that the user has Google analytics setup (https://analytics.google.com) as well as the Google tagmanager (https://tagmanager.google.com).
First of all in SimplyBook.me, go to Custom features and activate the Google tagmanager feature. Insert your tagmanager code in the relevant field in the tagmanager custom feature settings.
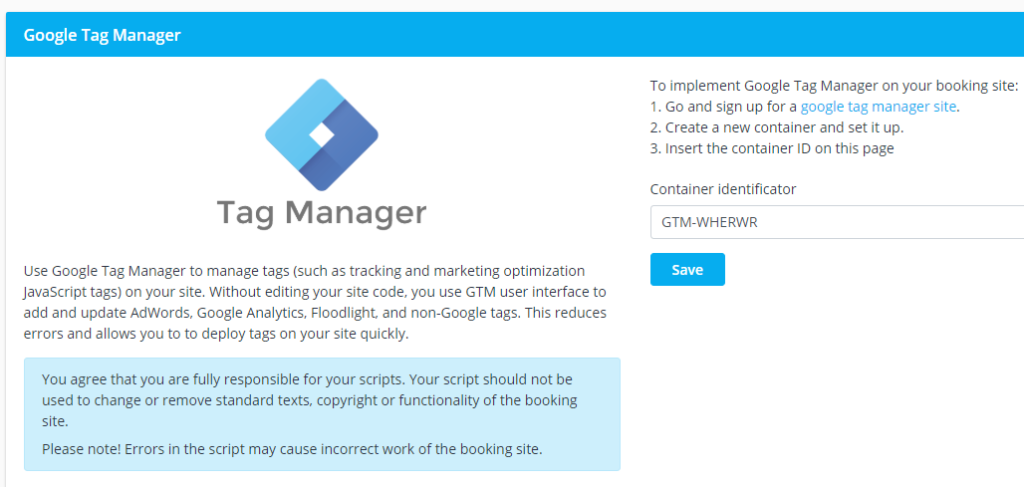
Insert the tagmanager code in to the SimplyBook.me tagmanager settings
First of all you need to go to your analytics, in the Menu on left side, go to bottom, click on Settings. You will then see 3 columns, go to middle column and choose “Js. Tracking info” and then click on Tracking code.
You will see code like this:
<!-- Global site tag (gtag.js) - Google Analytics -->
<script async src="https://www.googletagmanager.com/gtag/js?id=UA-XXXXXXX-3"></script>
<script>
 window.dataLayer = window.dataLayer || [];
 function gtag(){dataLayer.push(arguments);}
 gtag('js', new Date());

gtag('config', 'UA-70295730-3');
</script>
Copy the code that comes after “?id=” it looks like this -> UA-SOMENUMBER-1
You now need to go into the Google Tag manager, Workspace and choose Variables. Scroll to the bottom of screen where you can select to create a new variable.
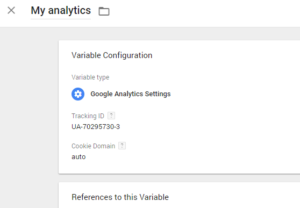
Create your google analytics code in the tagmanager as fixed variable.
Choose the variable type as Google analytics and set Tracking id as the code you copied from your analytics account and remember to both SAVE and PUBLISH the new Tagmanager settings.
Now go back to Variables, Built in variables, and select to Configure.
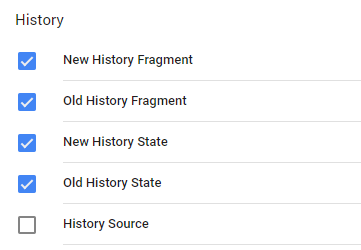
In fact you will only be using one of these variables, but it does not matter that all are activated.
In the Configure screen, make sure that History variables are checked as well as the Event variable.
Now you can save and go out of Variables and in Workspace you can select the Tags. When in Tags, press the button to create a New Tag.
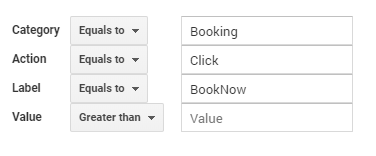
Name this new tag in the upper right corner “Book Now Success” and then set the rest of settings according to image below.

You can set the tag up as the image shows.
Then lower on the page in same function, you can press to create the Trigger. This will open a new settings for the Trigger. Call this trigger for example “Button Press Success”, select Trigger Type as “History Change” and select that this trigger fires on New History Fragment, and set it to contain “status/success”.
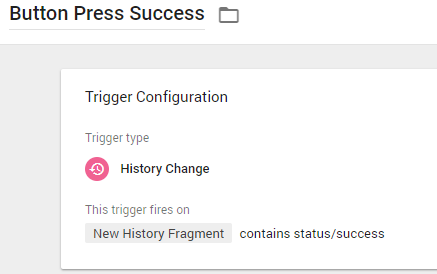
Set the trigger to fire only when part of Ajax link shows success.
You have now set up all that is necessary in the TagManager for this event tracking. You still need to sync this data back to the Google analytics so that you can analyse the event. Log in to the Analytics account. In menu go to bottom item, Settings and press it. In menu that appears, select Goals and Select to create a New goal.
Choose “Place an Order” as the template for the Goal and press button “Continue”. Set Goal Description as “Booking success” and set “TYPE” as “EVENT”. This is important! Then Press continue. You will now see 4 fields that you need to fill with exactly same information as you used for your TAG.
Remember to PUBLISH the changes in the Tagmanager! Then you just need to wait for a few hours until this kicks in and begins to count Booking events for you!
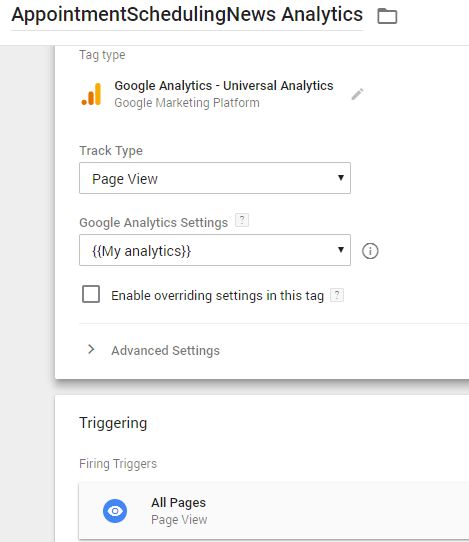
Obviously if you have not set the general Analytical tracker as well, now would be a good time. Simply go to your Tagmanager, and create a new Tag, just call it Booking page visit counter and set it up as the image below shows. Have the trigger fire on all pages as you want this to track visitors on all pages.
If you go into your analytics account, real time visitors, you should now see if any visitors are on your page. You can visit your page yourself in another browser tab to see it working.
If you got to this point you are a GENIUS that can now use Google Analytics to track successful appointment bookings 🙂

Comments
3 commentsJanina
Thanks so much for this documentation. It was really helpful. I set everything up as described and was assuming that the Preview Mode in GTM would show me the newly created tag on the page. However, it doesn’t show. Do you think I did something wrong? I double checked. The whole reason why I want to set this up is to create a conversion for Google Ads. So I created another tag for that. That should work with the same trigger, right? I would appreciate further help with this a lot! Thanks, Janina
Andis Silakaktins
Thank you for this documentation! I have just set up an event with this trigger. Are there other triggers that we could use for different events, like cancelled booking? Maybe there are some additional variables that Tag Manager can get from the page, like service that user is booking?
Armin
This document is for very basic scenarios. I wish it was more comprehensive with explaining other triggers as well. I’ve embedded Simplybook widget on my website, and I’d like to track the conversion and I think it needs cross-domain to send the data to my analytics.