Simplify Your Accounting with SimplyBook.me: A Comprehensive Guide to Integrations
This post is also available in:
![]()
![]()
![]()
![]()
Integrating accounting software with your SimplyBook.me system is a game-changer. Firstly, imagine seamless bookings and streamlined finances, all in one place. It sounds like a dream, right? Well, it’s very much a reality with SimplyBook.me’s integrations with QuickBooks, FreshBooks, and Xero. In this guide, we dive deep into why and how to merge these tools. We cover all your needs, whether you’re a small business owner, freelancer, or managing a growing company. Let’s make accounting hassle-free and focus more on growing your business. Stay with us as we unfold the simplicity and efficiency of using SimplyBook.me with your favorite accounting software.
Why Integrate Your Accounting Software with SimplyBook.me?
Imagine having more time. Time for your clients, for growing your business, or even just for yourself. Sounds great, right? That’s where integrating your accounting software with SimplyBook.me comes in. It’s a game-changer. Now, let me explain why.
Firstly, it’s all about saving time. Manual data entry becomes a thing of the past. No more double-checking every entry for errors. You get that time back. It’s now yours to use as you see fit.
Accuracy is another huge win. When your booking system talks directly to your accounting software, mistakes drop. You trust your numbers, and so can your clients and accountants. Peace of mind comes standard.
Then there’s the real-time data. Imagine always knowing your financial status. You see which services are your best sellers at a glance. Making informed decisions about your business becomes second nature.
Don’t forget the customer experience. It gets a boost too. Invoices are prompt and accurate. Payments are a breeze. Happy customers tend to be repeat customers.
In short, integrating SimplyBook.me with your accounting software isn’t just a smart move. It’s essential. It streamlines operations, cuts down on errors, and frees up your most valuable resource: time. Stay tuned as we dive deeper into how this integration works and how you can set it up for your business.
Understanding the Available Integrations
Integrating your booking system with accounting software simplifies business operations. Firstly, let’s dive into the integrations SimplyBook.me offers.
QuickBooks Integration
QuickBooks accounting software is a lifesaver for many businesses. Firstly, it simplifies accounting, making financial management a breeze. Furthermore, with SimplyBook.me, this integration automates your workflow. It sends booking data straight to QuickBooks. As a result, sales and refunds update automatically. This setup keeps your finances in check without extra effort.
FreshBooks Integration
FreshBooks accounting software caters to small businesses and freelancers. Its user-friendly interface stands out. Integrating it with SimplyBook.me streamlines invoicing and accounting. Consequently, each booking and transaction reflects in FreshBooks instantly. This seamless connection ensures your financial data is always up-to-date.
Xero Integration
Xero accounting software supports growing businesses with robust accounting features. While SimplyBook.me’s integration is slightly different, it’s still effective. You export booking data as CSV files, then import them into Xero. This process requires a few more steps but keeps your accounts accurate.
These integrations transform how you handle business finances. They save time and reduce manual errors. With SimplyBook.me, your financial management becomes more efficient.
Step-by-Step Guides for Setting Up
Setting up your SimplyBook.me with QuickBooks, FreshBooks, or Xero accounting software is straightforward. Start by following these guides.
QuickBooks Setup
- Invoices generated by QuickBooks through integration will only include the total amount, not details on taxes and discounts. While the SimplyBook invoices contain information about the item price taxes/discounts (if any), and the total amount.
- You must enable multi-currency in QuickBooks to handle transactional documents with different currencies.
How to set and use
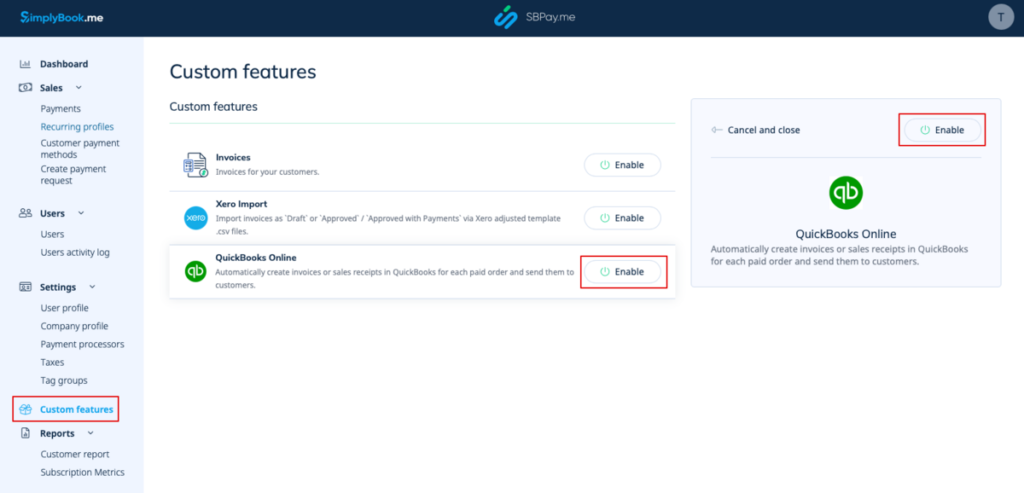
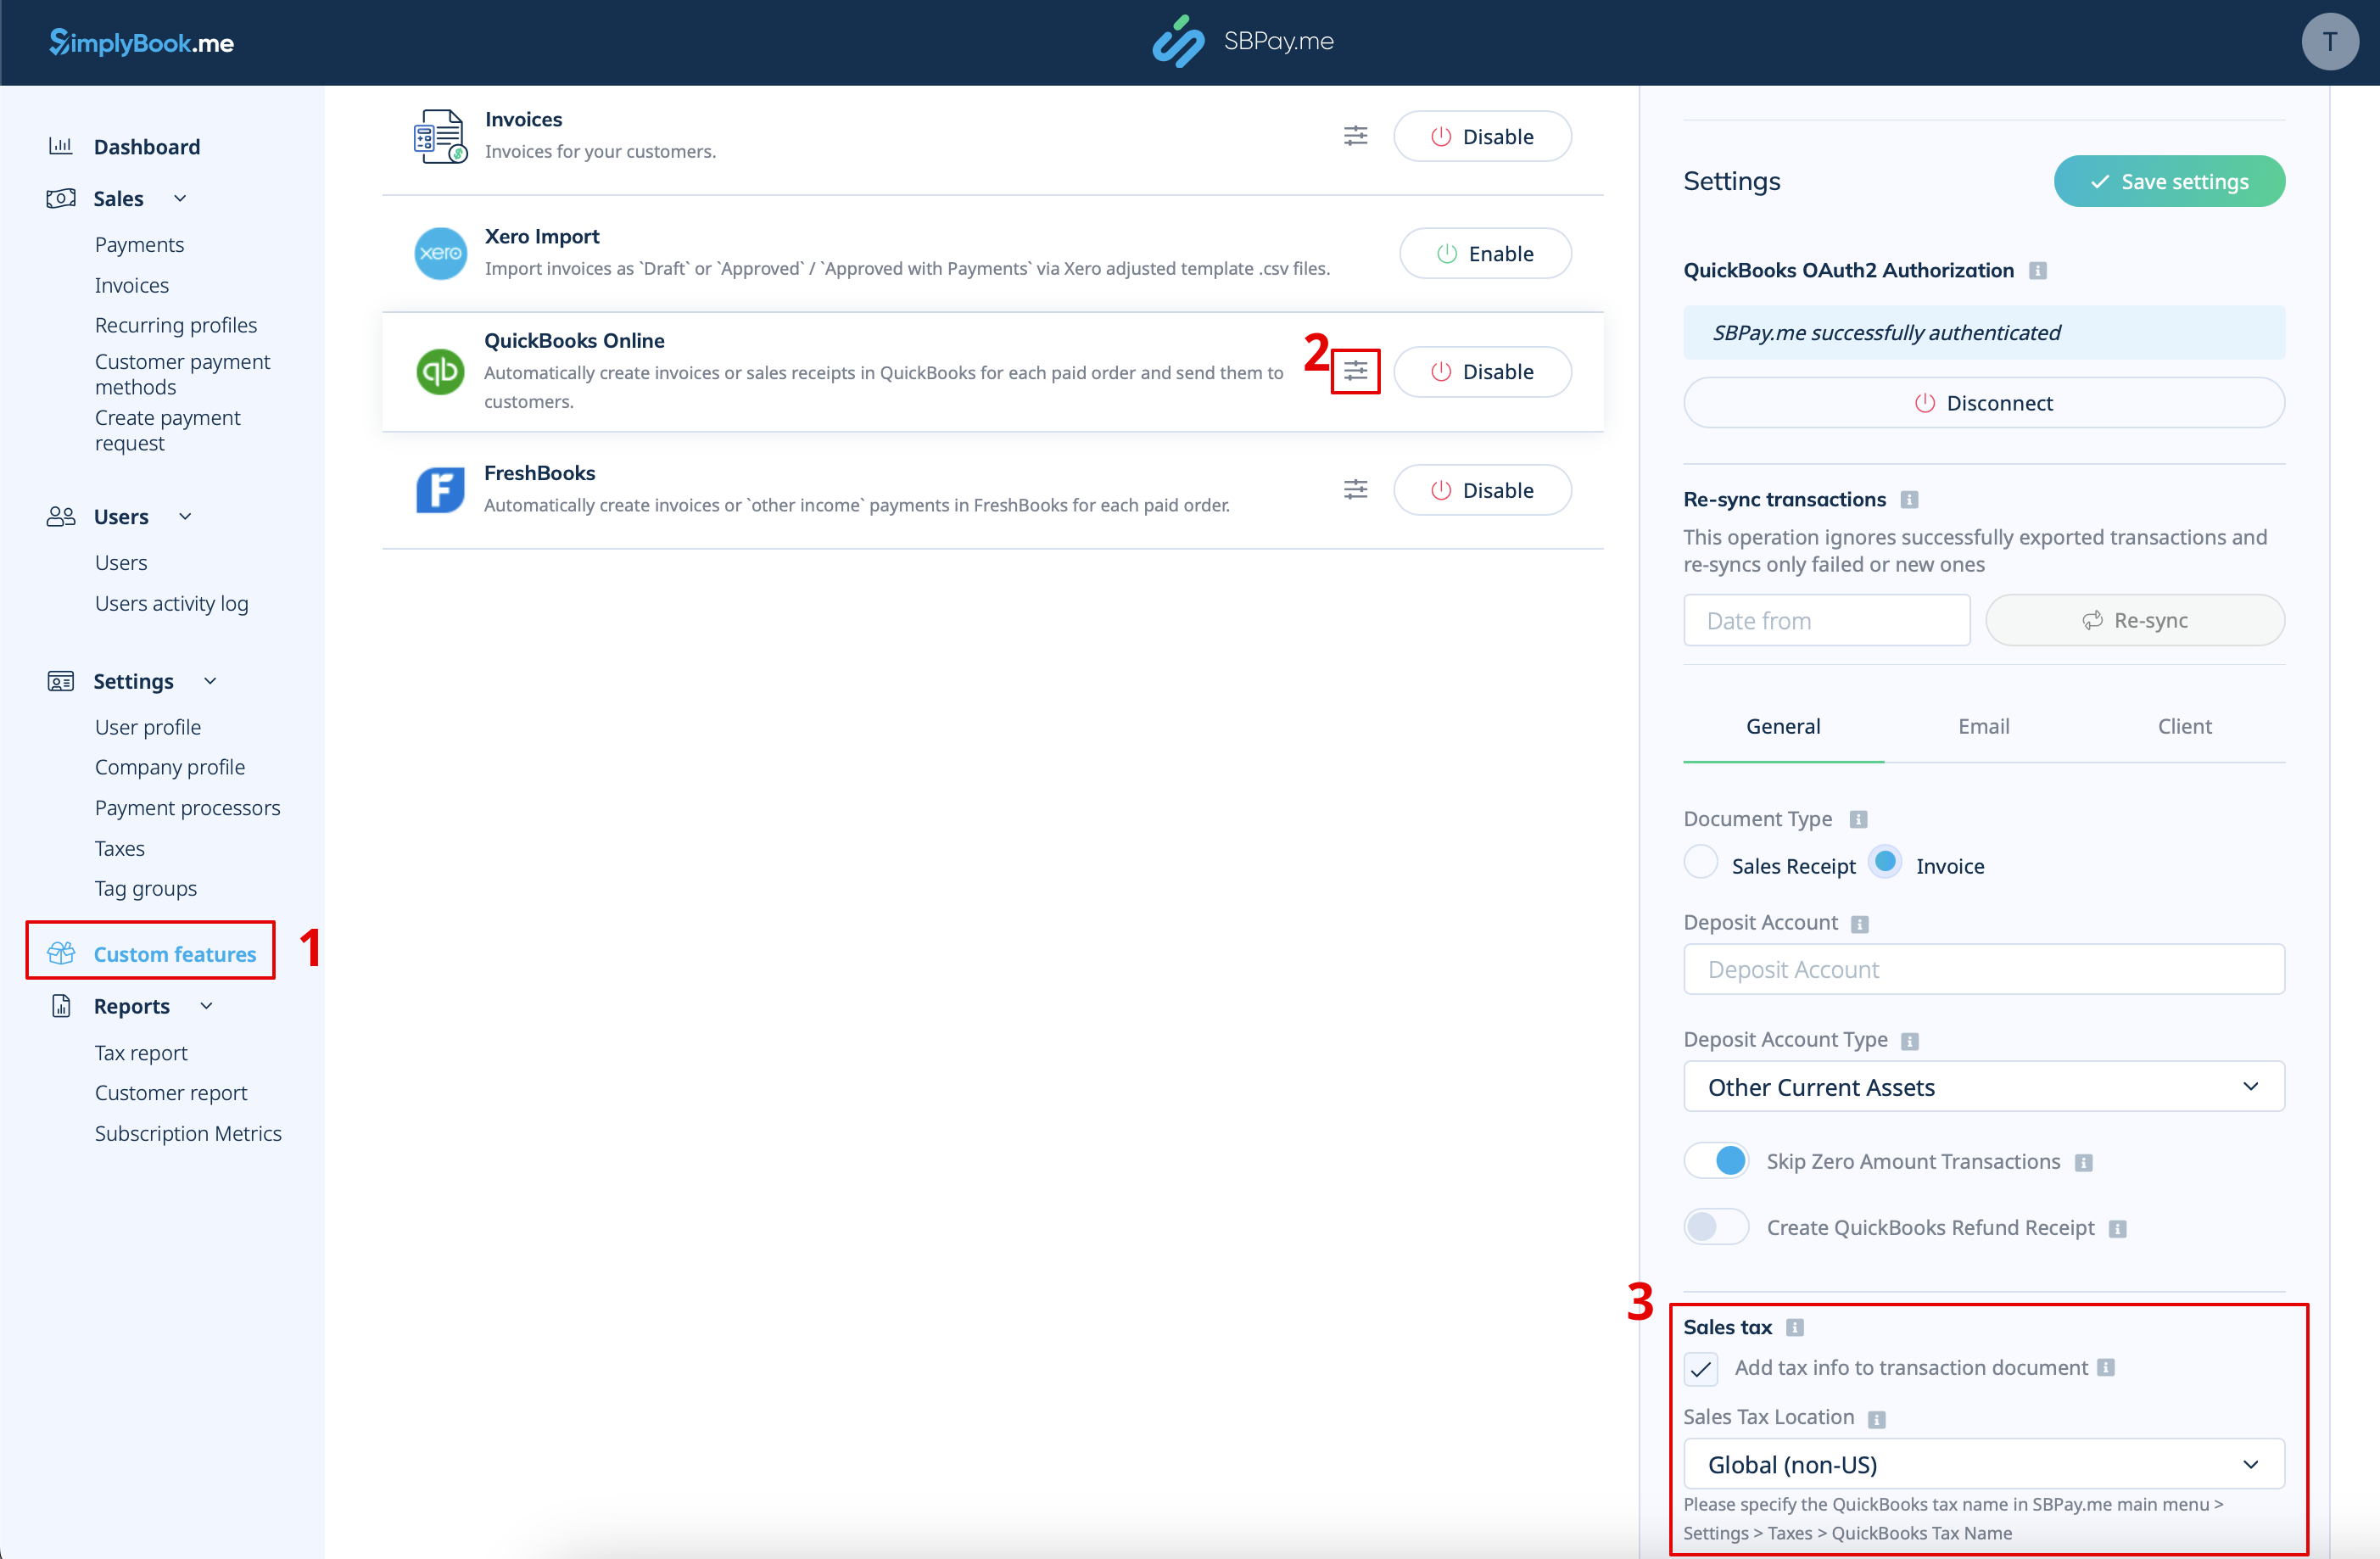
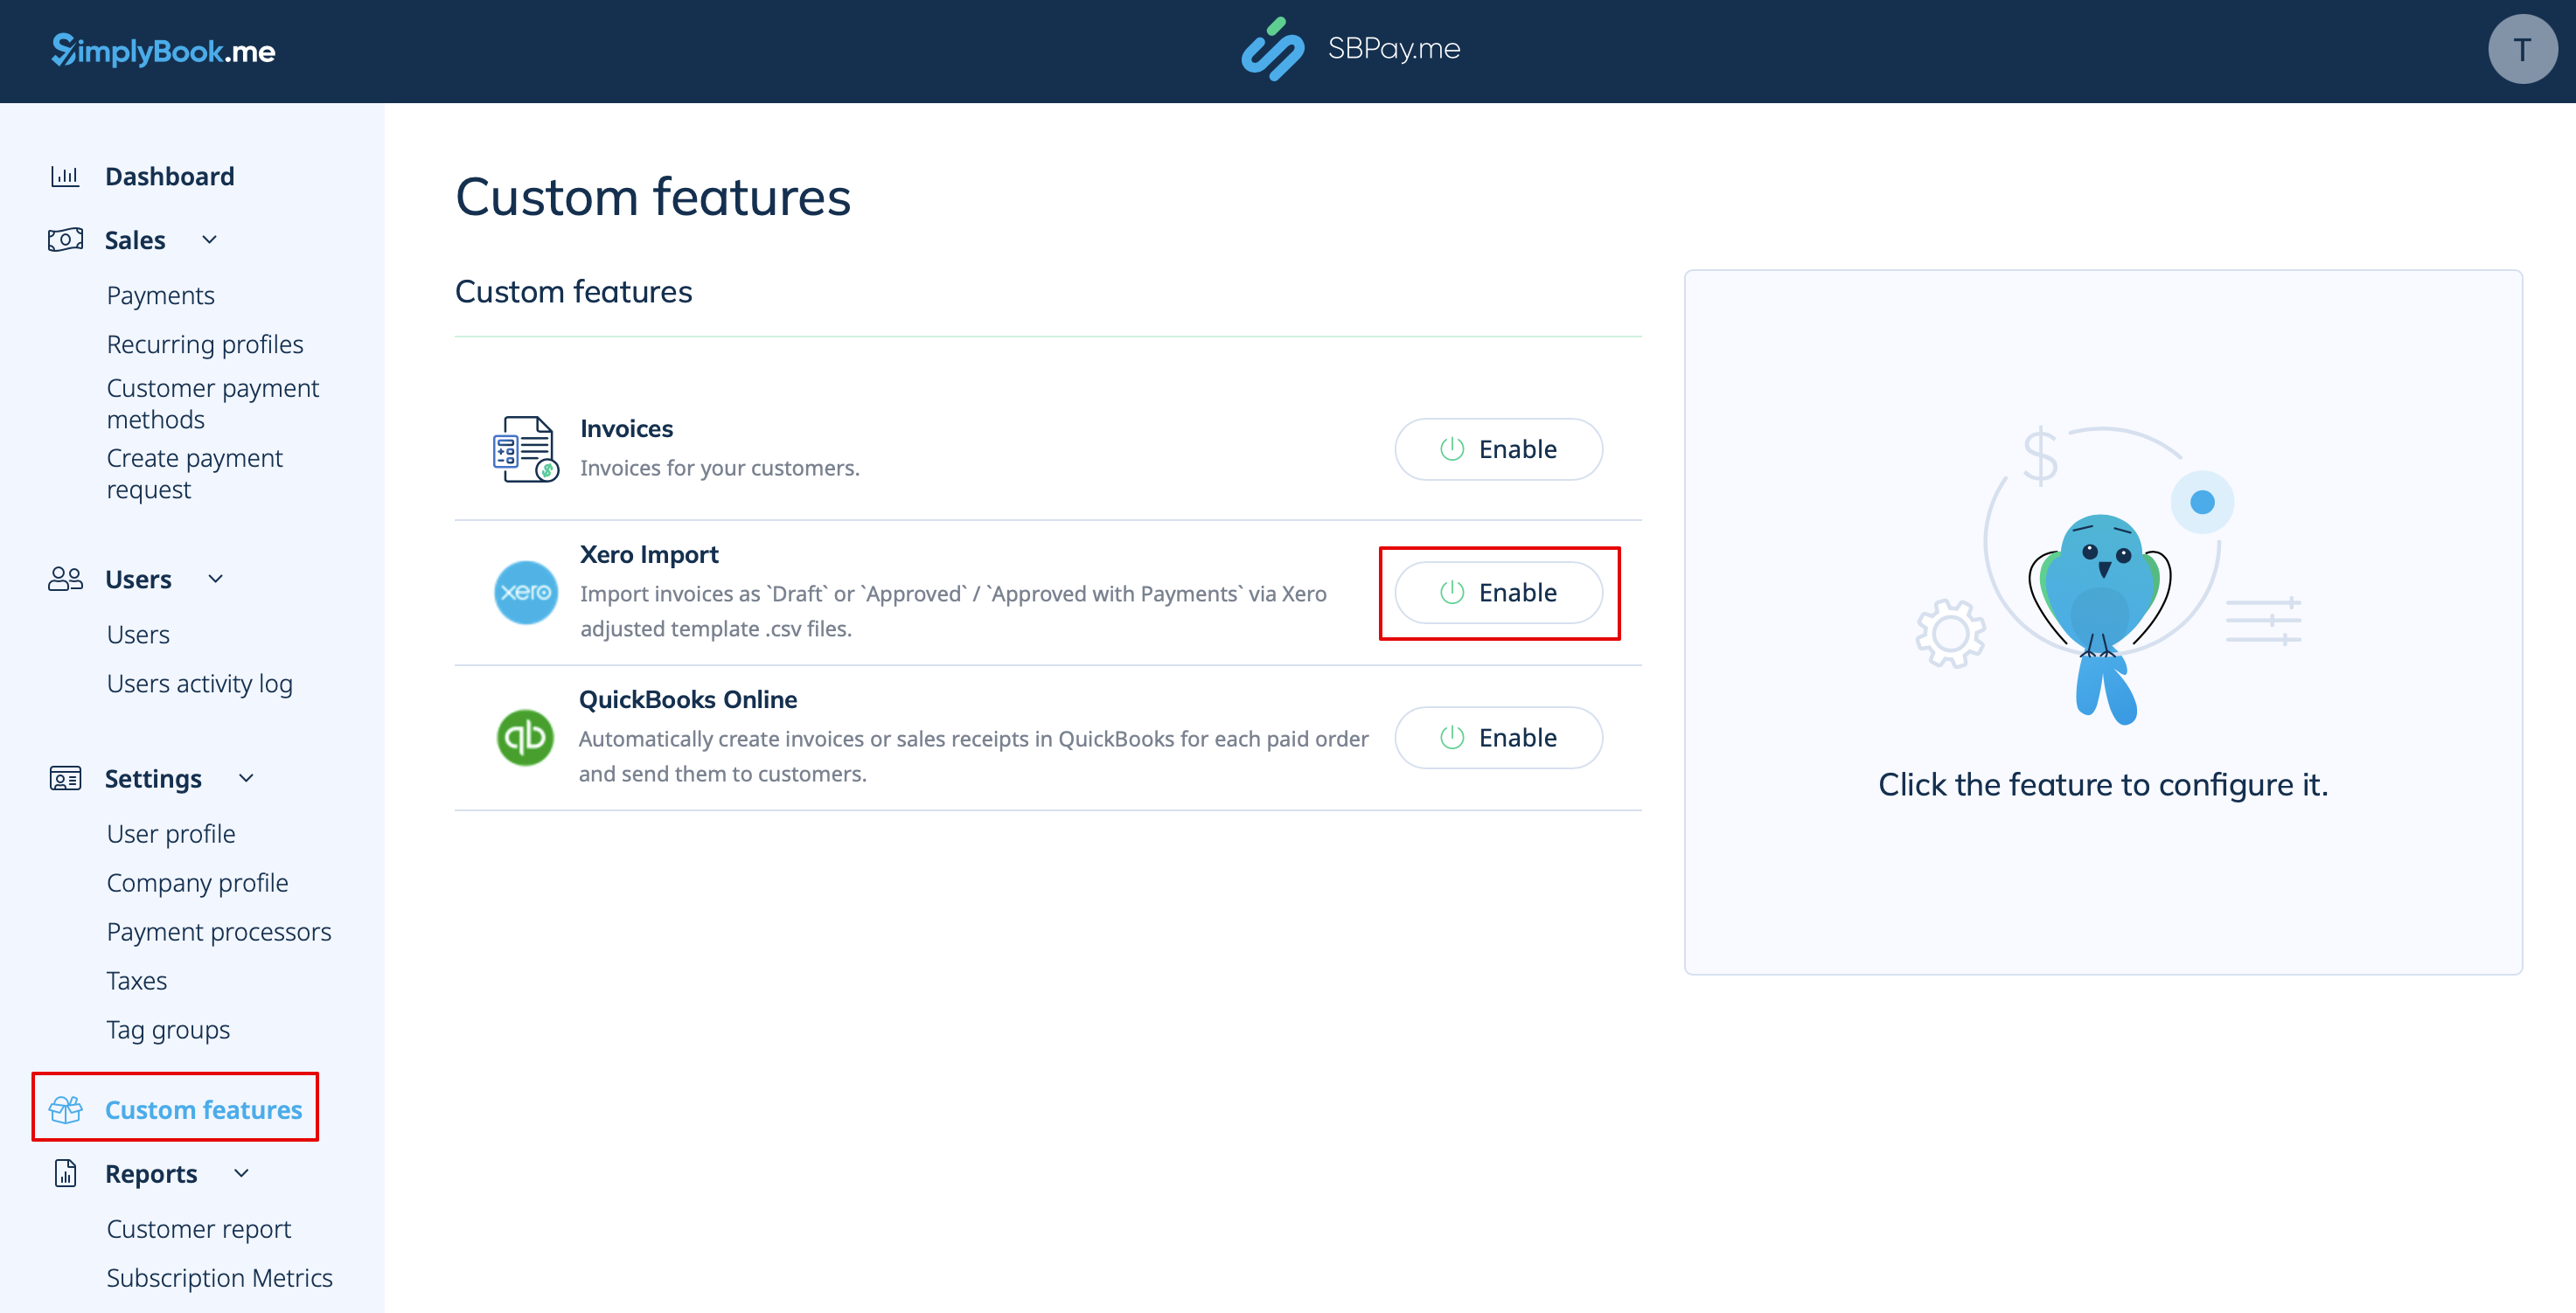
1. Firstly, navigate to Custom Features page within your SBPay.me interface and click on the Enable button next to QuickBooks.
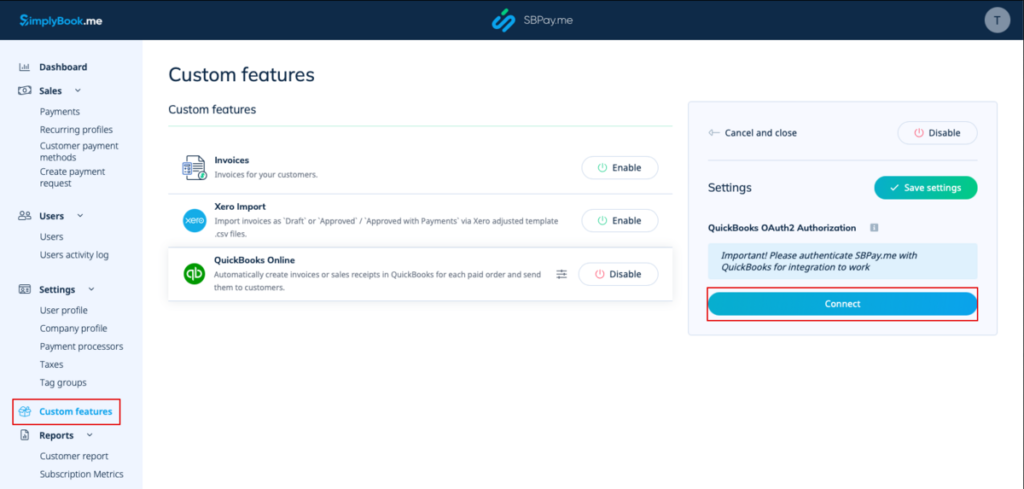
2. Once enabled, click on the Connect button to proceed with setup.
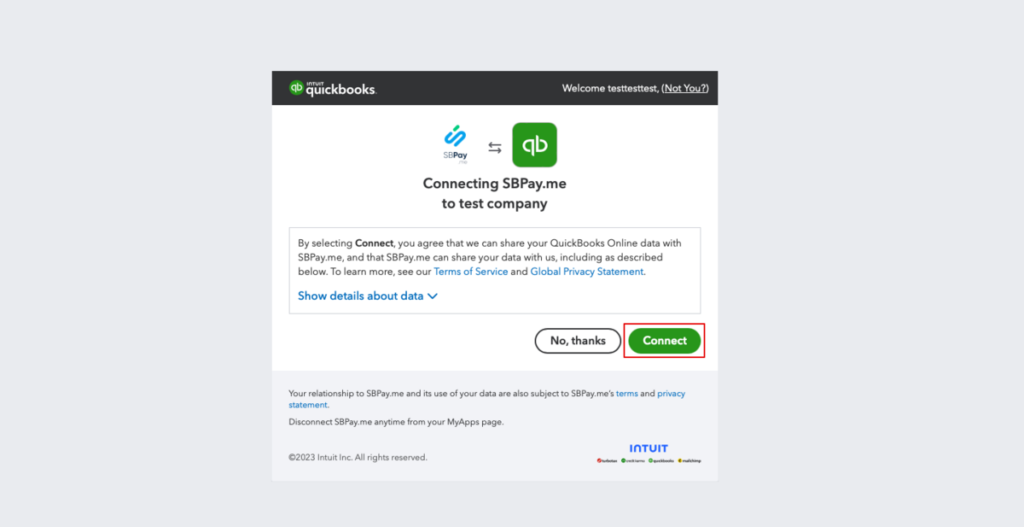
3. Subsequently, to connect, you’ll need to log into your QuickBooks account, or if already logged in, simply confirm to set the connection automatically. You will also see SBPay.me in the Apps -> My Apps section of QuickBooks accounting software.
4. Thus, by connecting the systems, this grants you access to the integration settings through the SBPay.me interface.
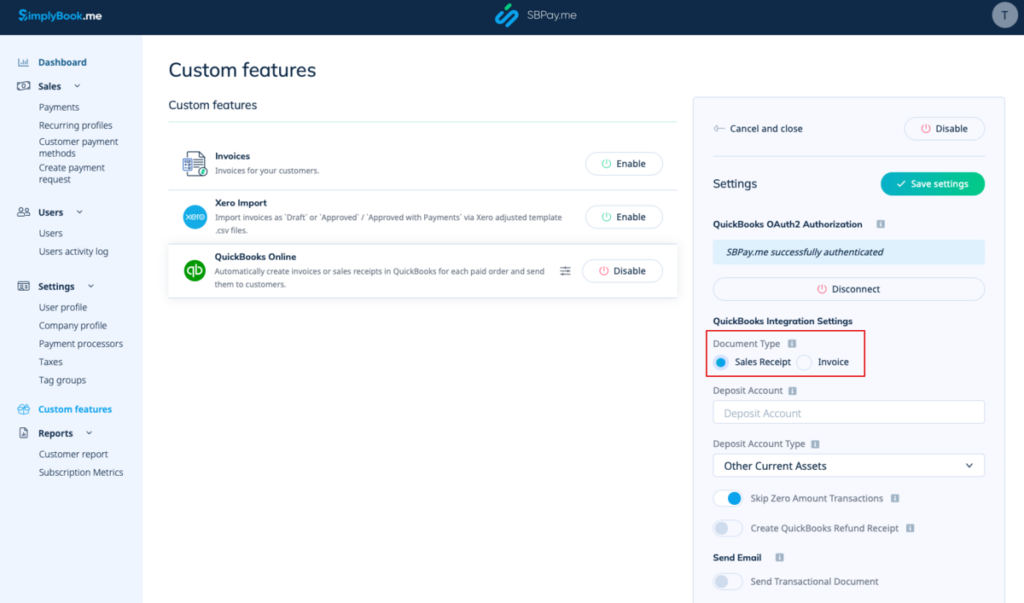
5. Firstly, choose the transactional document type: There are two options: Invoice and Sales Receipt. Invoice triggers the creation of both an invoice and its corresponding payment within QuickBooks for each fulfilled order on the SimplyBook side. Thus, you will see two records (Payment and Invoice) on the QuickBooks account associated with the same transaction. Sales Receipt results in the generation of a sales receipt (Payment) solely upon successful payment for the order.
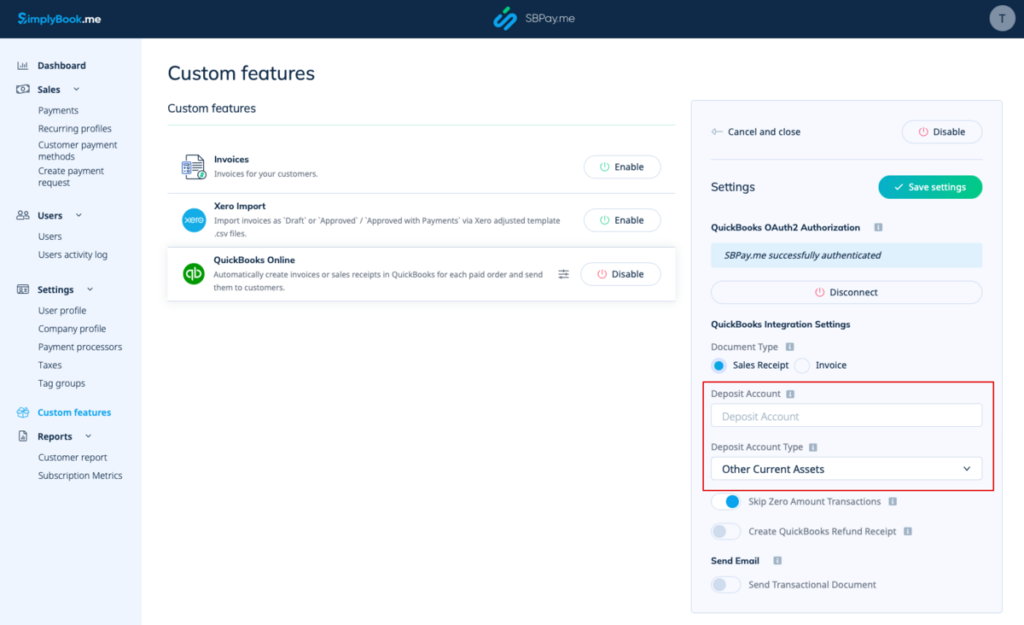
6. You can add a Deposit Account Name and select the deposit Account Type. It should be either Other Current Assets or Bank (Cash on Hand) type. If deposit account is not specified QuickBooks accounting software will use a default account called Undeposited Funds.
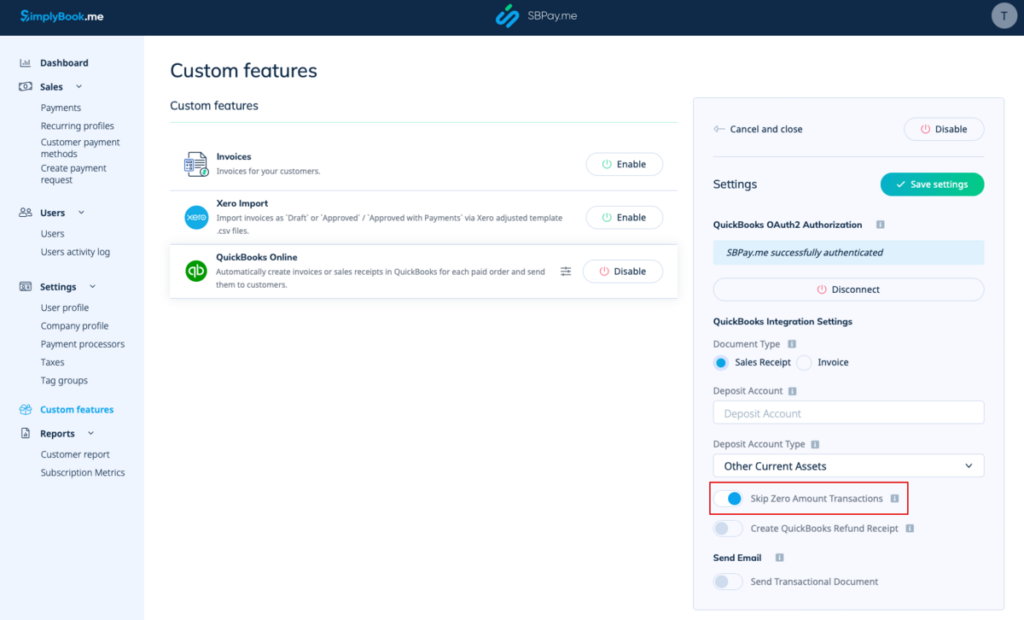
7. It’s important to note that by default, the system skips zero amount transactions to prevent transferring zero amount orders to QuickBooks. This applies, for example, to transactions discounted to a total of 0. You can keep it as it is if you do not need to see such records in QuickBooks accounting software or disable if it is important to have them for your bookkeeping.
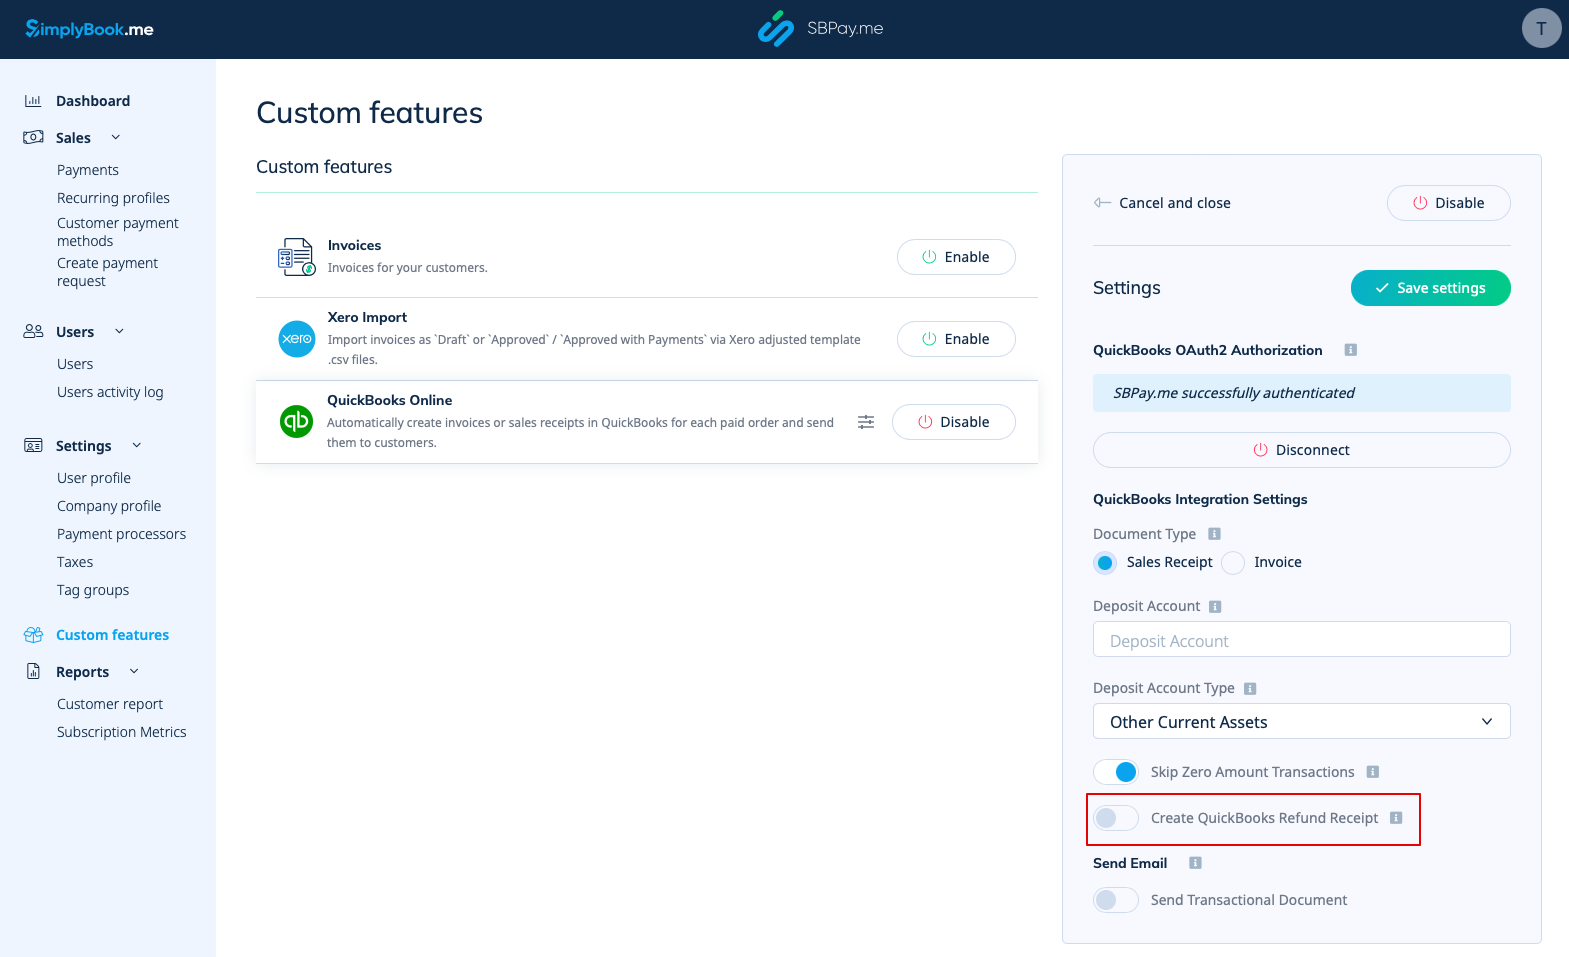
8. When you make a refund on the SBPay.me side, you can set QuickBooks to automatically create a Refund Receipt entry. Next, please ensure to include the Deposit Account Name if you decide to enable this option as it is mandatory for refunds synchronisation.
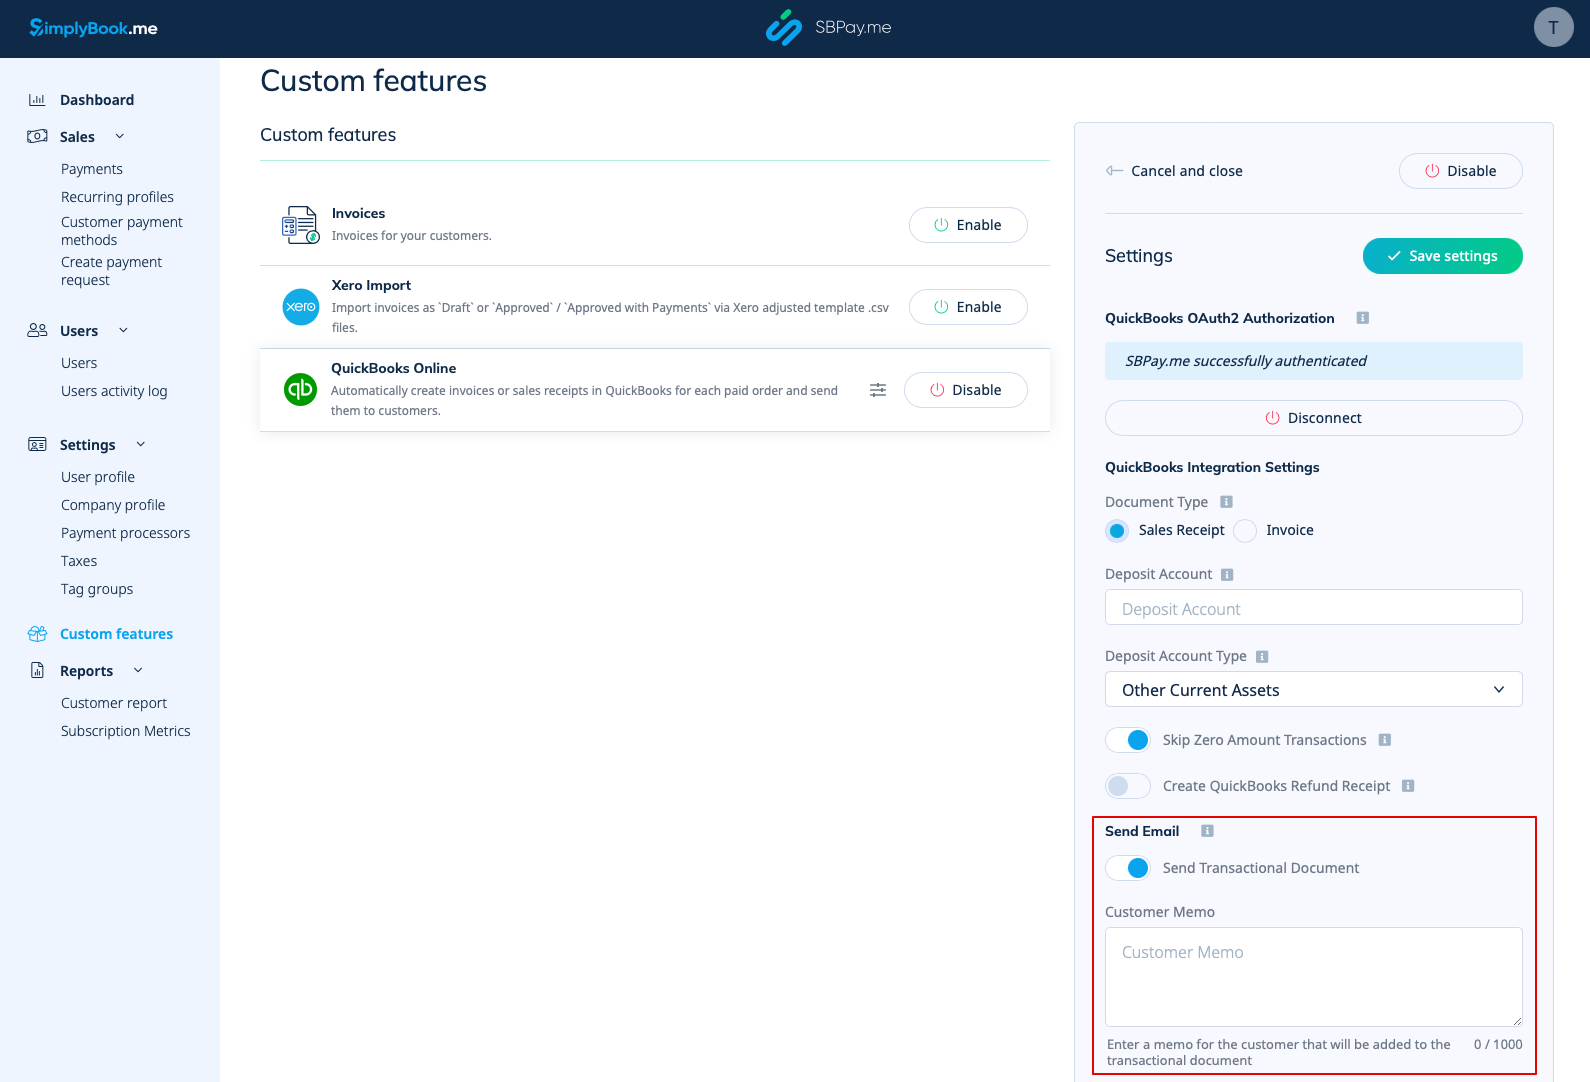
9. Lastly, there is also an option to send a transactional document. If enabled, the client will also receive an invoice from QuickBooks in addition to other active notifications.
You can also include a note in QuickBooks invoices to be reflected.
Taxes
Firstly, to activate this option and pass tax information to QuickBooks accounting software, check the “Add tax info to transaction document” box. Then, in the Custom features -> Sales tax section of your SBPay.me interface, select the corresponding tax location.
For Global tax location
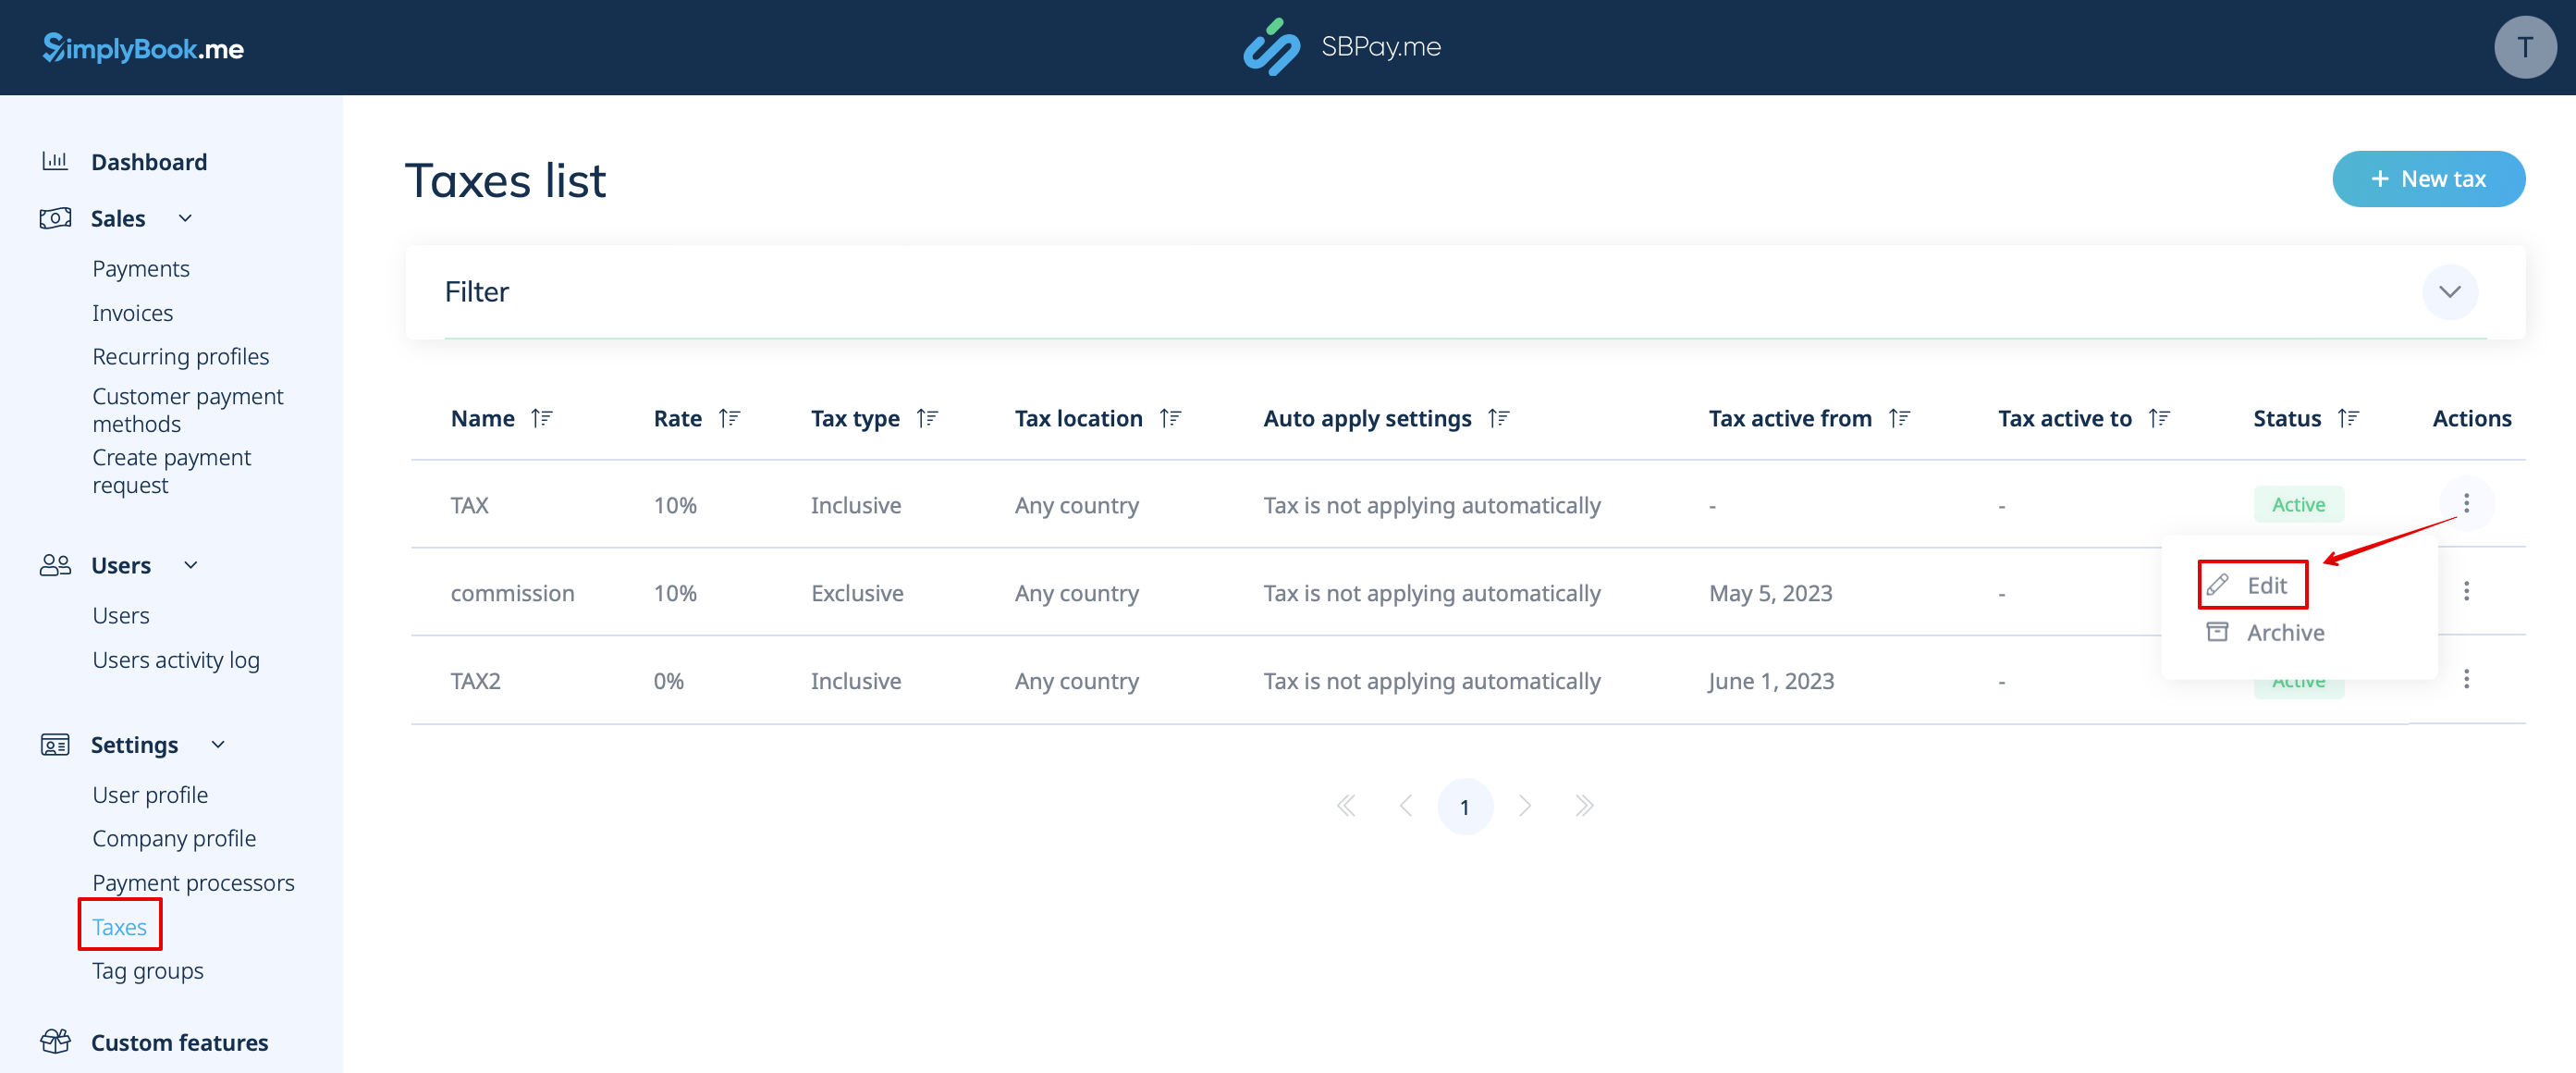
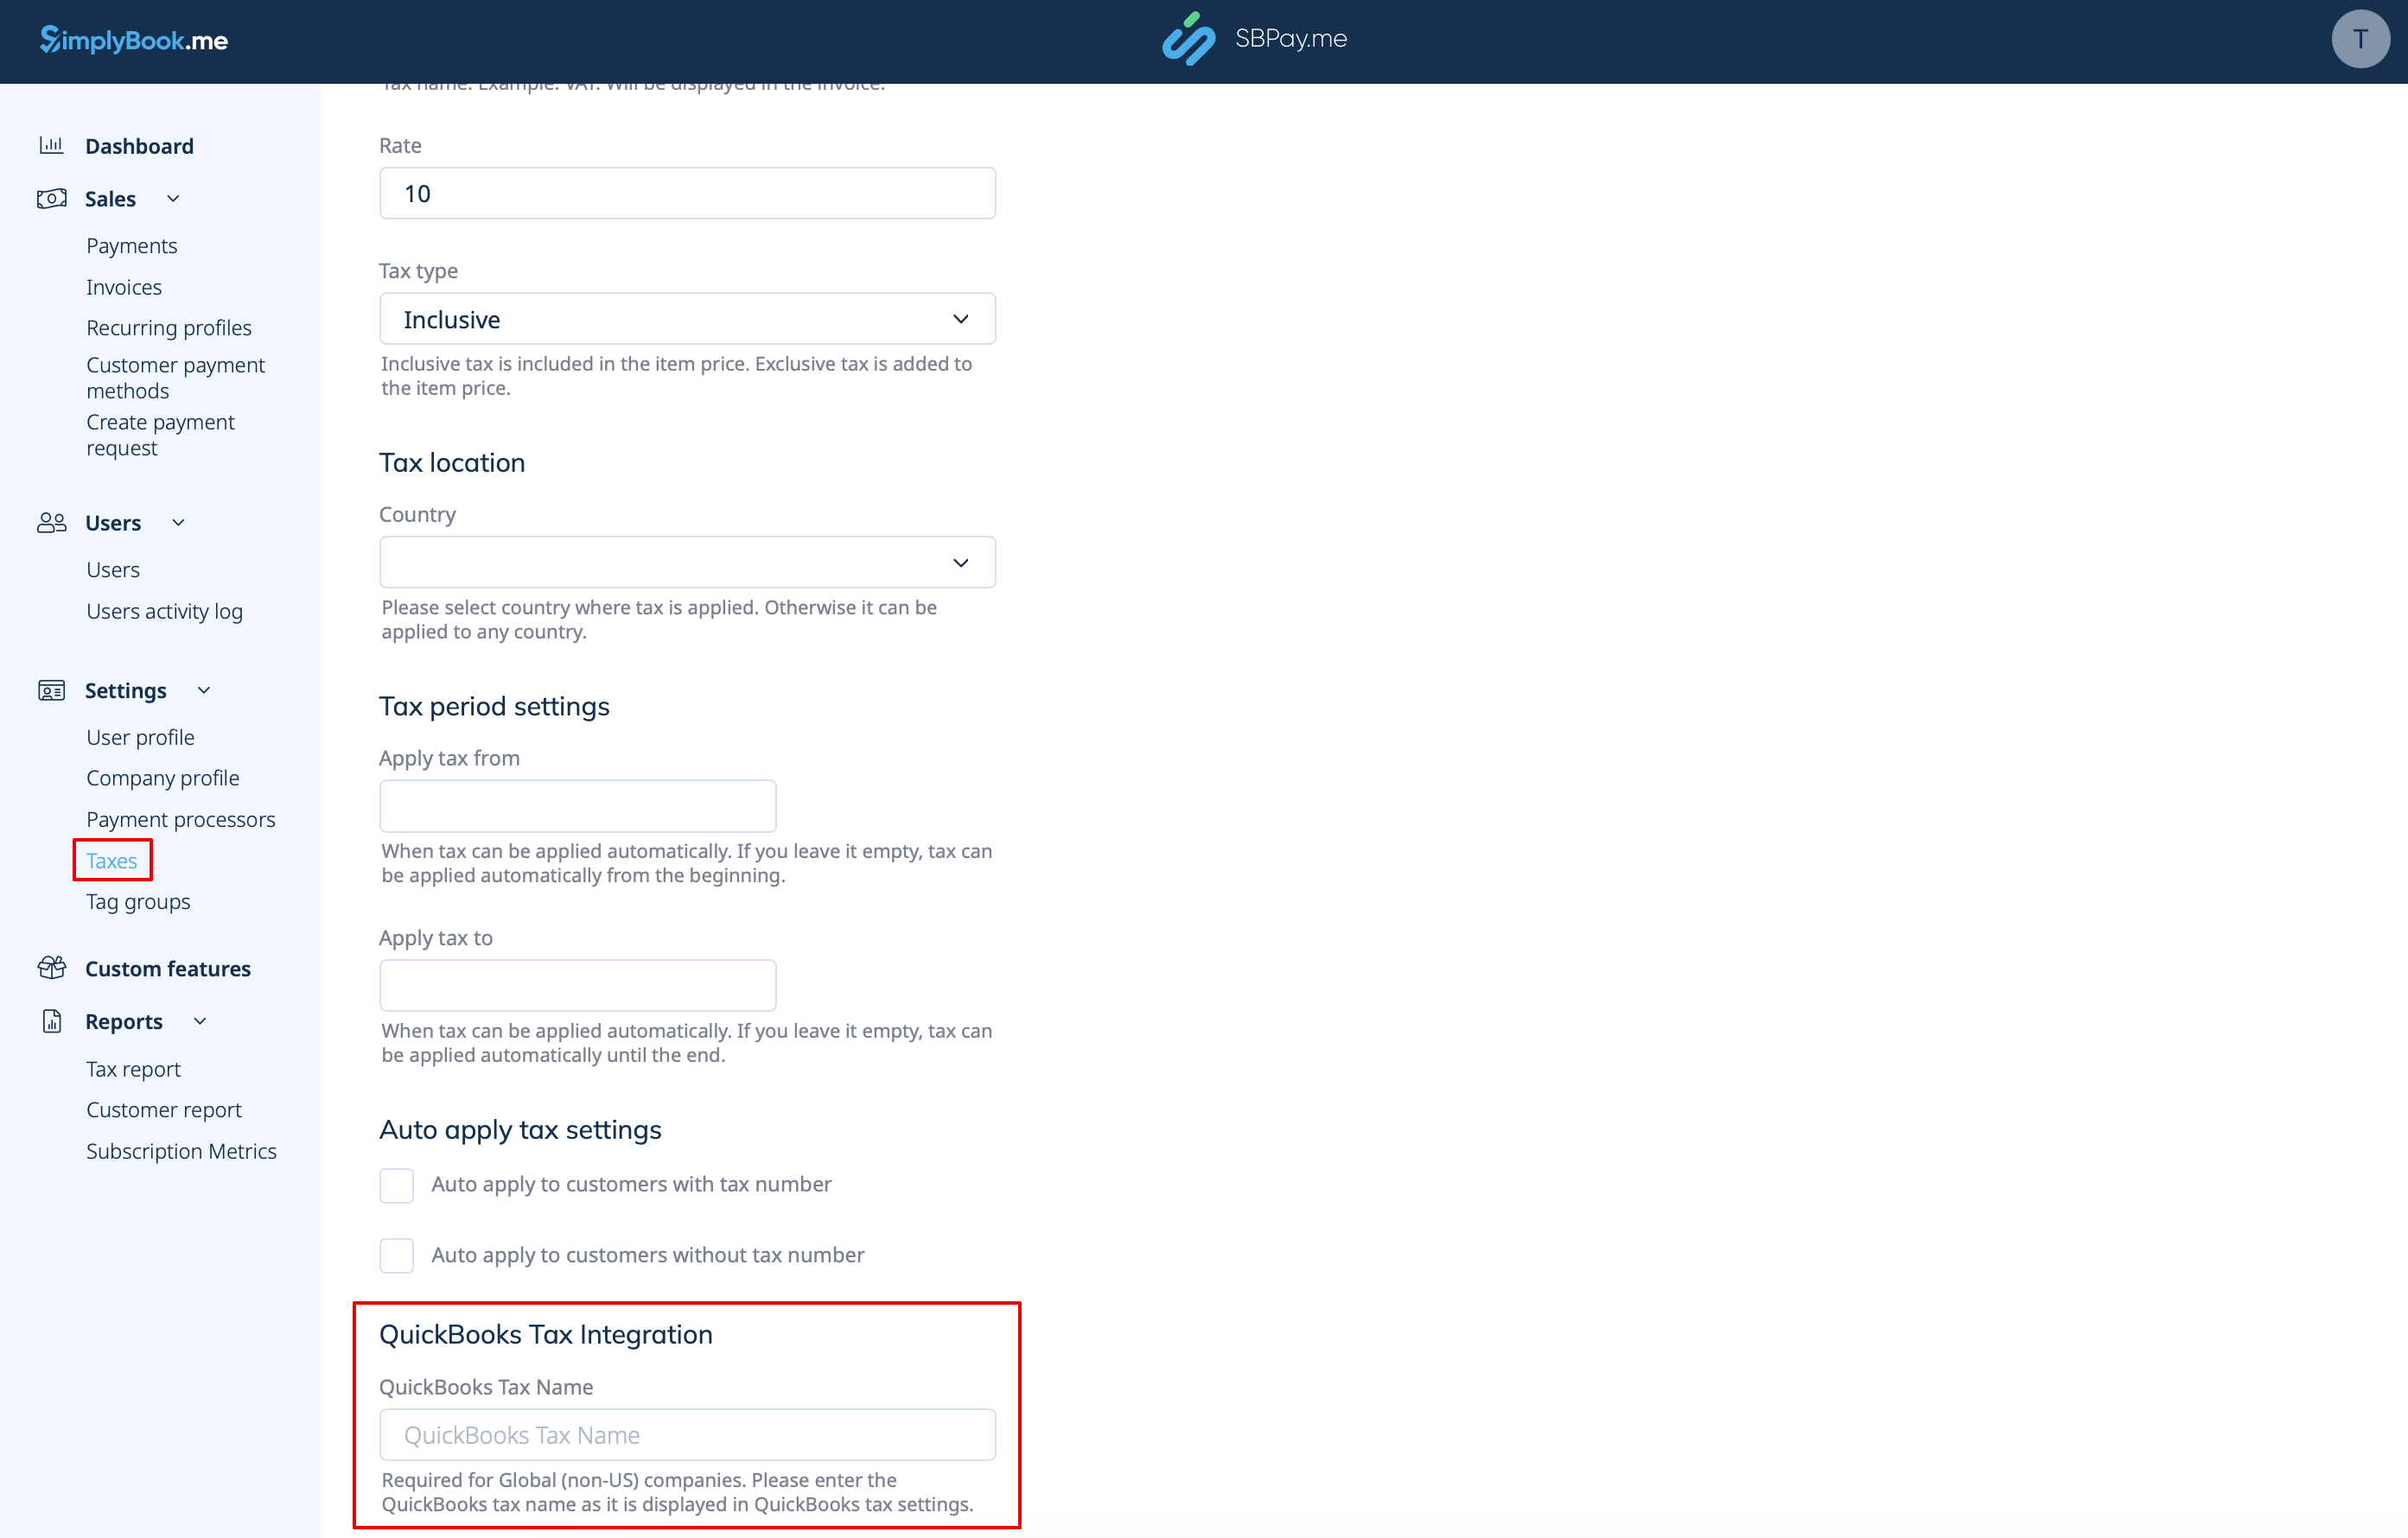
Navigate to Settings -> Taxes in the SBPay.me interface, choose the required tax, and enter its exact name as defined in QuickBooks accounting software.
It’s important to note the following:
- Tax is defined for each line separately;
- All lines with taxes should have the same tax type (inclusive or exclusive) throughout the order;
- The orders that contain lines with multiple taxes will not be passed to Quickbooks;
- If the order contains lines with no tax applied it will not be passed to Quickbooks;
- The orders that contain lines with mixed inclusive and exclusive taxes are not passed to Quickbooks;
- If the Quickbooks tax name is not set for some tax in that order it will not be passed to Quickbooks.
For USA tax location
It’s important to note that it is only possible to use Automated Sales Tax (AST) as defined in QuickBooks. If you set the tax name set in SBPay.me Settings -> Taxes, it will be ignored.
Please note!
- Tax is defined for the whole order. On the SBPay.me side, this means that ALL lines should have the same single tax with the same rate and type set for each order line;
- Tax is always exclusive.
FreshBooks Setup
- The invoices created through FreshBooks accounting software integration will show only the total amount, omitting details about taxes and discounts. On the other hand, SBpay.me invoices will include comprehensive information, such as item prices, any applicable taxes or discounts, and the total amount.
- Automatic creation of a Refund Receipt entry in FreshBooks accounting software for refunds processed on the SBPay.me side is not possible.
How to set and use
1. Firstly, navigate to the Custom Features page within your SBPay.me interface and click on the Enable button next to FreshBooks accounting software.
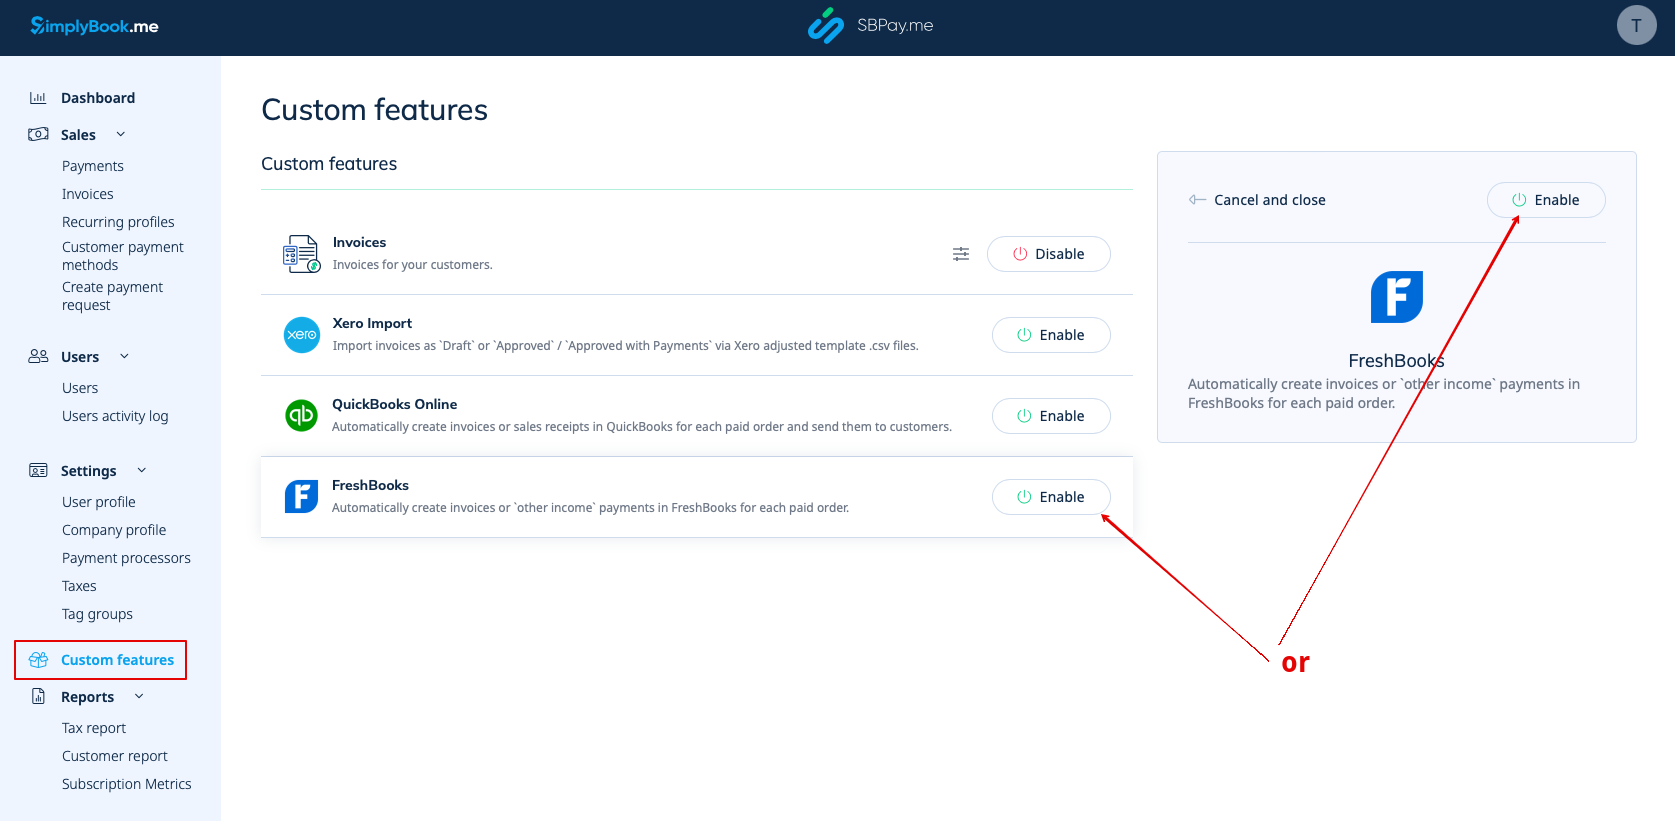
2. Once enabled, click on the Connect button to proceed with setup.
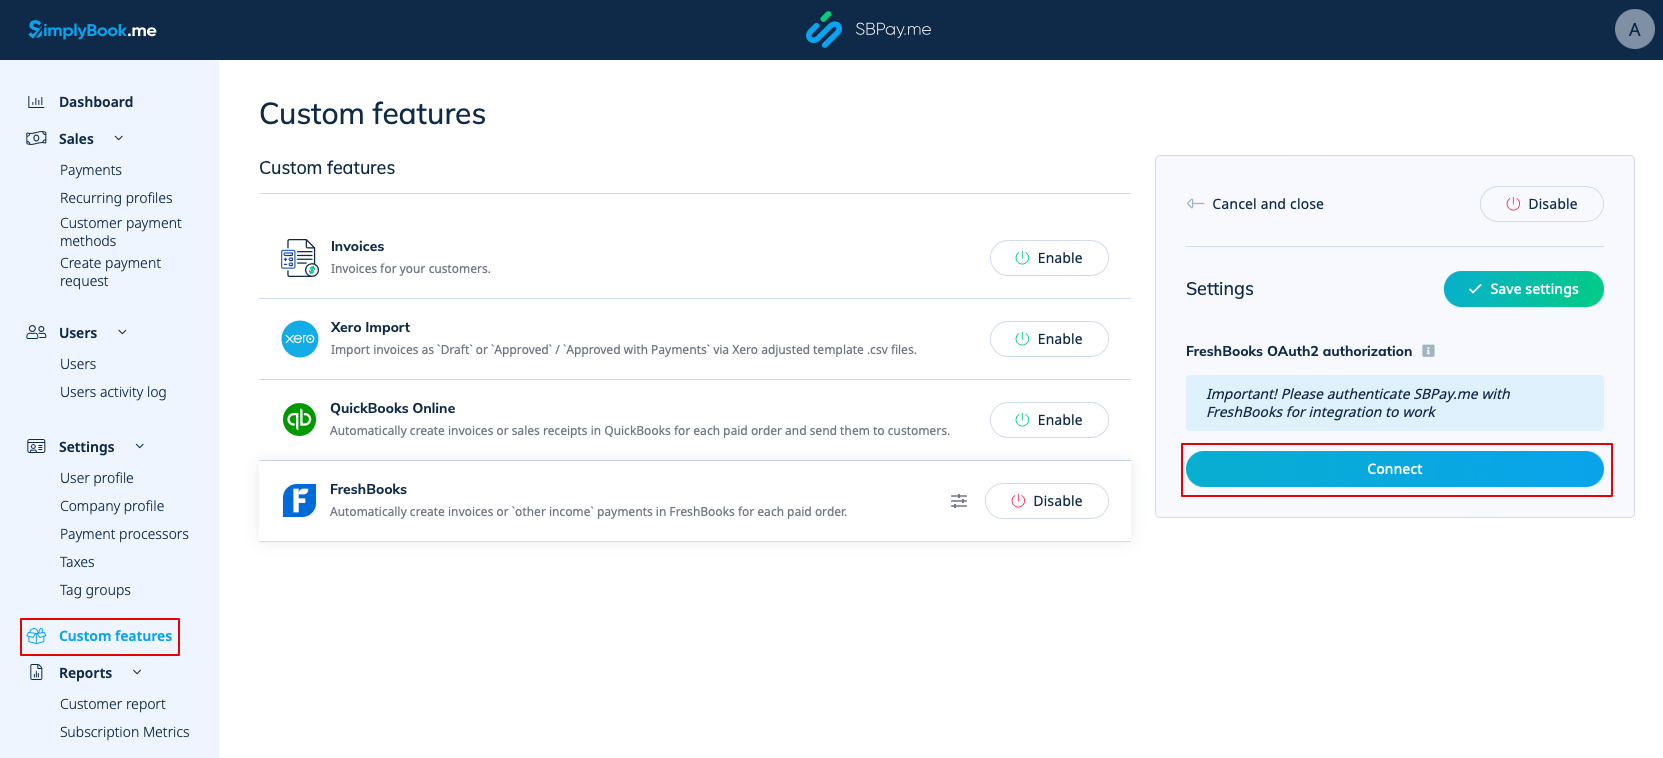
3. Then, to establish the connection, log into your FreshBooks accounting software account. If already logged in on the same browser, clicking the ‘Allow’ button will automatically connect you.
If needed, you will find SBPay.me in the FreshBooks Apps -> Connected Apps section.
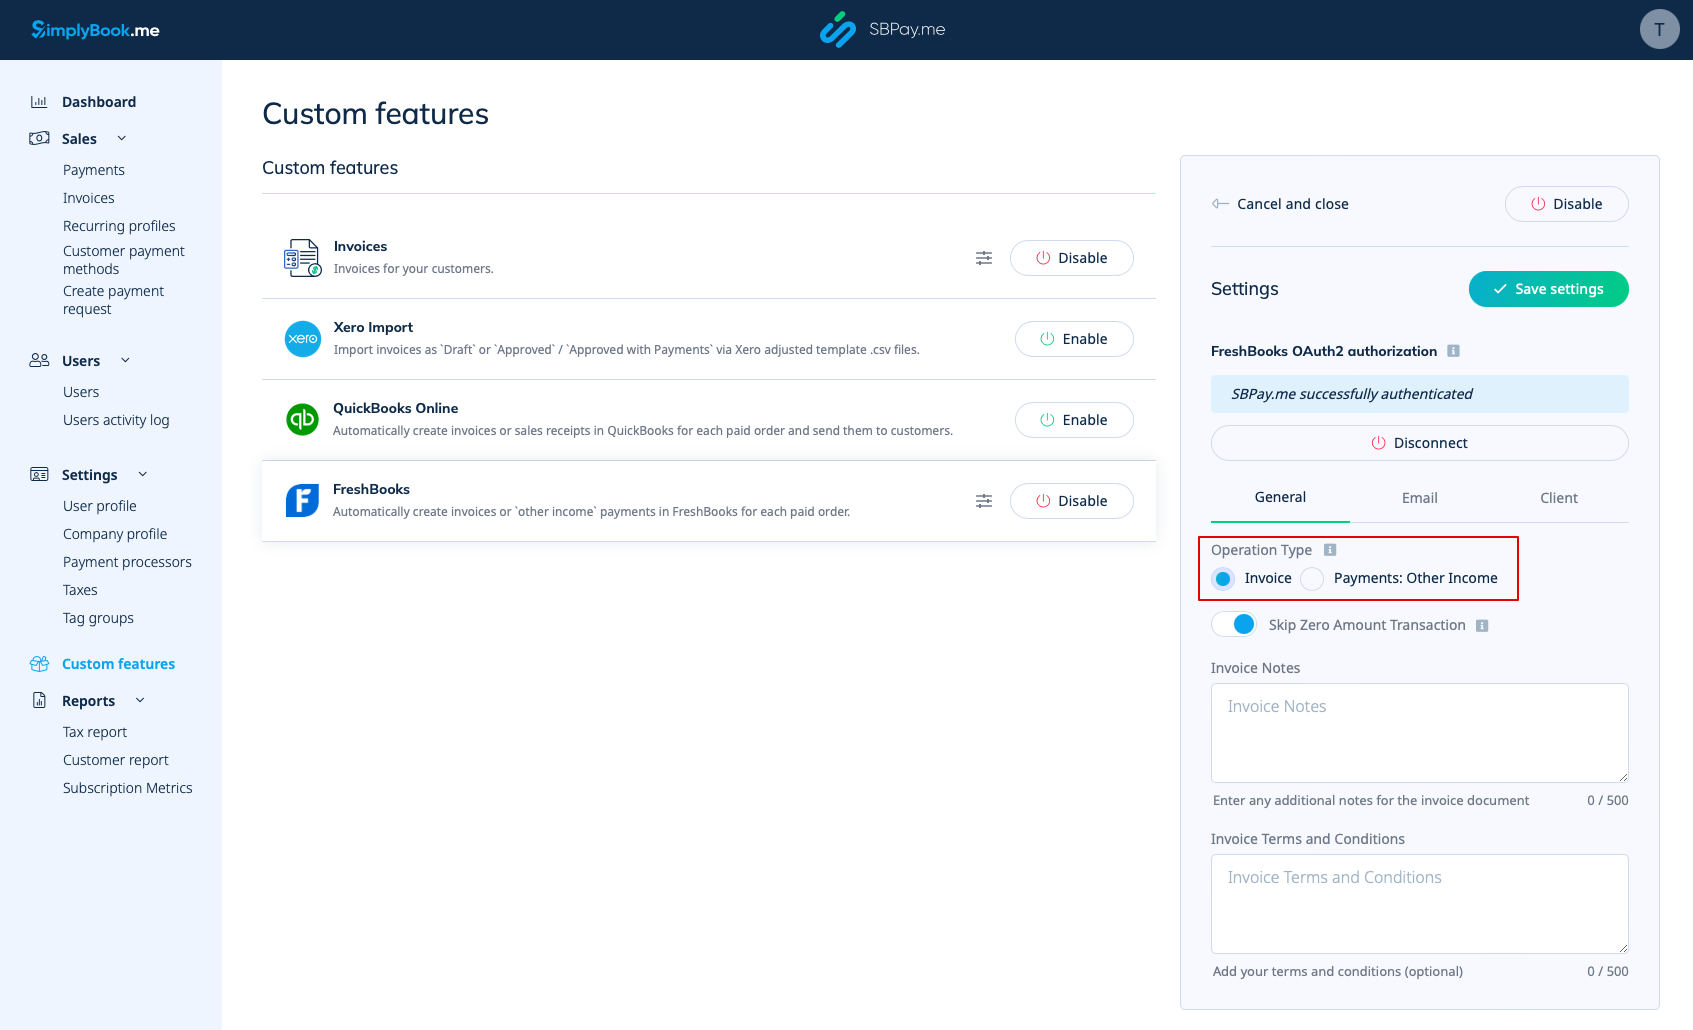
4. Once the systems are linked, you’ll gain access to the integration settings within the SBPay.me interface.
5. Then, select the operation type. There are two options: Invoice and Payments: Other Income.
If you choose Invoice, each paid order will generate both an invoice and the associated payment in FreshBooks. Selecting ‘Payments: Other Income’ will create an ‘Other Income’ entry in FreshBooks accounting software for paid orders.
6. It’s important to note that the system automatically skips zero amount transactions to prevent sending them to FreshBooks accounting software. This happens, for instance, with transactions where discounts result in a total of 0. You can maintain this setting if you don’t require these records in FreshBooks. However, if it’s crucial for your bookkeeping, you can disable this feature to include such transactions.
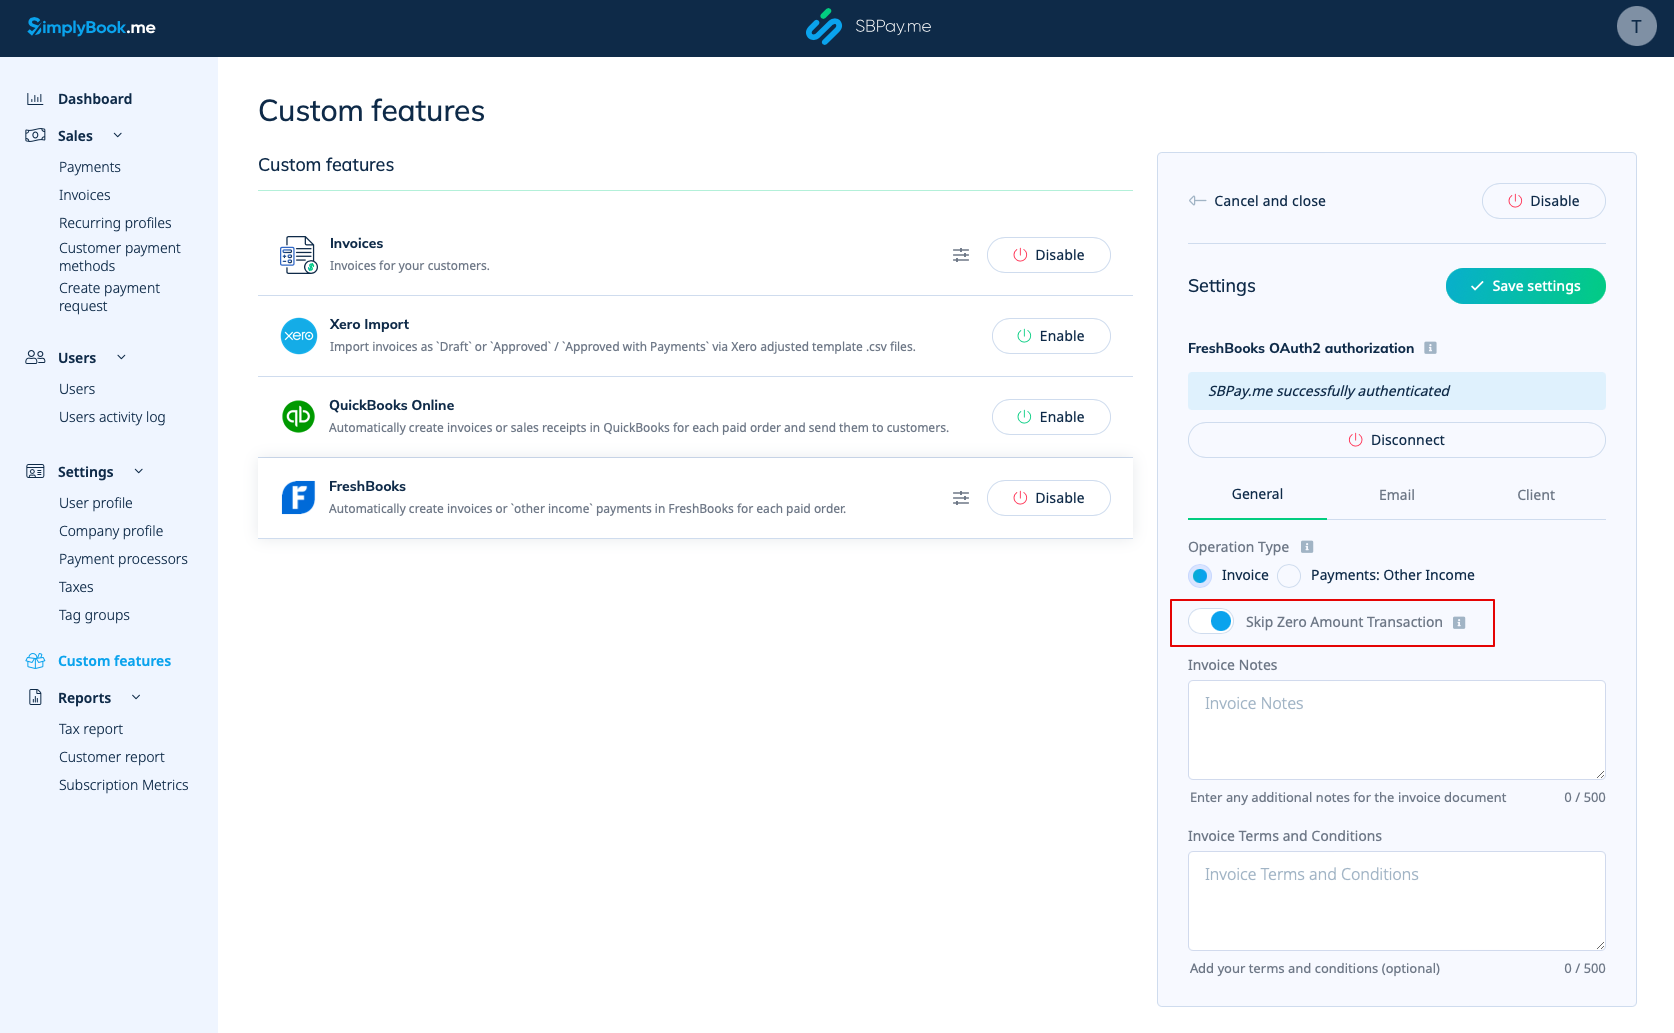
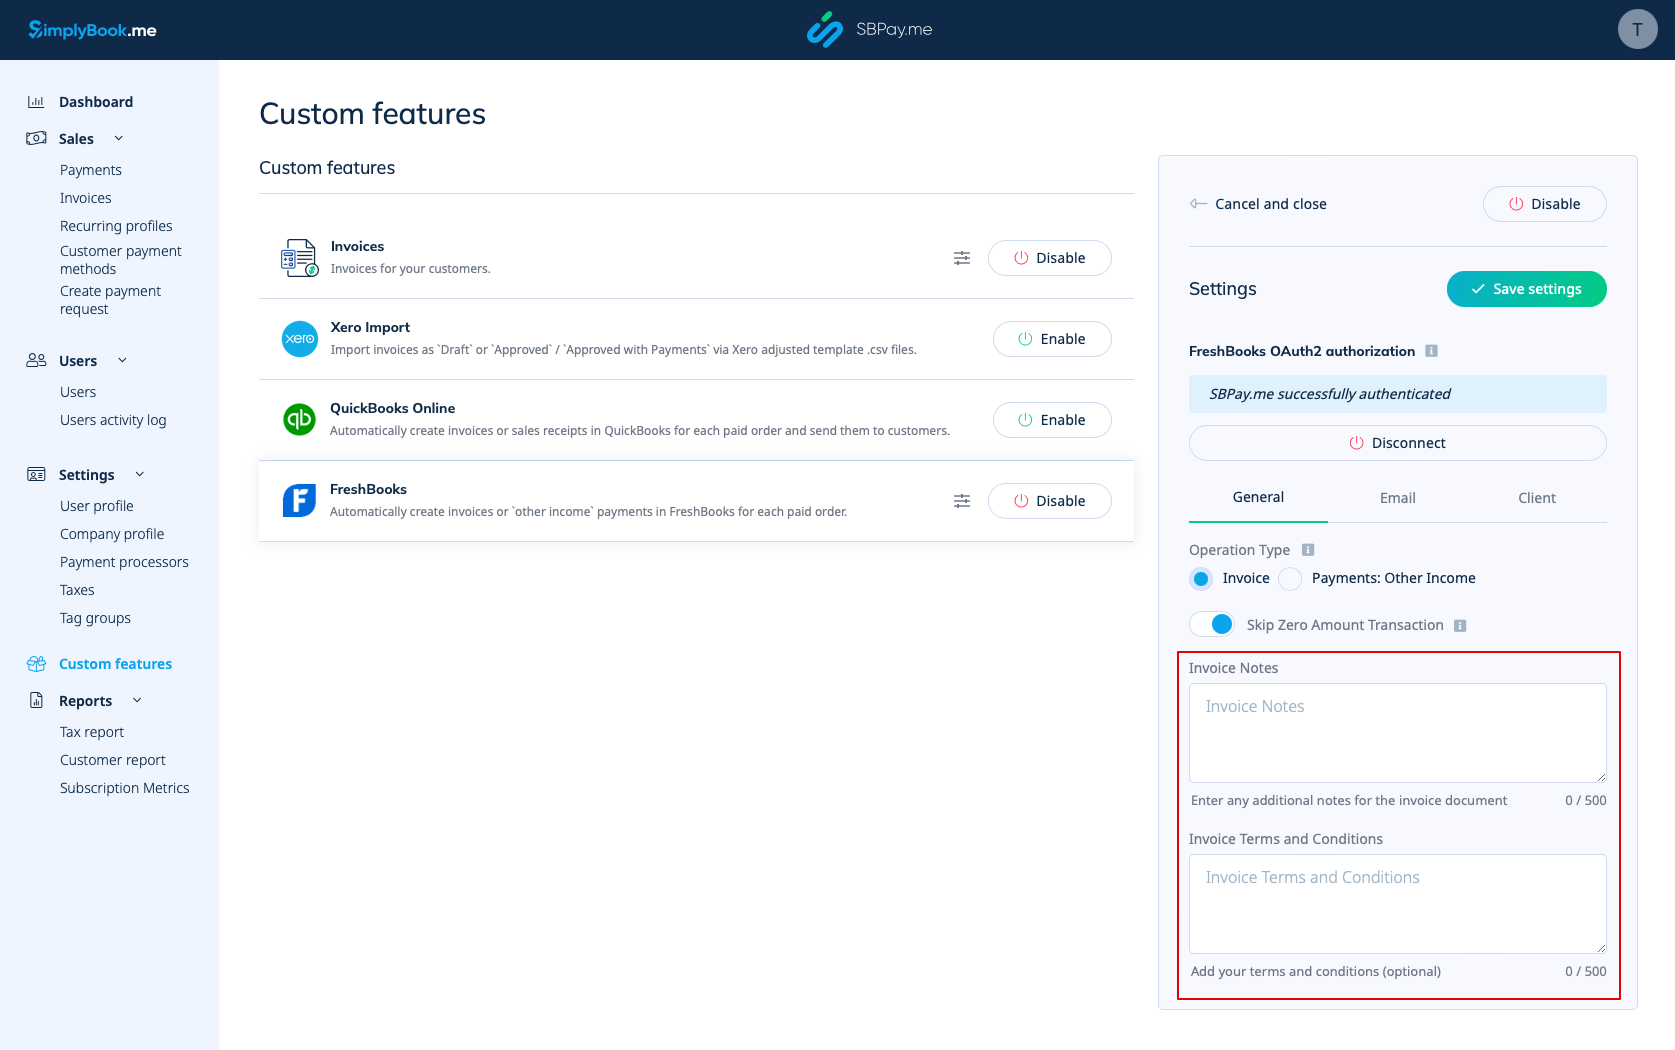
7. You can also include the Invoice Notes and the Invoice Terms and Conditions in the invoice document.
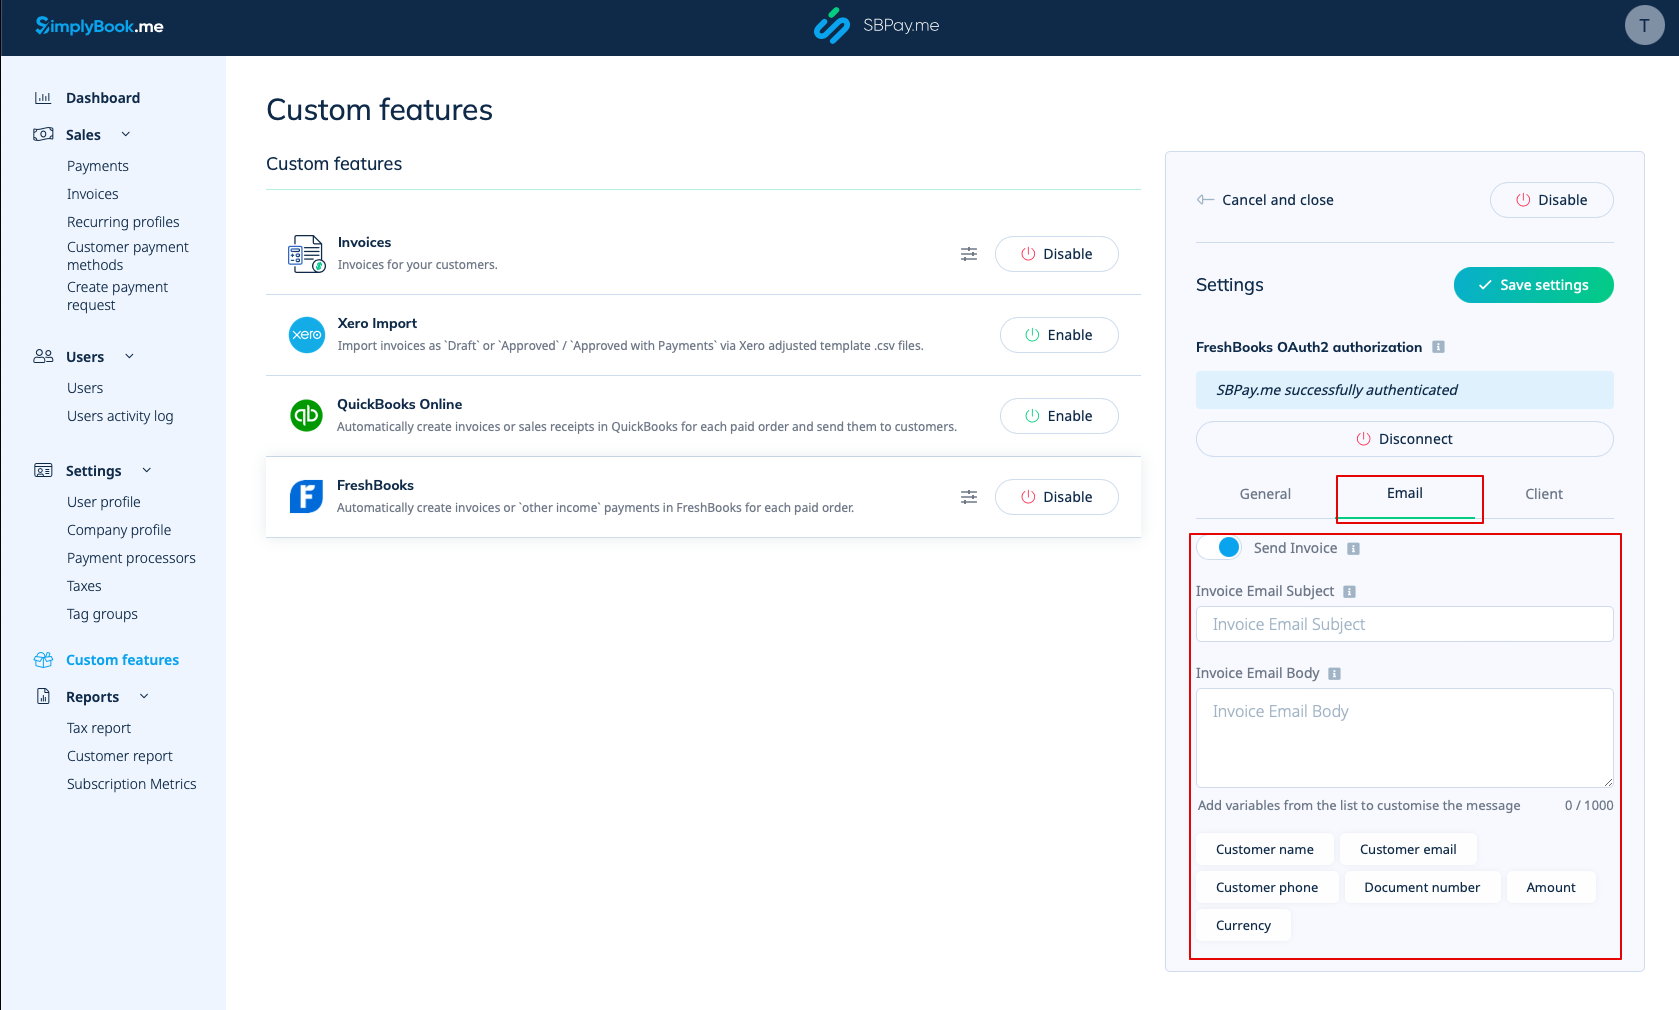
8. In the Email section you can disable or leave the Send Invoice option On. If enabled, you can specify the Invoice Email Subject as well as the Invoice Email Body. You can include supported variables in the email body, which will be replaced with actual information when sent to clients. If not specified, the default FreshBooks template will be used for the email subject or body.
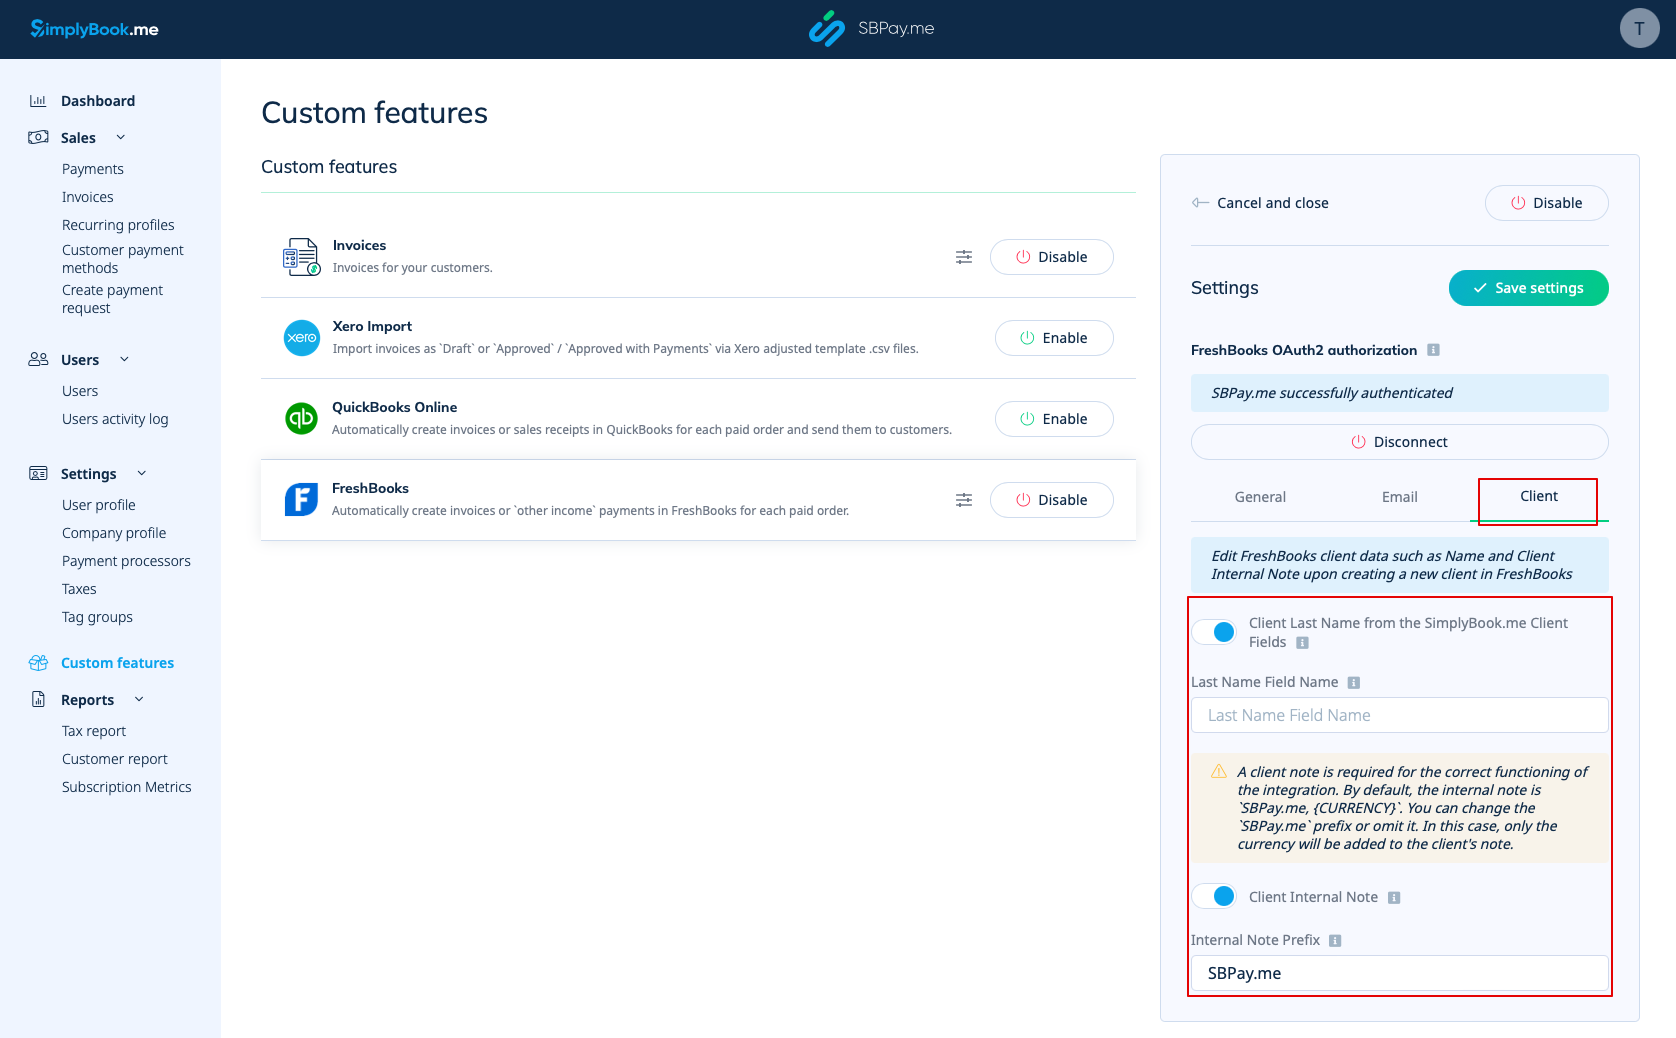
9. In the Client section you can adjust client information such as Last Name and Client Internal Note upon the creation of a new client entry in FreshBooks.
- You have the option to activate the Client Last Name from SimplyBook.me Client Fields. This feature is useful if you have the corresponding custom feature enabled in the SimplyBook.me’s account and set it for obtaining the last name of your clients.
- Ensure that you input the precise field name matching the one used in SimplyBook.me’s Client Fields Custom Feature for the last name.
- Client Internal Note option allows the addition of a personalised prefix to a client’s internal note in FreshBooks. It’s important to note that modifying the prefix won’t affect existing FreshBooks clients. Only the new clients will be created in FreshBooks with the updated note. A client note is essential for the integration to work correctly. By default, the internal note includes SBPay.me, {CURRENCY}.
- You have the flexibility to change the SBPay.me prefix or exclude it. If omitted, only the currency will be appended to the client’s note.
Xero Setup
- To clarify, the process is not fully automated. You will need to export the invoices from the SBPay.me Invoices page and import them on the Xero side. (we have prepared the specific file format to make it easy)
- It’s important to note, if standard Xero import functionality is used, invoices will be imported as Draft. For invoices to be Approved or Paid, Xero Conversion Toolbox should be used.
- Tax amount is not exported since Xero imports final amounts as tax exclusive. Taxes are calculated and added to the final amounts within the Xero platform itself.
- Xero Custom Feature will work only if the Invoices custom feature is enabled in the SBPay.me
How to set and use
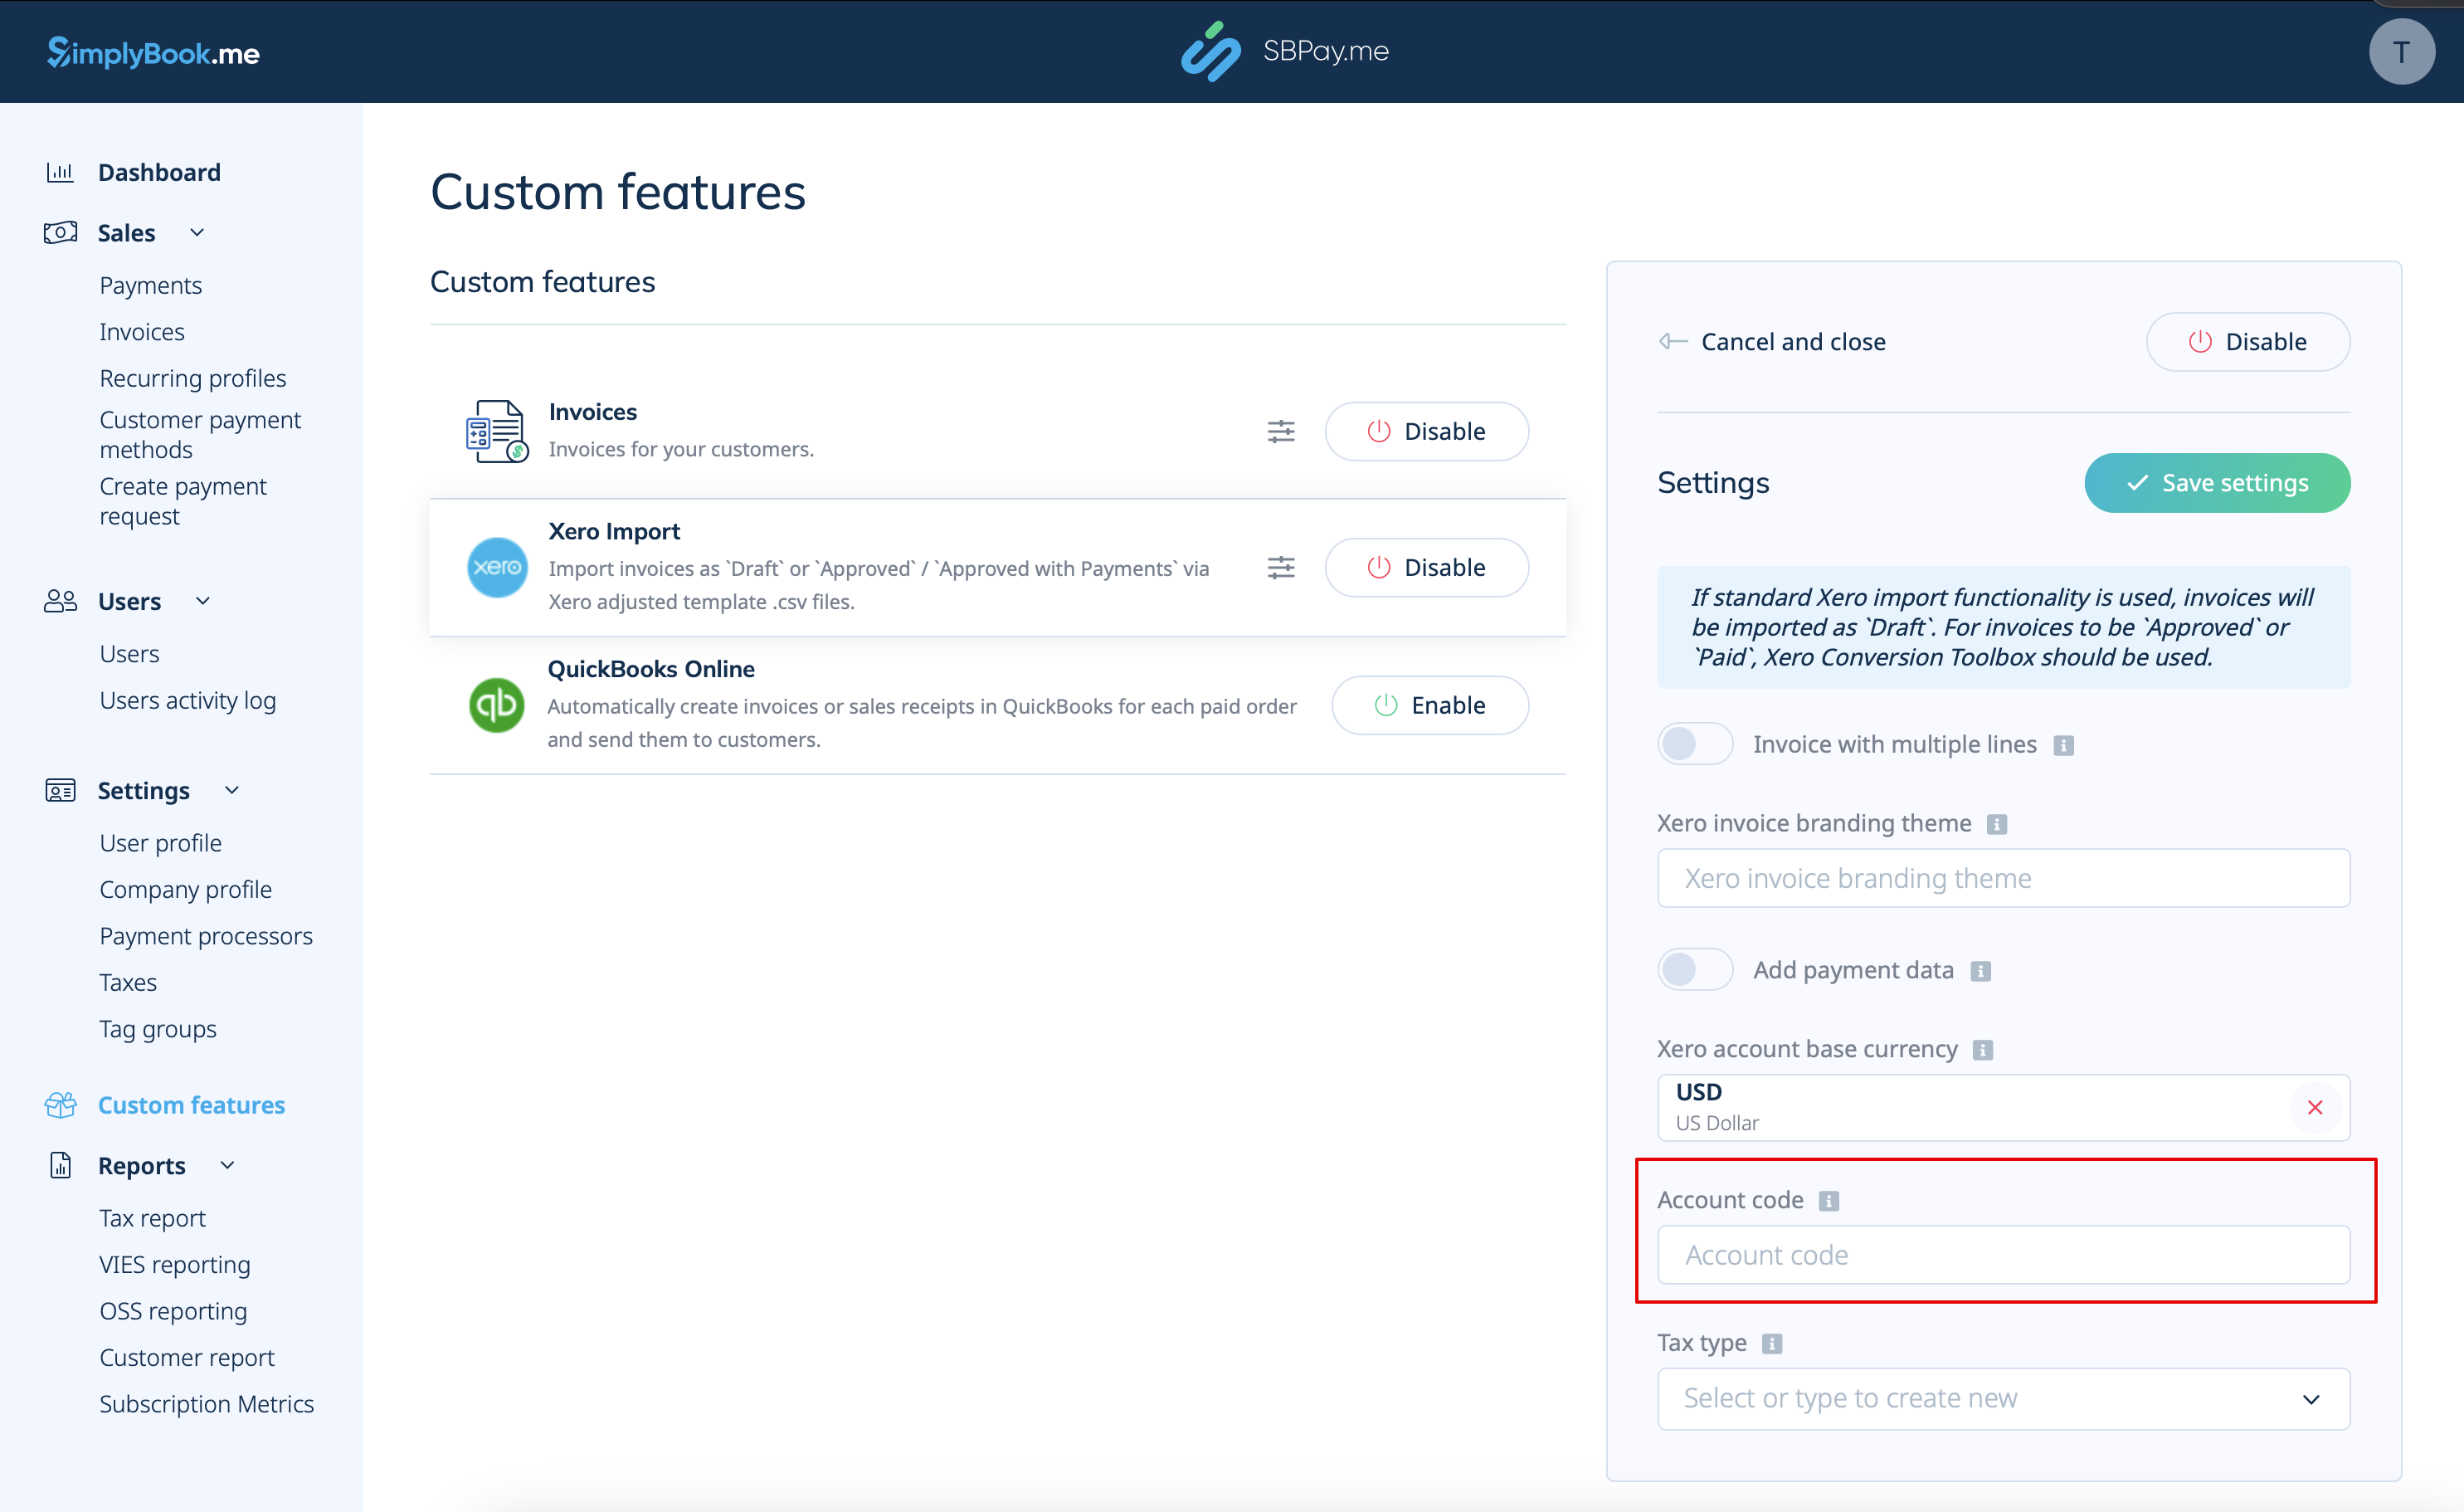
1. Firstly, navigate to the Custom Features page within your SBPay.me interface and click on the Enable button next to Xero.
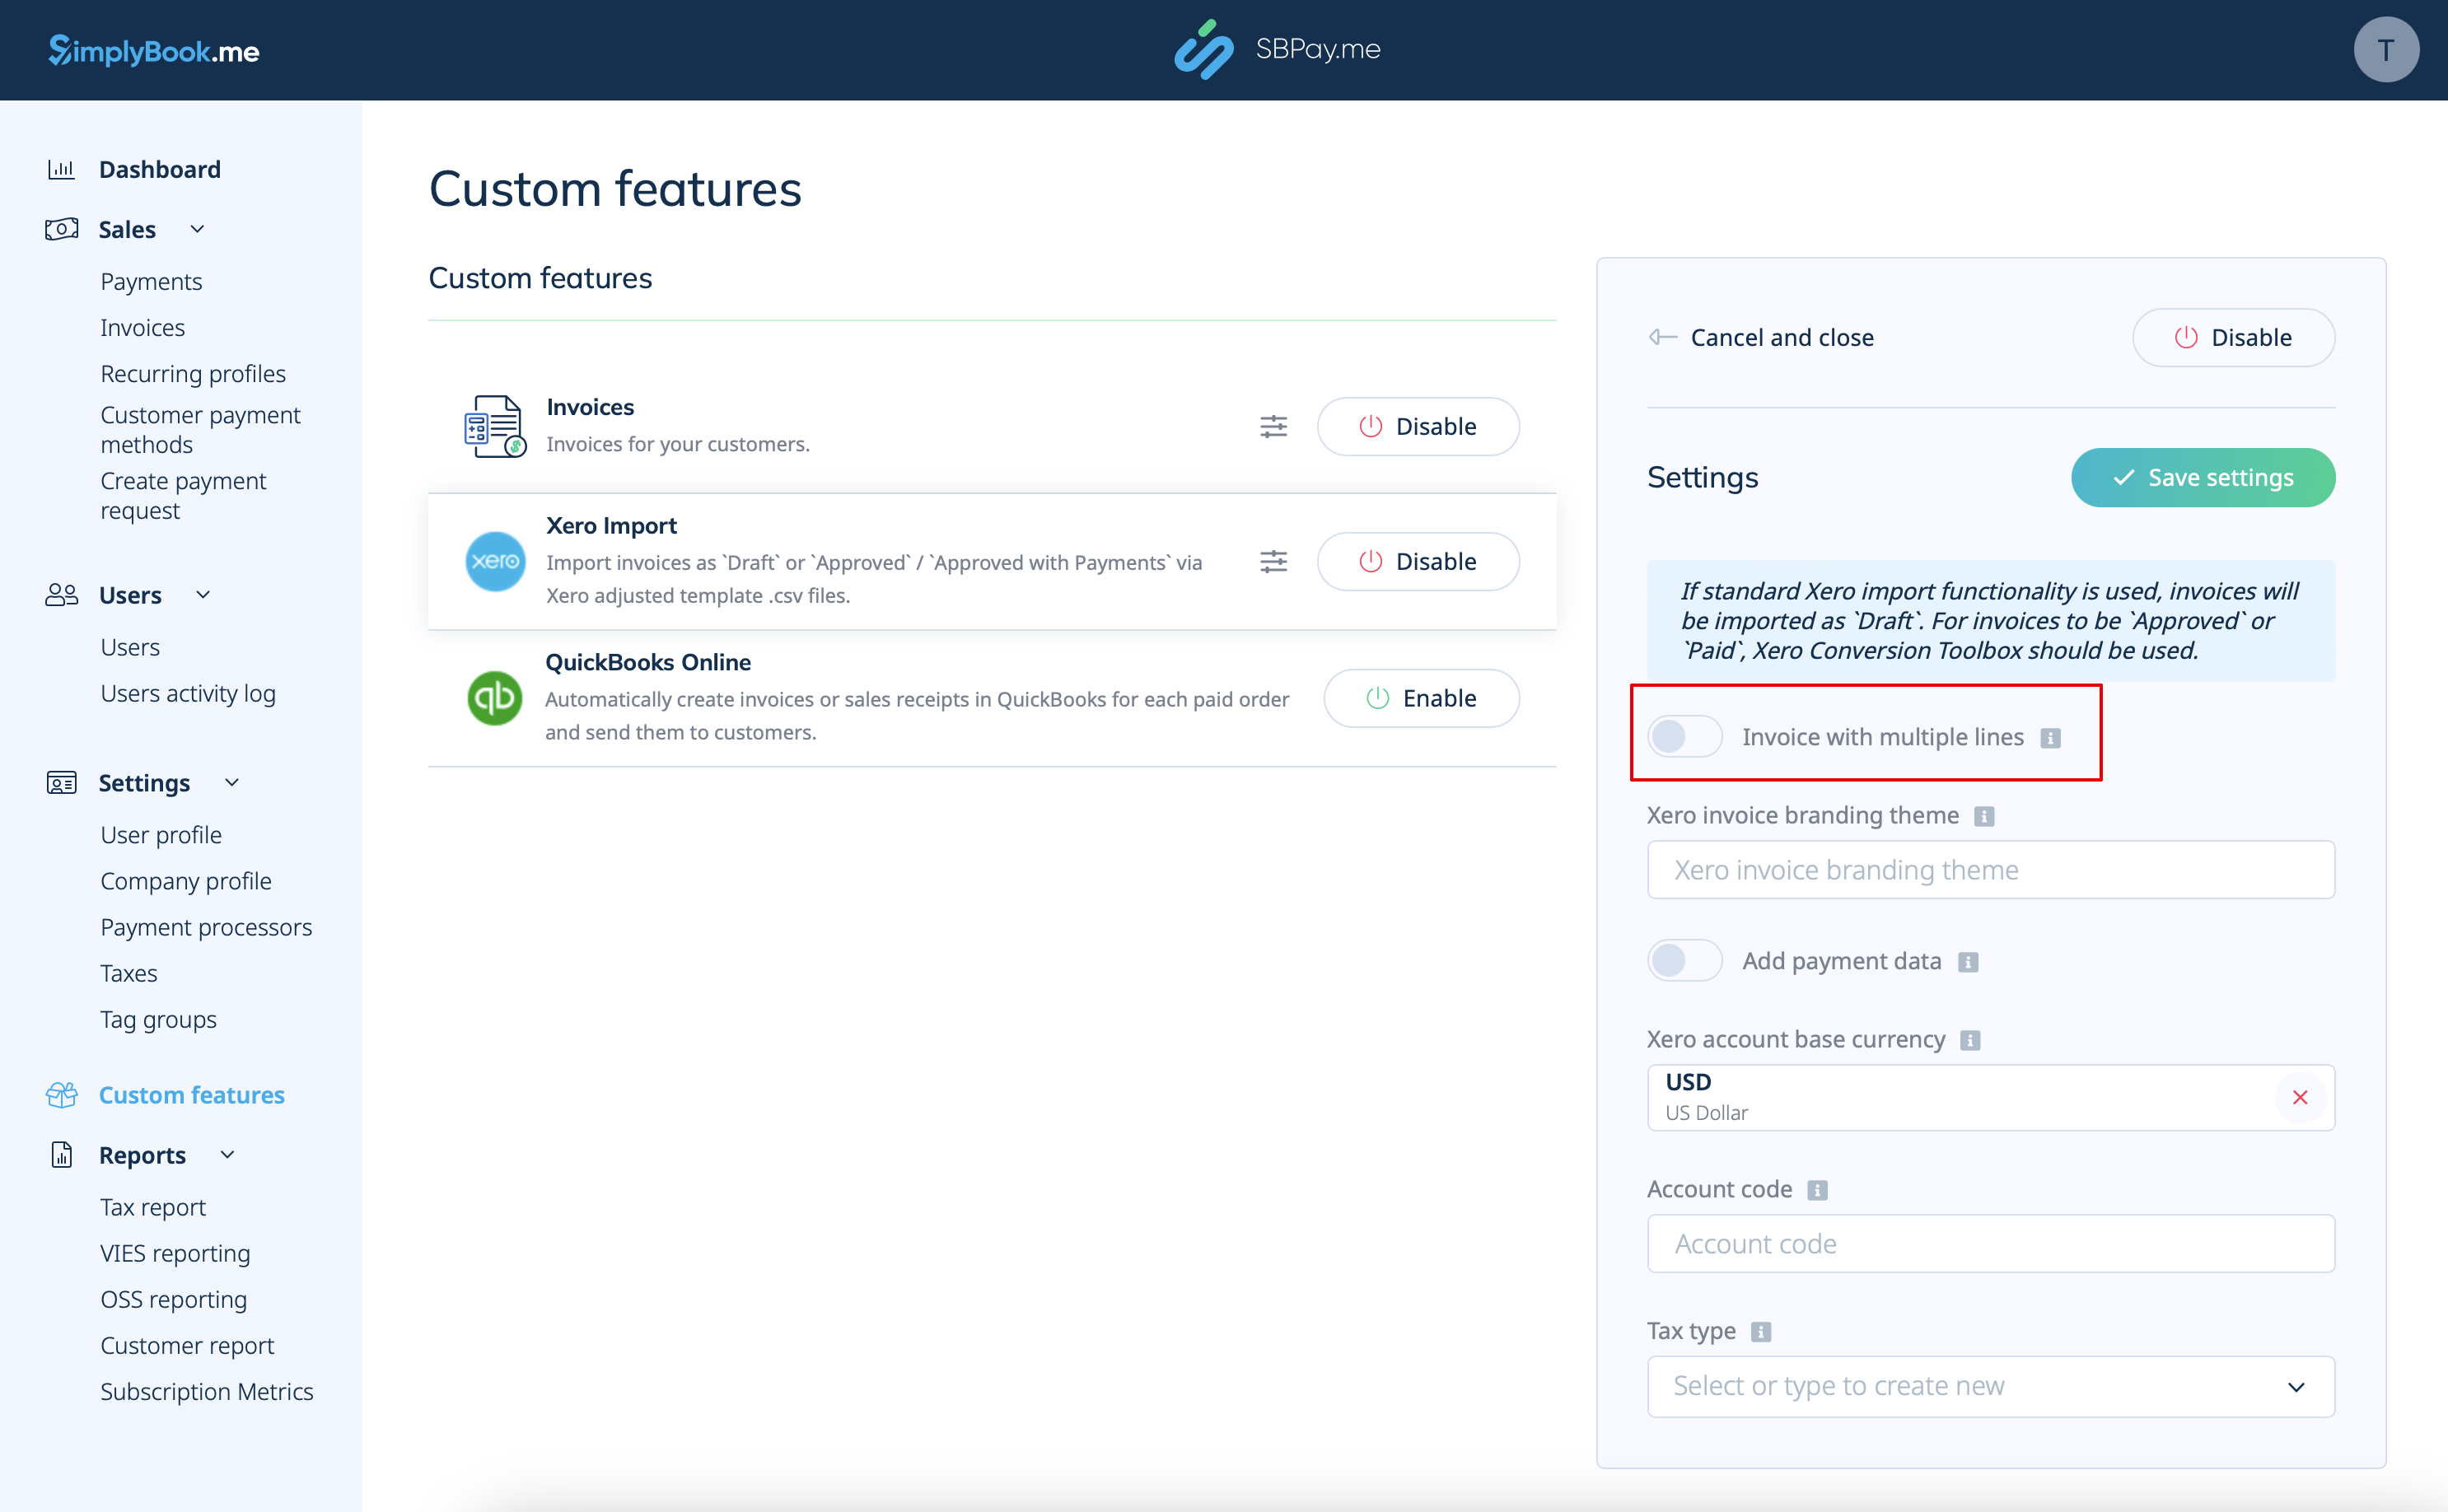
2. Decide whether to import the invoice with multiple lines. This affects the structure of invoice information when moving from SBPay.me to Xero.
If enabled, each row in the export file will correspond to a specific invoice line item. This means that detailed information about each item within an order is organised in separate rows of the resulting .csv file.
If disabled, all invoice line items within an order are combined into a single line. This results in a concise summary of the invoice with the total amount displayed in one row of the .csv file.
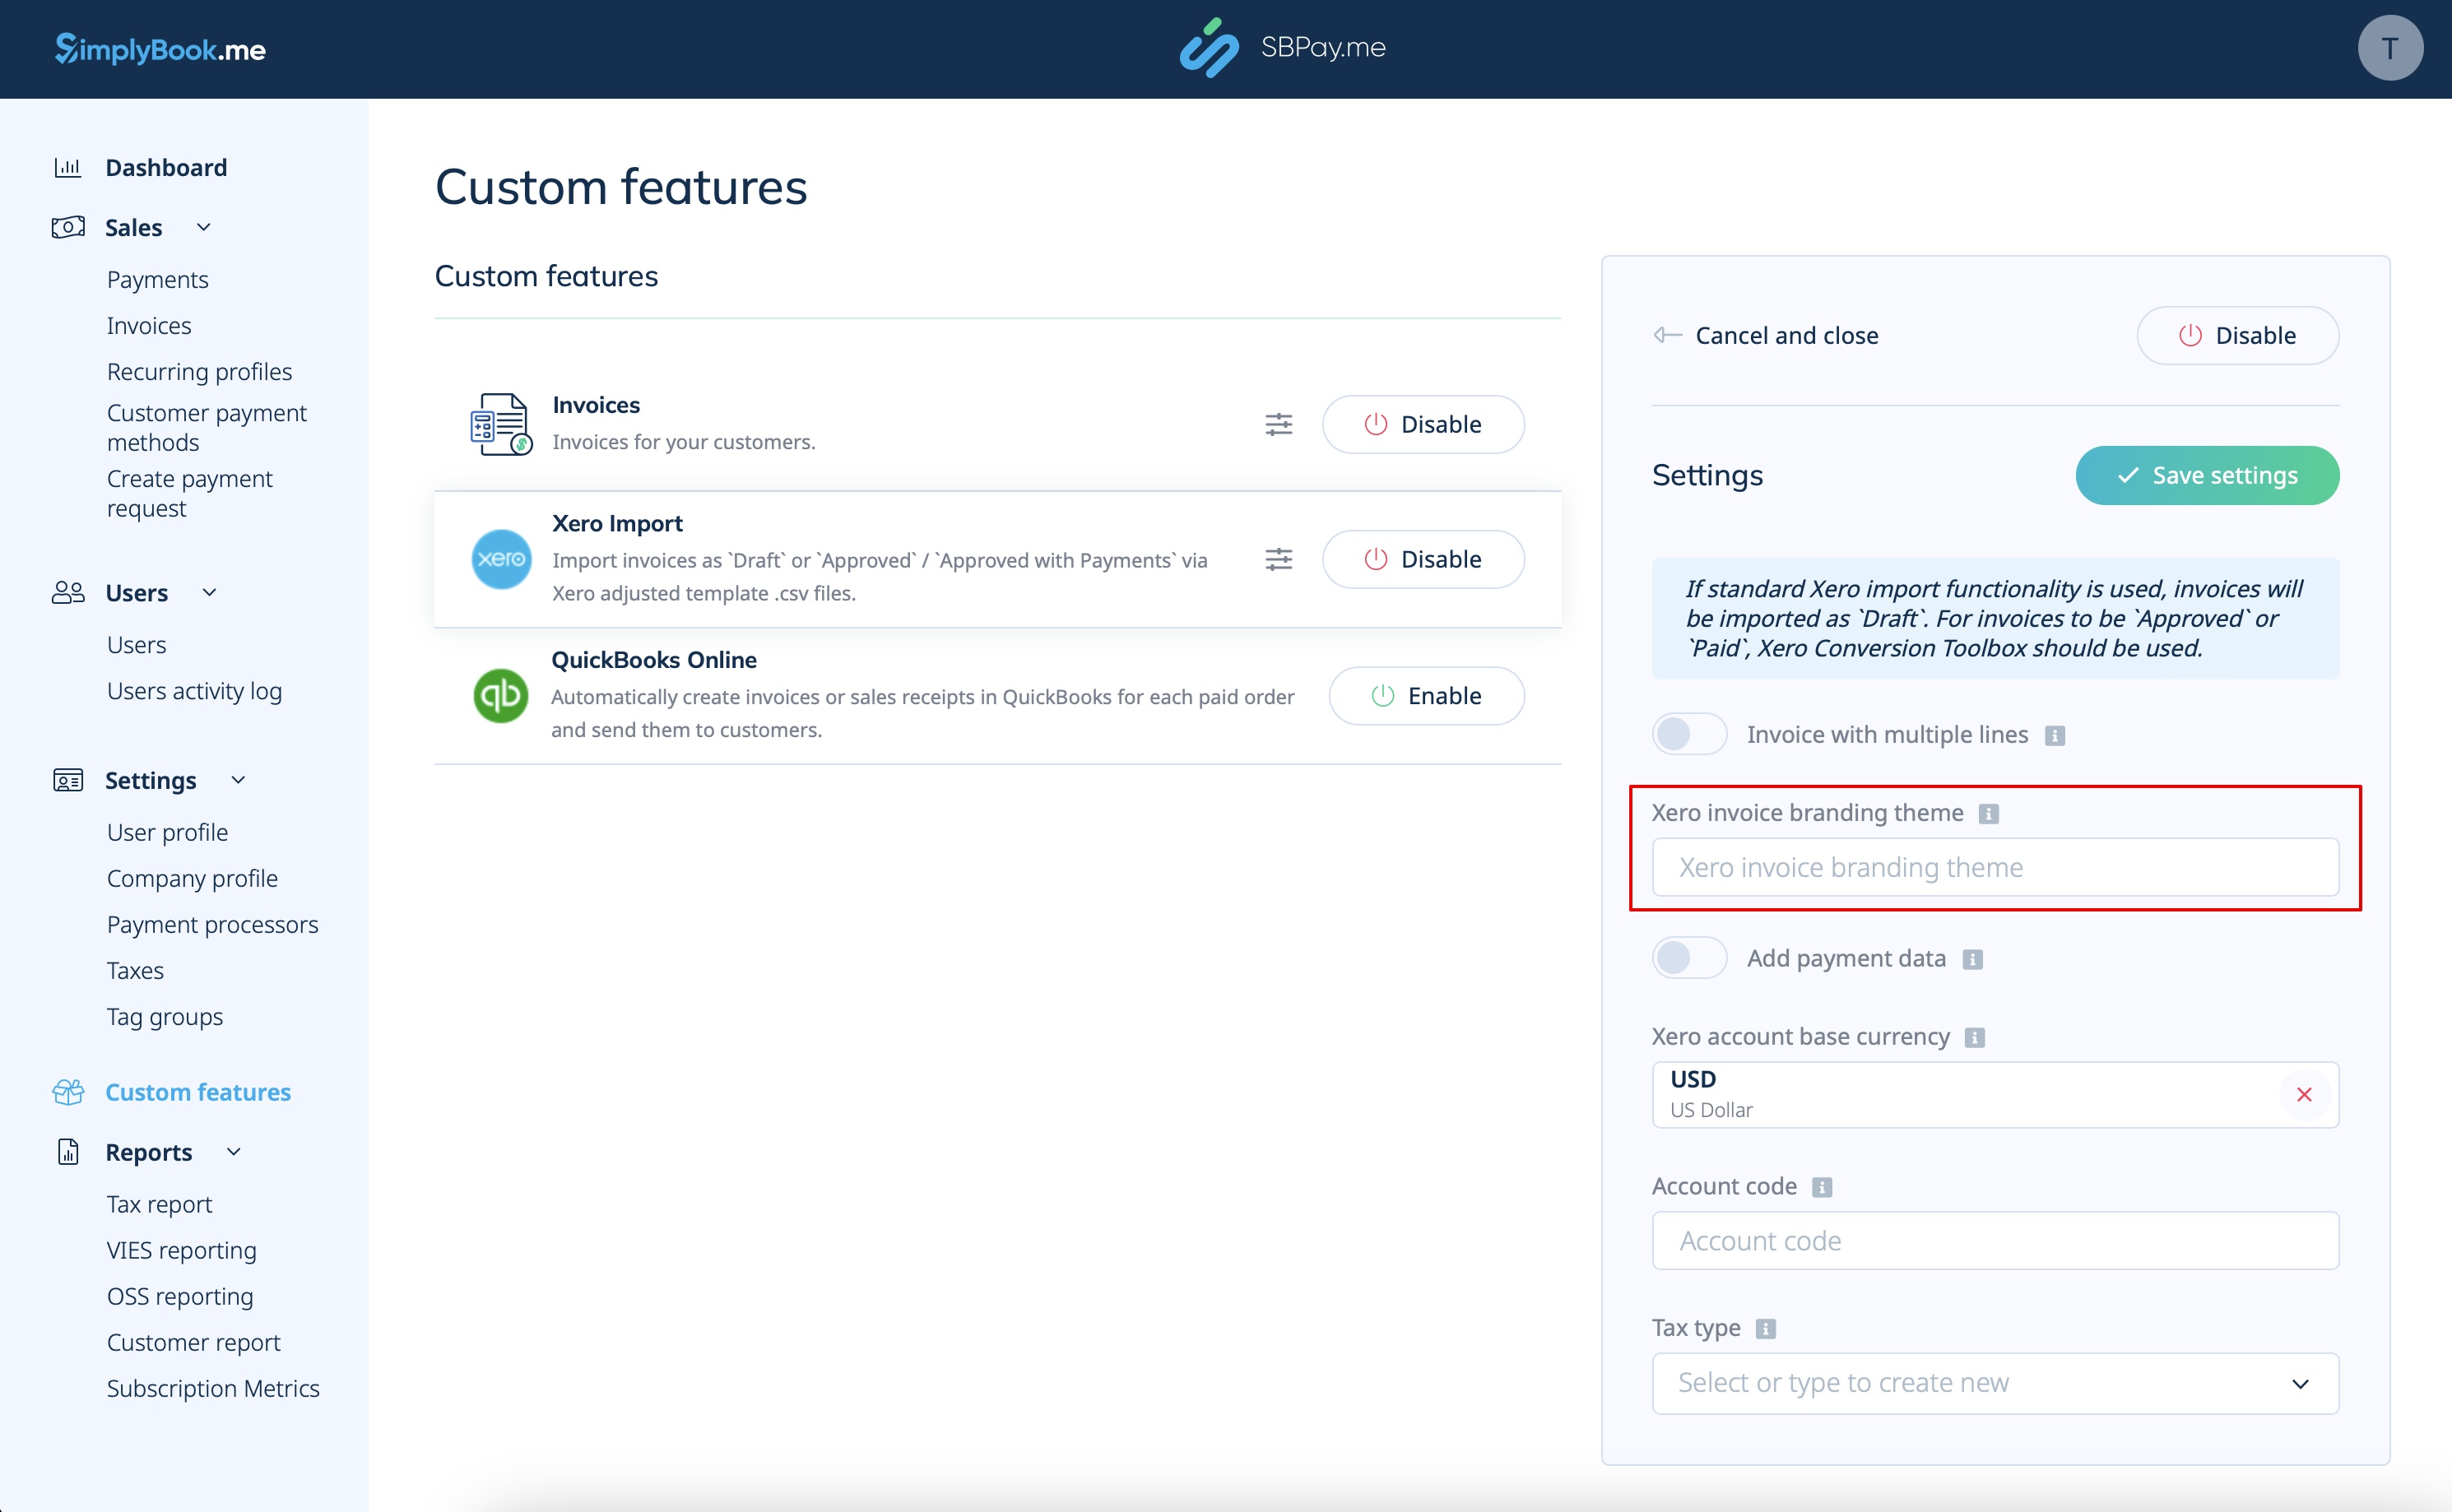
3. Then, insert Xero Invoice Branding Theme Name. In Xero, a branding theme name is the name of the invoice template that determines the layout and design of your invoices.
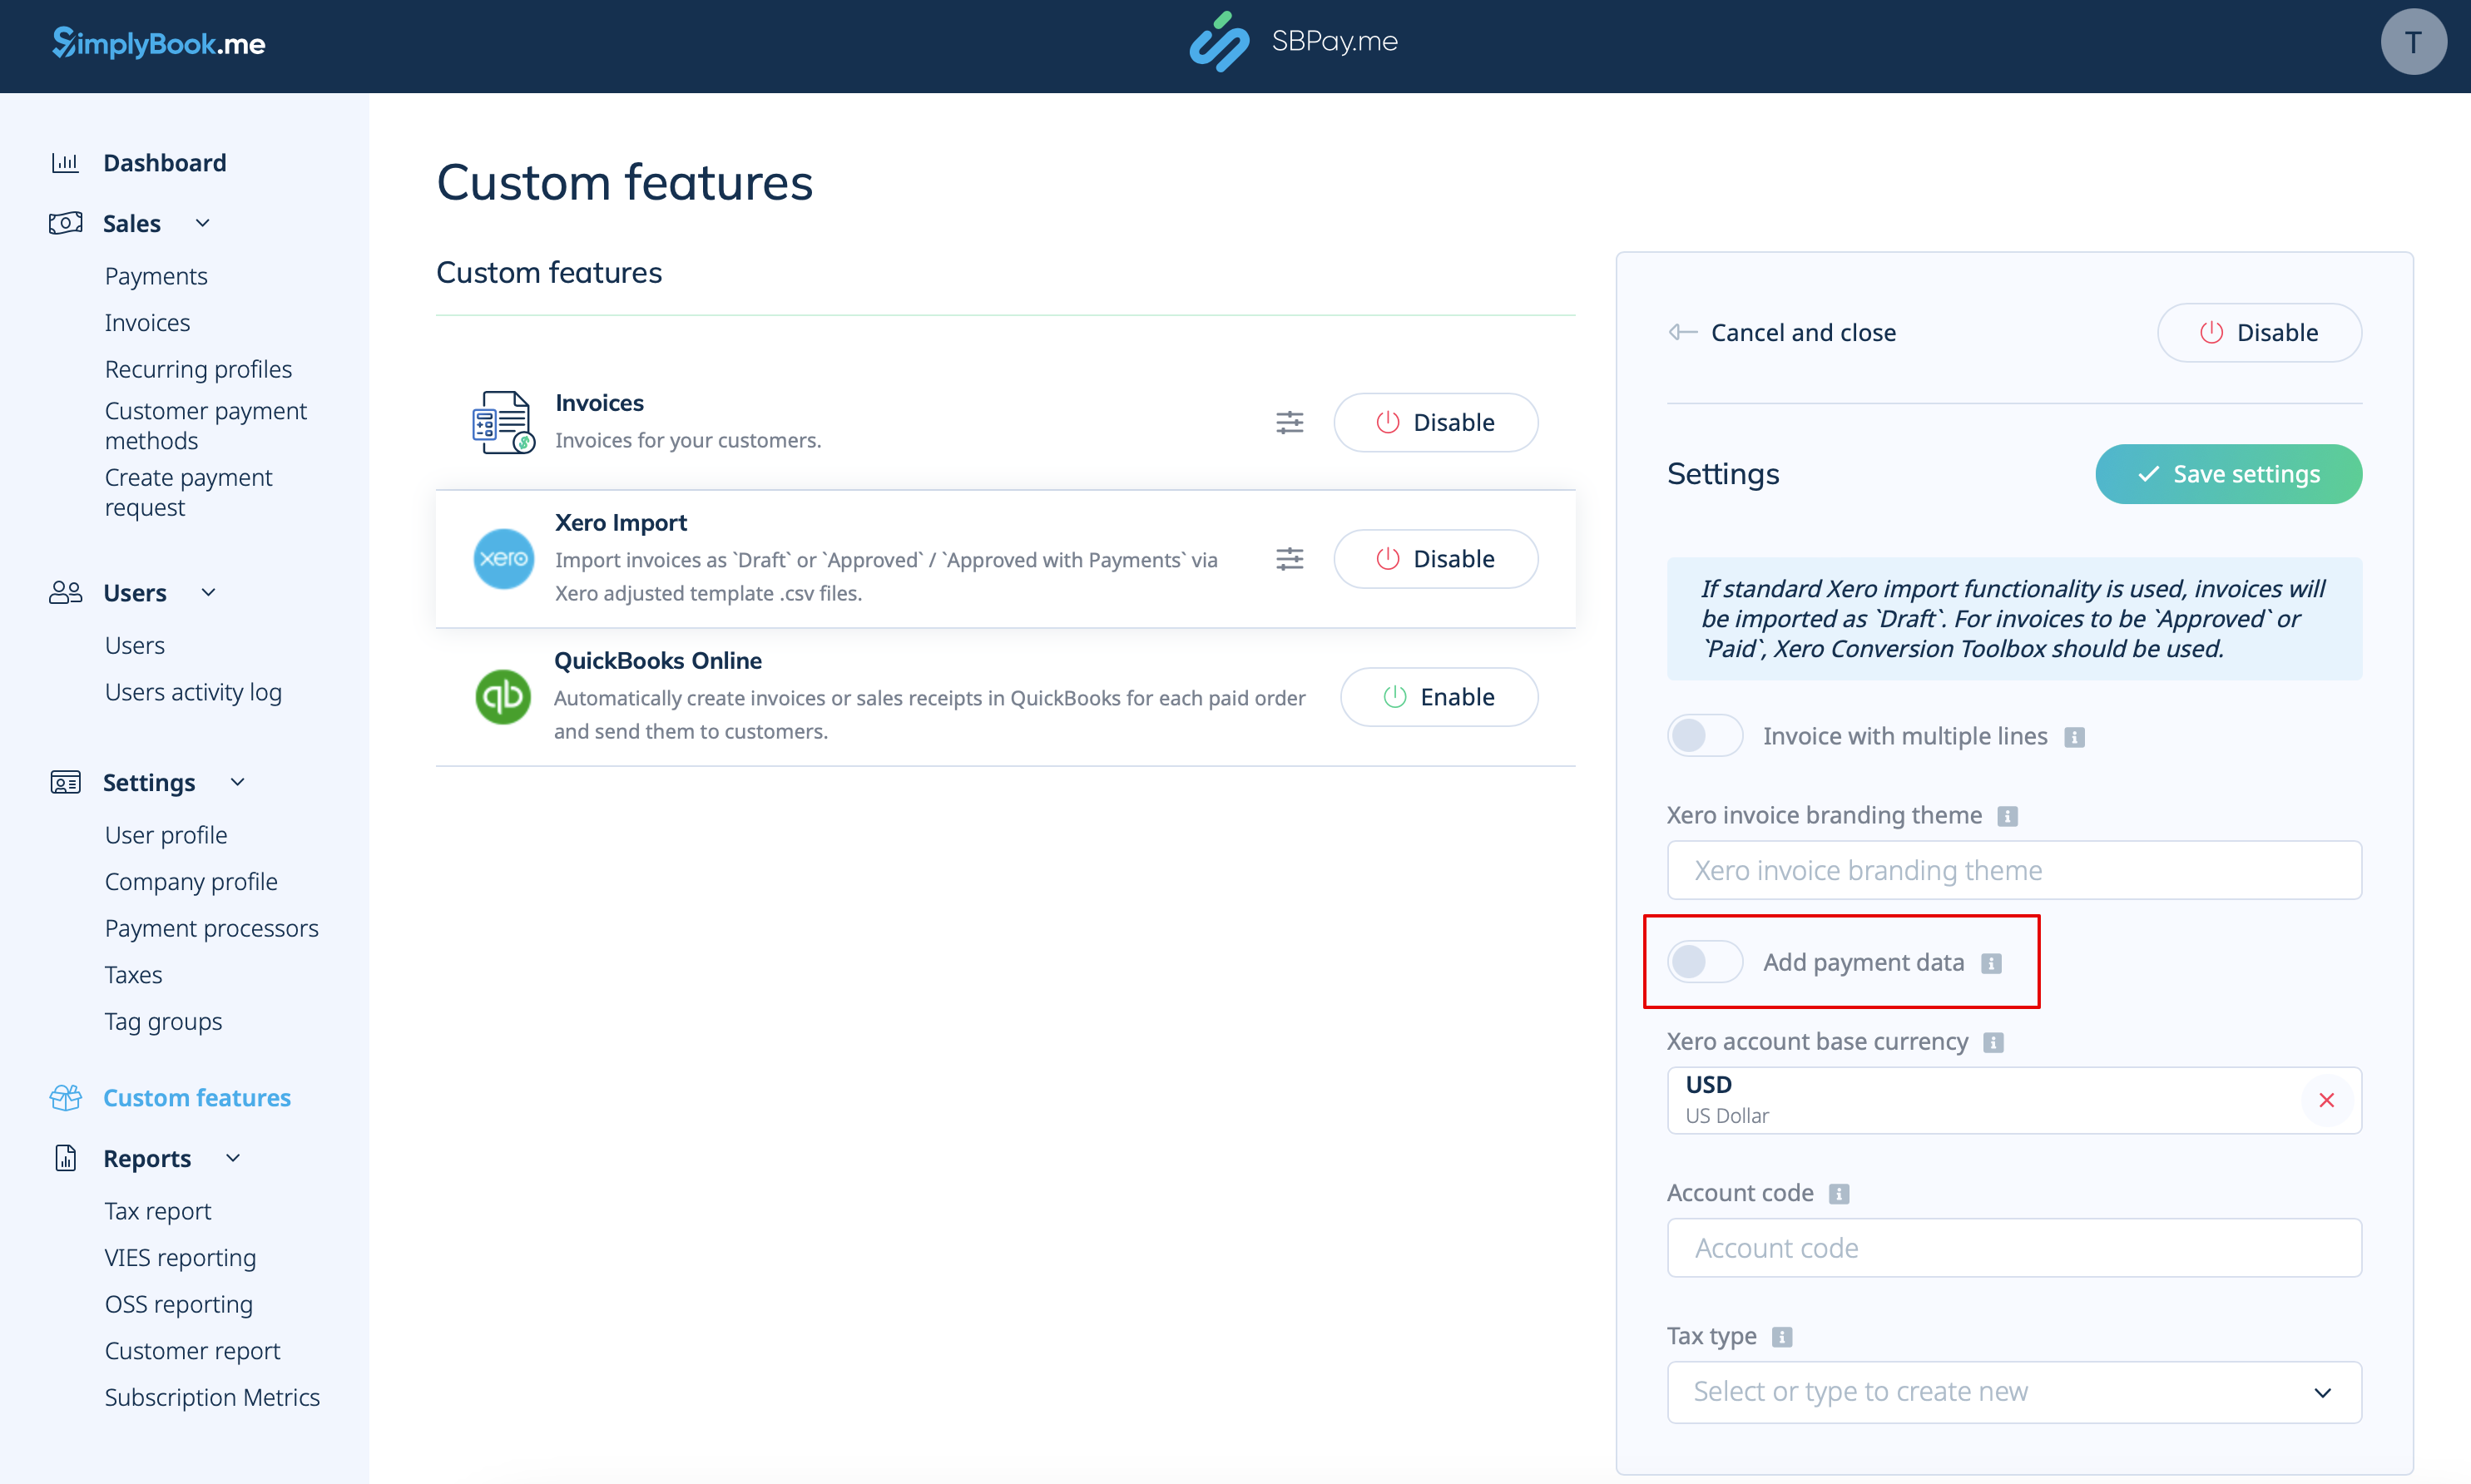
4. Then, add Payment Data. If enabled, additional payment data, including the amount paid, Xero account code, invoice paid date, and payment exchange rate will be exported to the .csv file.
By including this payment data during the export process, you ensure that Xero has all the necessary information to accurately record payments against the corresponding invoices.
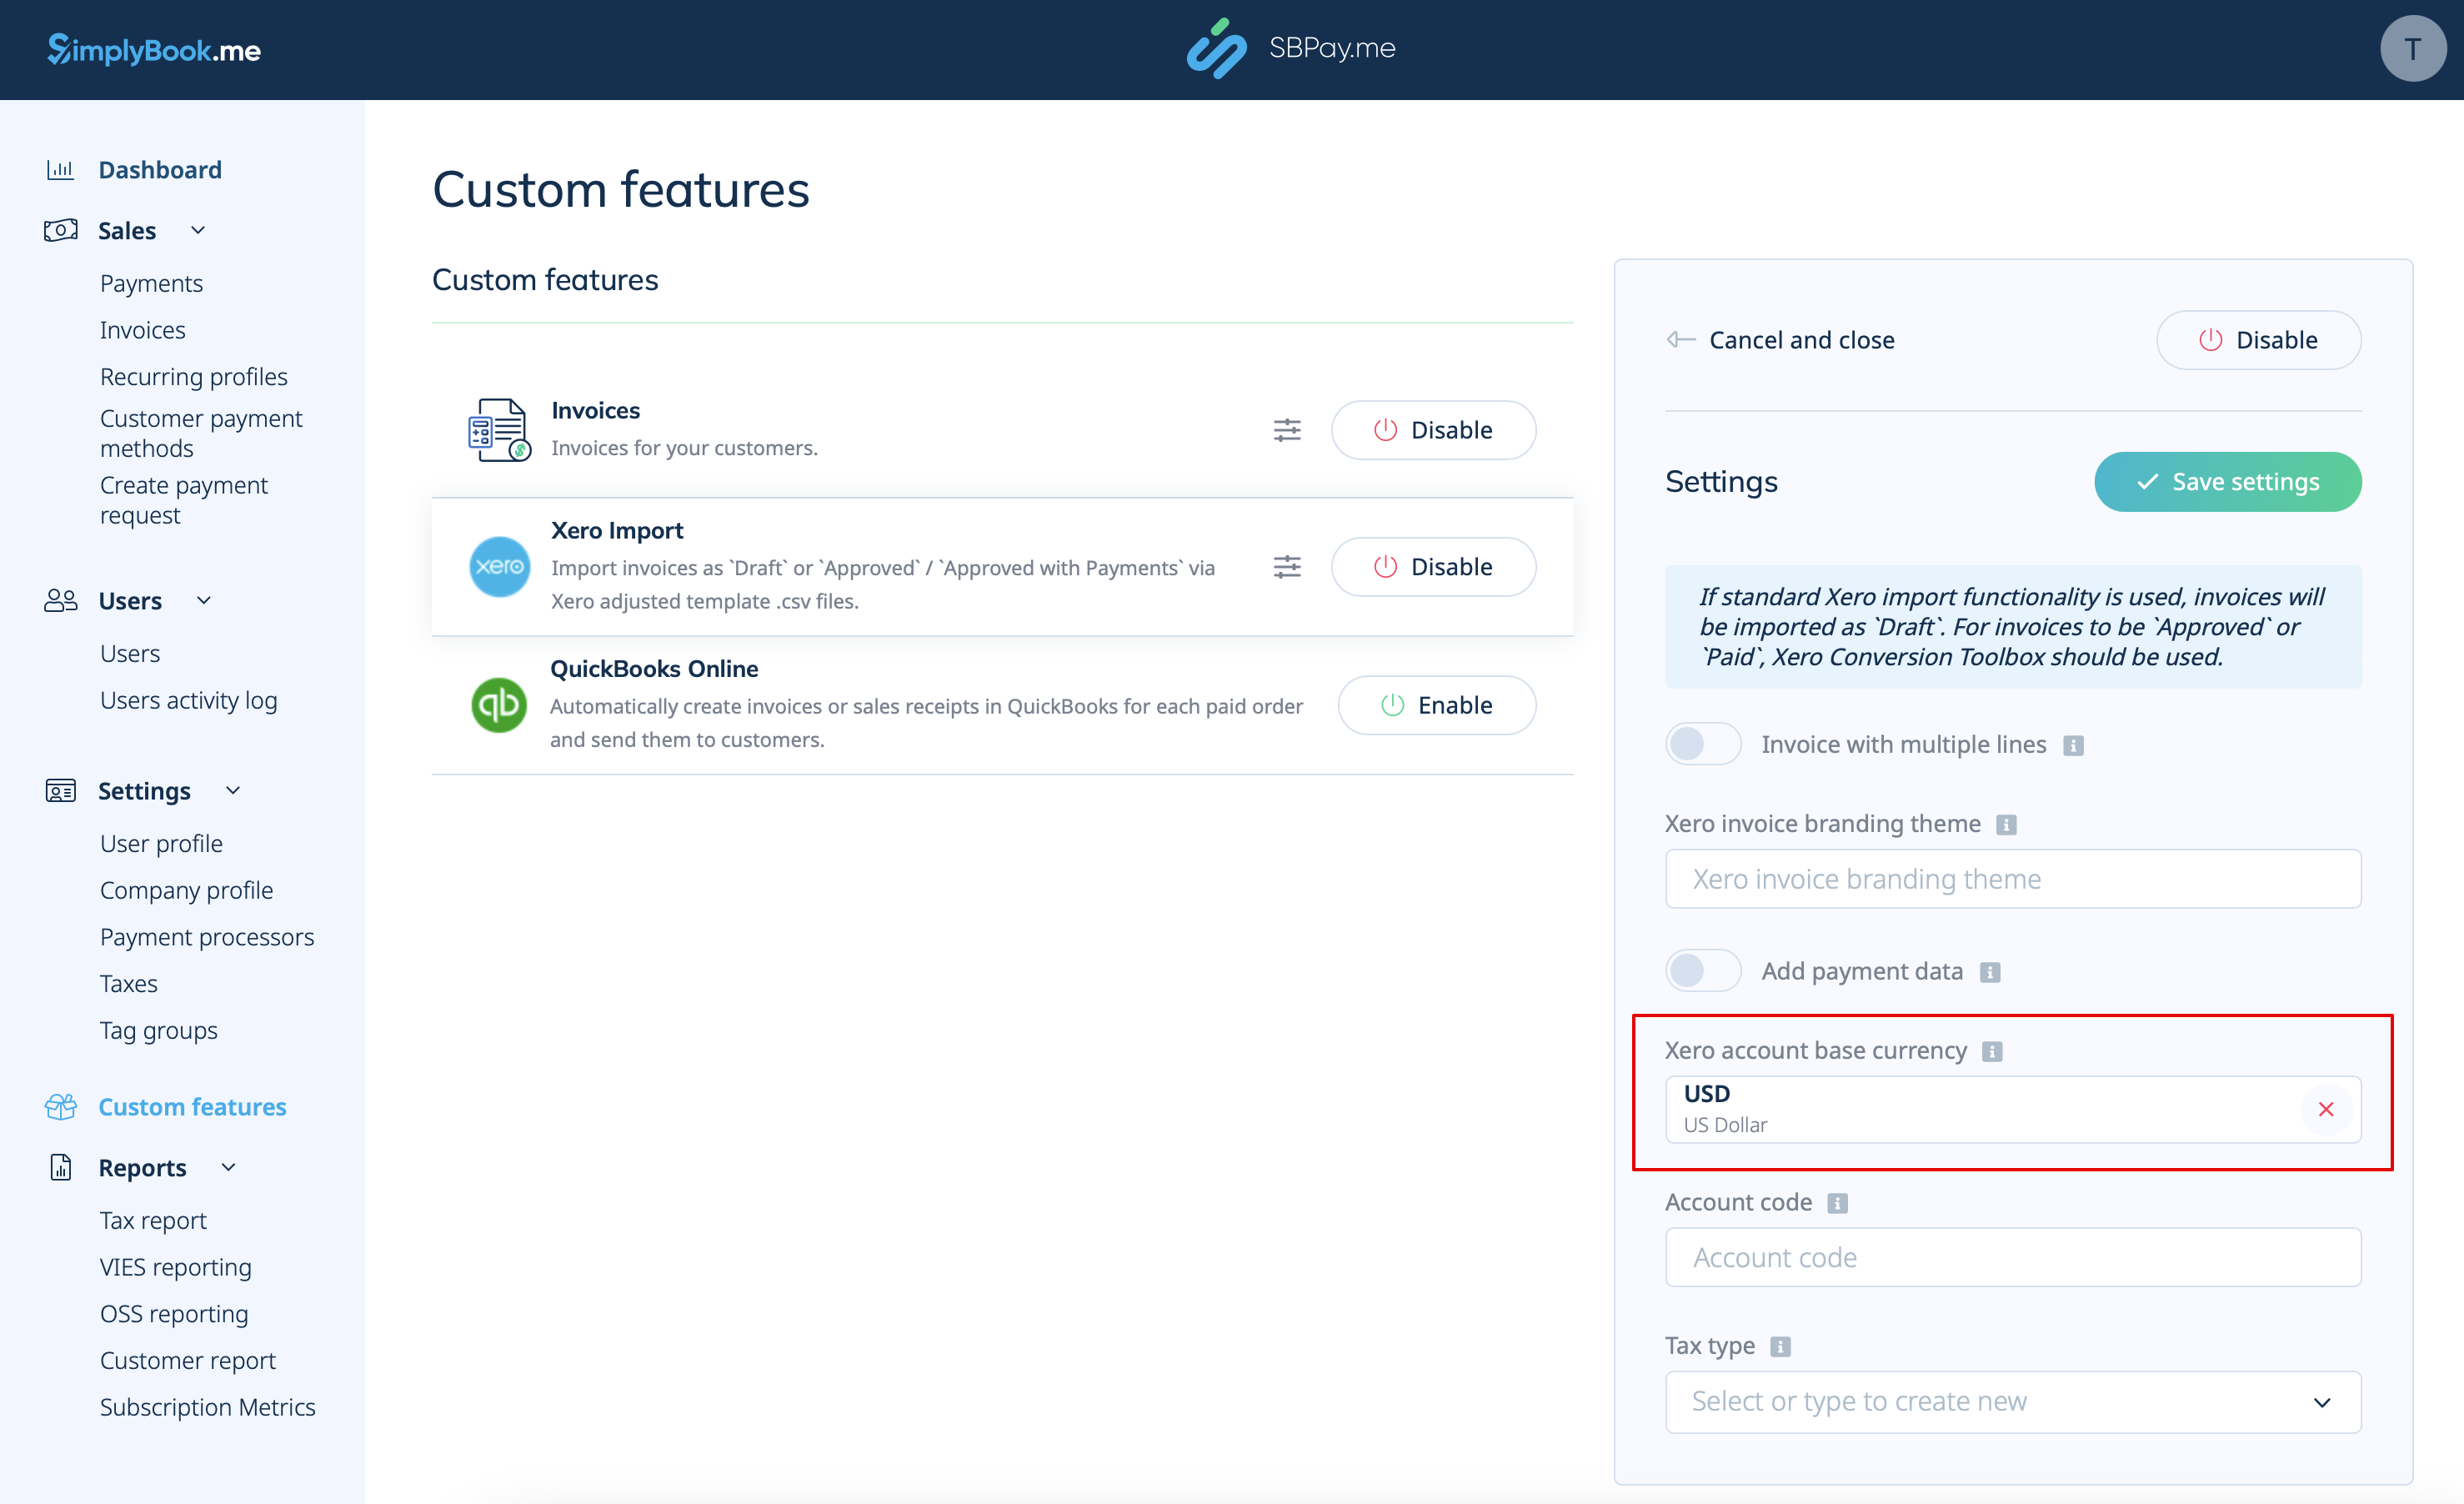
5. Furthermore, select Xero Account Base Currency. In Xero, the account base currency is the primary currency in which your financial records are kept. It serves as the standard currency for your accounting and reporting purposes. Specify it if you accept payments in multiple currencies or if the SBPay.me invoices currency is different from the Xero account base currency.
6. In particular, for paid invoices, specify the relevant Deposit Account Code as it appears in the chart of accounts in Xero. This ensures that transactions are automatically categorised into the appropriate account within Xero. Alternatively, you can leave it blank to manually specify the account code during the invoices import.
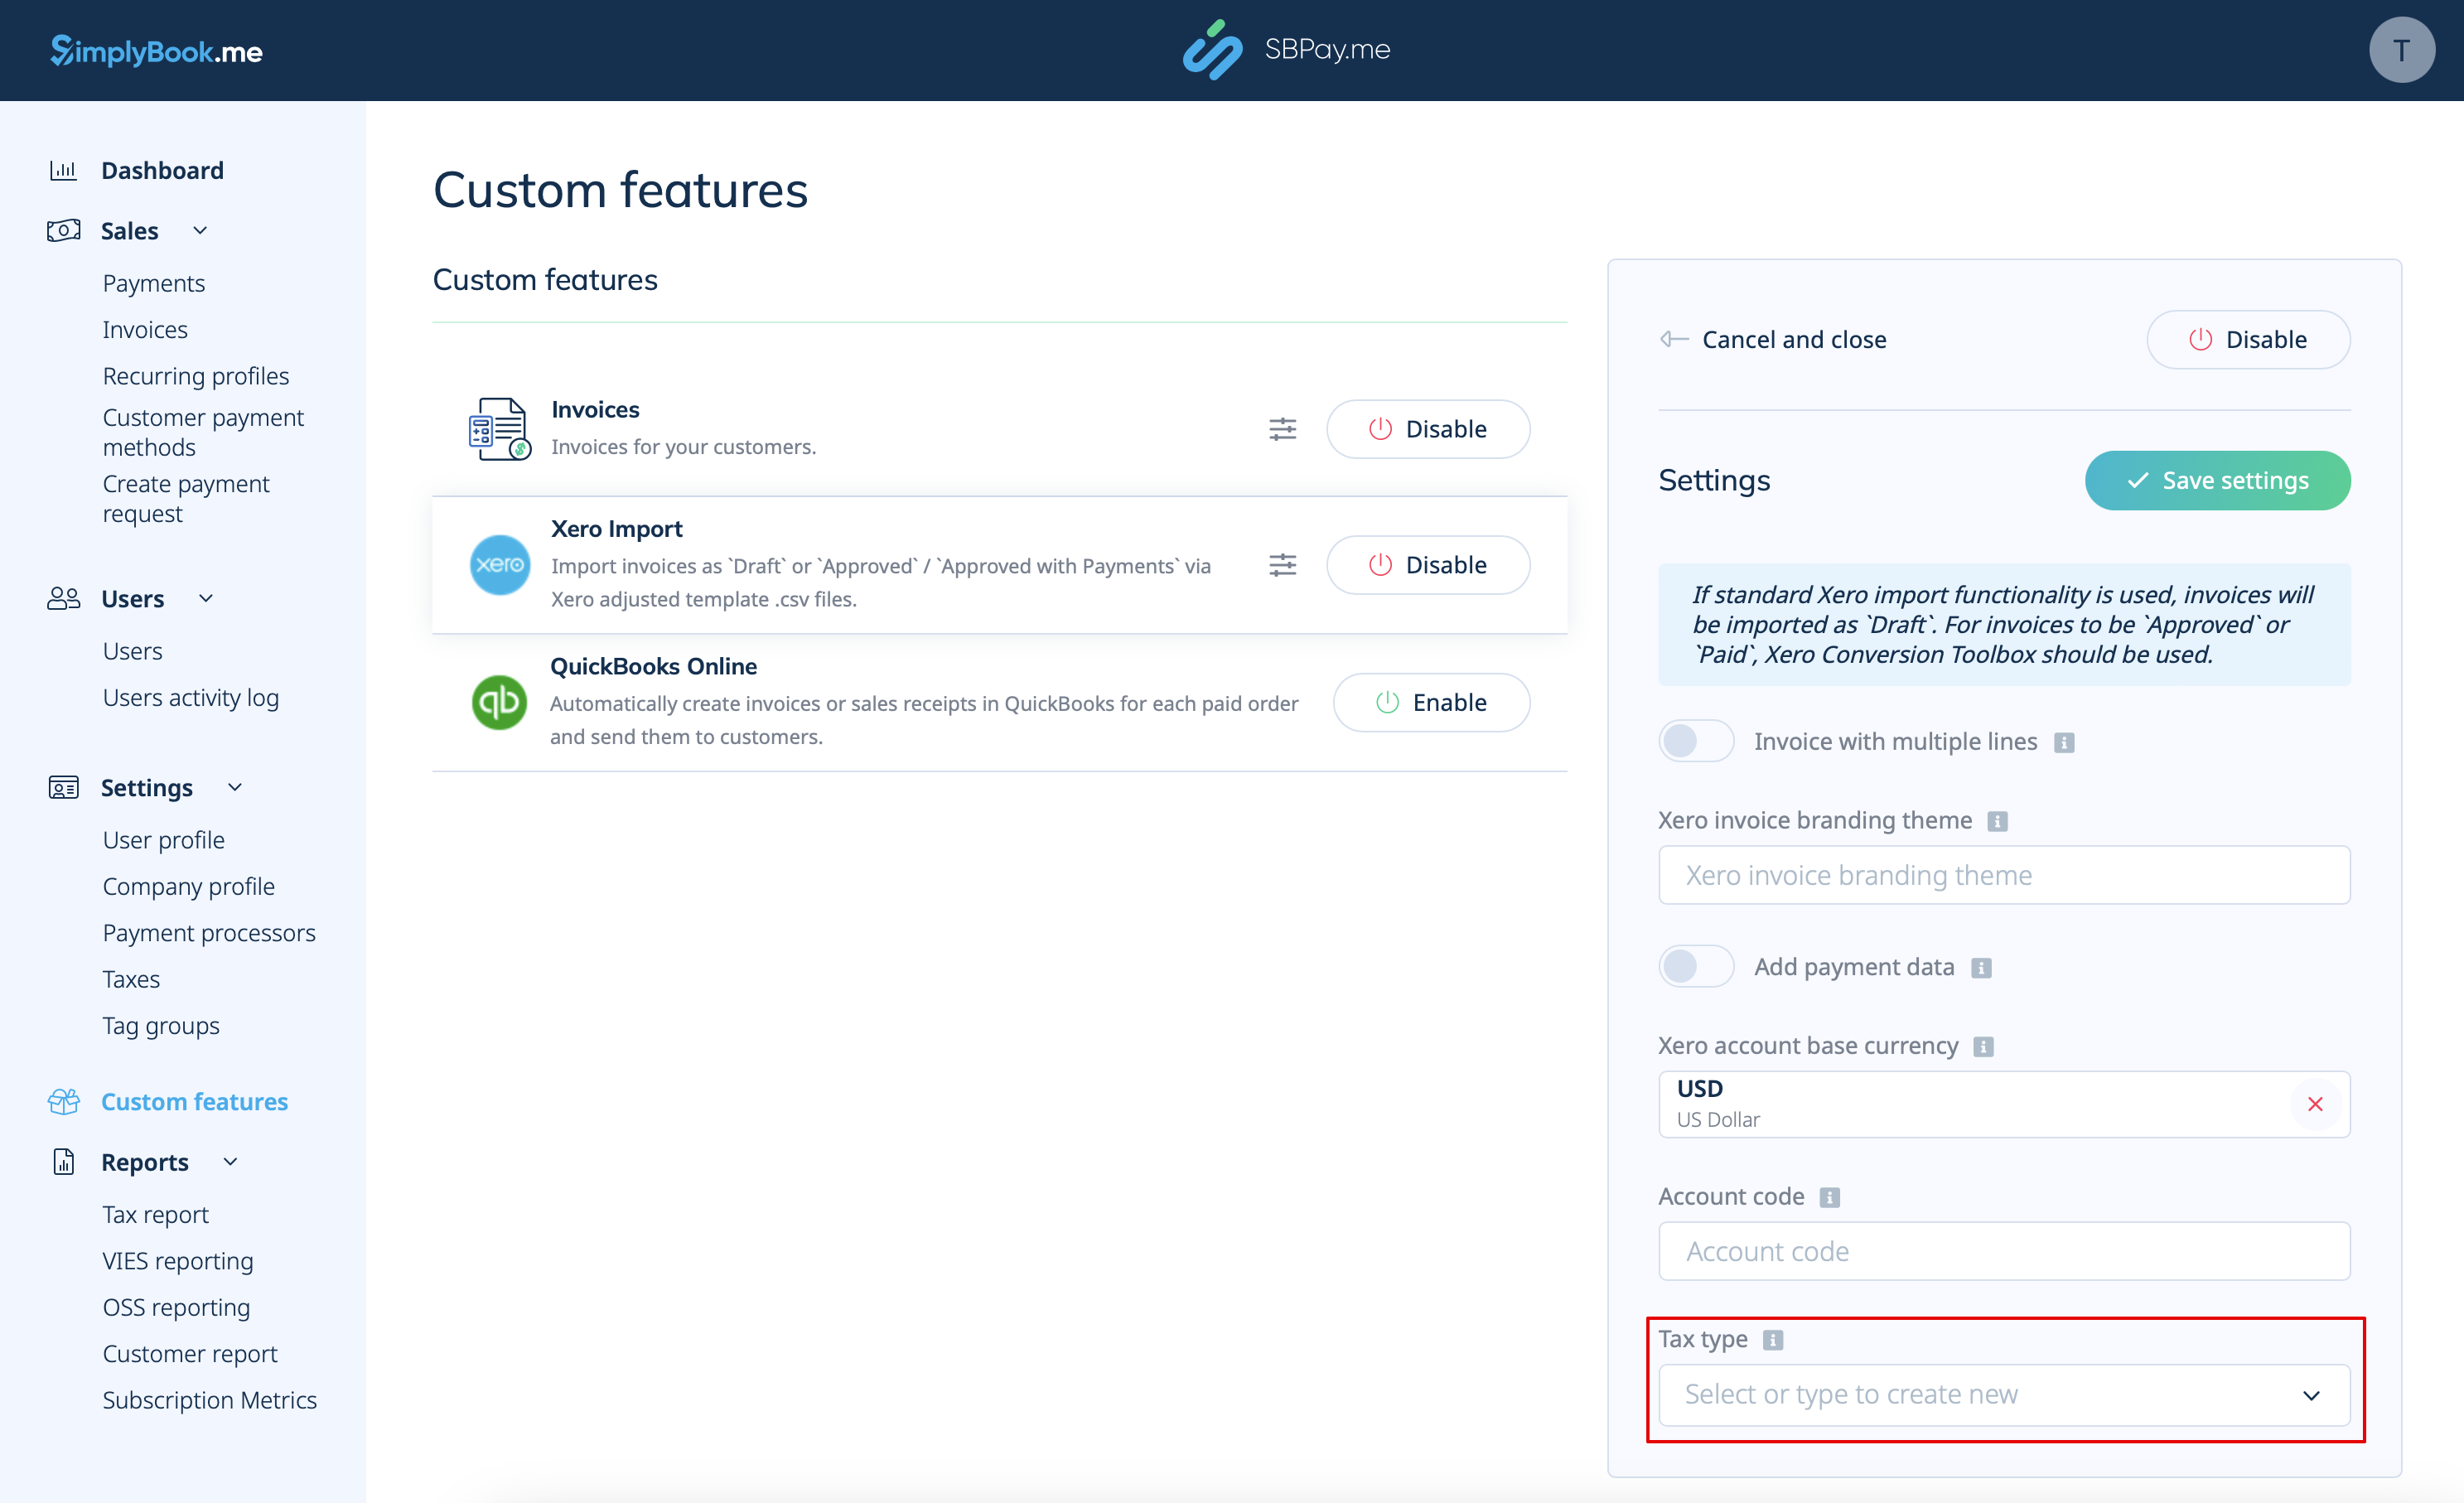
7. Then, select Tax Type. Then enter the exact tax rate name from your Xero settings to ensure that each transaction is correctly linked to the corresponding tax rate.
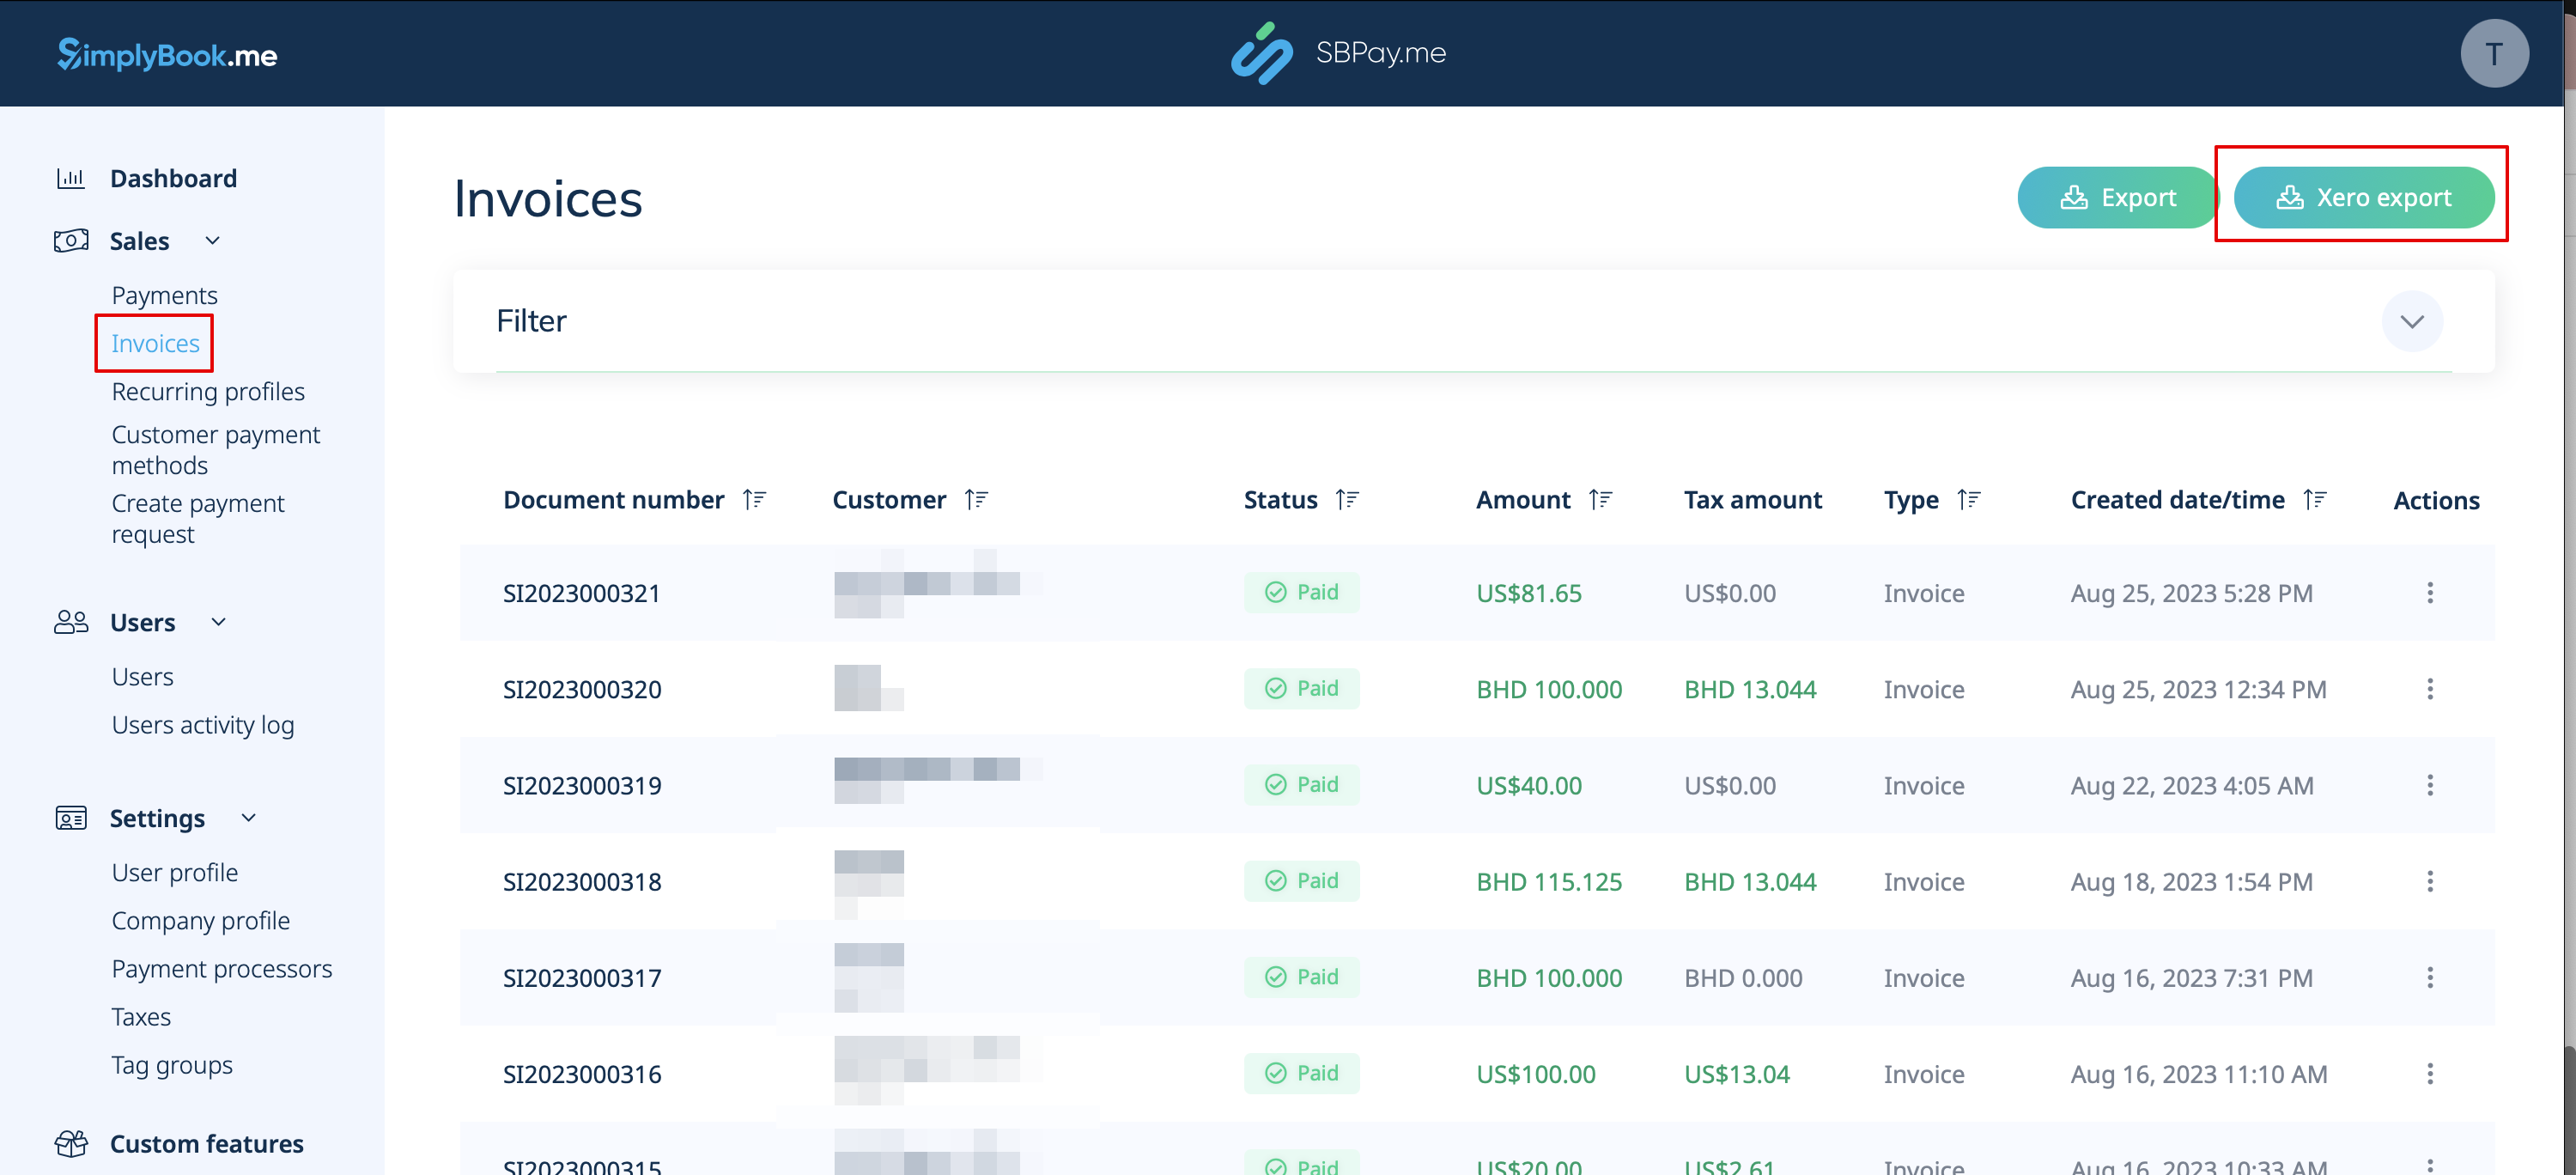
8. Lastly, after enabling and configuring the Xero Custom Feature, you can now go to Invoices in your SBPay account and click on the Xero Export button to generate the .csv file which can be imported on the Xero side.
For each integration:
- Double-check the data fields to ensure correct syncing.
- Regularly review the integration for any updates or errors.
Finally, these setups make accounting tasks less time-consuming. They allow you to focus more on your clients and services. Remember, keeping your accounting software integrated ensures streamlined financial tracking. As a result, you’re always prepared for financial planning and reporting.
Maximising Your Integration
By integrating your SimplyBook.me with QuickBooks, FreshBooks, or Xero unlocks many benefits. Let’s explore how to make the most of this setup. Keep your operations smooth and insights sharp with these tips.
Streamline Invoicing
Automate invoice creation right after booking. It saves time and reduces errors. Now, sending timely invoices becomes a breeze.
Sync Expenses Automatically
For instance, record your expenses as they happen. No more manual entries. This real-time update keeps your books accurate and up-to-date.
Leverage Financial Reports
Gain insights with ease. These integrations offer detailed financial reports. Understand your revenue streams and identify growth opportunities.
Monitor Cash Flow
Keep a close eye on your cash flow. Automated data sync gives you a clear picture. Make informed decisions with confidence.
Schedule Regular Audits
For example, set up regular audits through your dashboard. This habit ensures your financial data stays accurate and trustworthy.
Optimise Tax Preparation
Come tax season, you’re ready. Integrated accounting makes tax preparation less daunting. Easily access all financial records and deductions.
Utilise Client Insights
Understand your clients better. See which services drive revenue and client preferences. Tailor your offerings to match demand.
Embrace Automation
Let automation handle routine tasks. Spend more time on what matters—growing your business and serving your clients.
Each of these steps not only simplifies your financial management but also enhances the strategic aspect of your business operations. To summarise, syncing everything positions you to quickly meet business needs, optimise your services, and foster growth. Lastly, remember, the goal is to work smarter, not harder, allowing you to focus on what you do best.
Troubleshooting Common Issues
However, even with the best tools, challenges can arise. Here’s how to navigate common issues with SimplyBook.me integrations.
Issue 1: Integration Not Syncing
Firstly, check your internet connection. Then, verify that you’ve correctly linked your accounts. Sometimes, a simple reconnection fixes syncing issues.
Issue 2: Incorrect Data Transfer
Ensure all fields match between SimplyBook.me and your accounting software. Mismatches often lead to errors. Double-check your setup configurations.
Issue 3: Missing Transactions
Transactions might not appear if they’re entered after the sync period. Regularly update your records. This keeps your accounts aligned.
Issue 4: Duplicate Entries
To avoid duplicates, establish a clear workflow. Decide where to input data first. Stick to this process for consistency.
Issue 5: Access Denied Errors
This often means permissions need adjusting. In your accounting software, ensure SimplyBook.me has the necessary access rights.
Getting Additional Help
Don’t worry if you’re stuck. Help is just a few clicks away.
Firstly, the SimplyBook.me Help Center is your go-to. This hub is filled with step-by-step guides and FAQs. A goldmine of useful insights awaits you at the SimplyBook.me Help Center.
Next up, need answers swiftly? Our live chat service operates 24/5. Whatever the issue, big or small, our dedicated team is here to help.
For the visual learners, we’ve got you covered with video tutorials. These guides walk you through common procedures, available on the SimplyBook.me YouTube channel.
Keep in mind, facing hurdles is simply part of the process. Armed with the right tools, you’ll deftly navigate any challenge. Soon enough, your integrations will operate seamlessly.
Conclusion
To conclude, integrating SimplyBook.me with leading accounting software like QuickBooks, FreshBooks, and Xero is more than a convenience—it’s a strategy for growth. These integrations streamline operations, ensuring that your financial management is as efficient and accurate as possible. By automating tasks that once required manual input, businesses can save time, reduce errors, and focus more on strategic activities that drive growth.
We encourage all businesses to explore these integrations. They not only simplify accounting tasks but also provide valuable insights into your financial health, helping you make informed decisions. Whether it’s through enhanced reporting capabilities, streamlined invoicing, or simplified tax preparation, the benefits are clear. Furthermore, these integrations are designed to support your business as it grows, adapting to your changing needs.
Overall, as we look forward to future developments and updates, staying informed will enable you to leverage new features as they become available. Remember, the goal of SimplyBook.me and its integrations is to help your business thrive. Moreover, embrace these tools, and you’ll find your path to growth smoother and more manageable. Finally, let’s move forward together, making the most of what SimplyBook.me and its integrations have to offer.

Comments
0 commentsNo comments yet