Analytics tools integration guide | SimplyBook.me
This post is also available in:
![]()
![]()
![]()
![]()
Table of contents
This guide will assist you in seamlessly integrating a variety of analytics tools to monitor activity, bookings, and other events with SimplyBook.me software.
Analytics account
Before delving into the setup of any analytics tools, ensure that you have either an existing account or have successfully created one for the specific tool.
Step 1: Visit Google Analytics homepage.

Step 2: Follow one of the options below:
- To set up a new account, click “Start for free“
- If you already have an account, click “Sign in to Analytics“
Google Analytics
1: Visit google.com/analytics and click on “Get started today”. This action will prompt you to log into your Google account.
2: Complete the registration:
- Enter an account name.
- Select account data sharing preferences.
- Create a Google Analytics property (you can use your website name as your property name).
- Provide essential details about your business (e.g., company size, industry category, etc.).
- Agree to the Google Analytics Terms of Service.
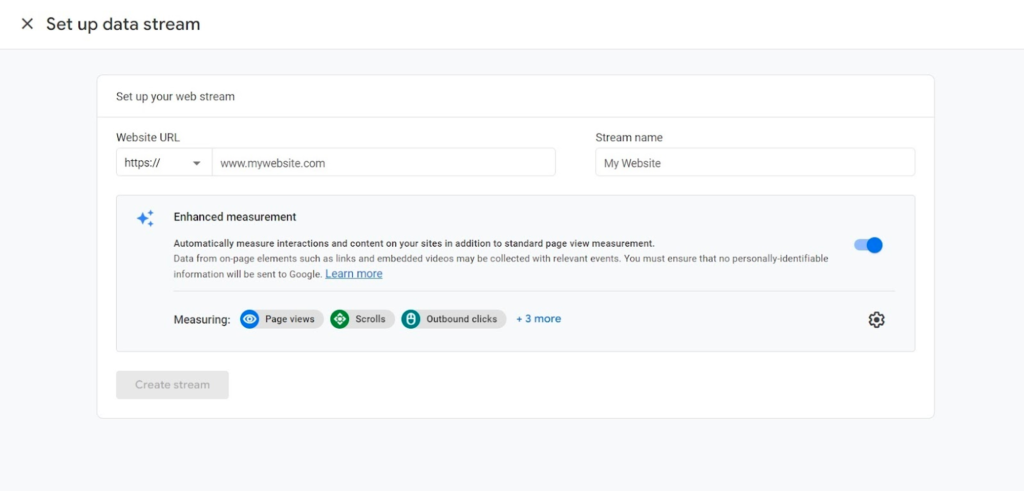
- While selecting a Data Stream choose “Web”
3: Add your website URL, enter a stream name, then click ”Create stream”.
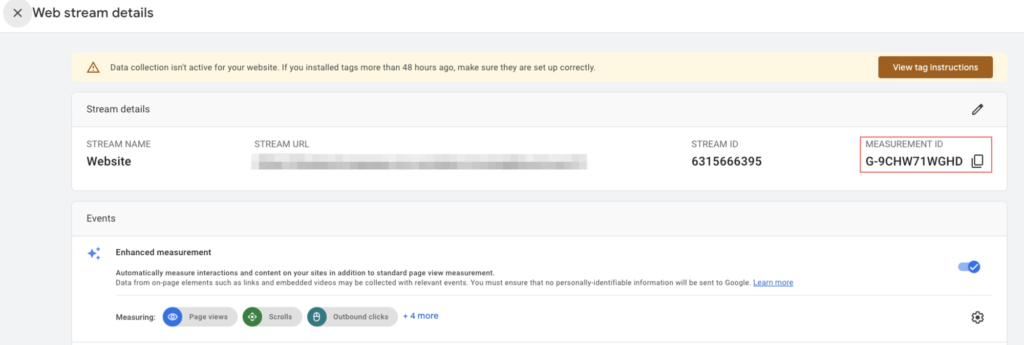
4: You will receive the details of your web stream. Copy the measurement ID and then proceed to add it to your SimplyBook.me Google Adwords and Analytics feature settings.
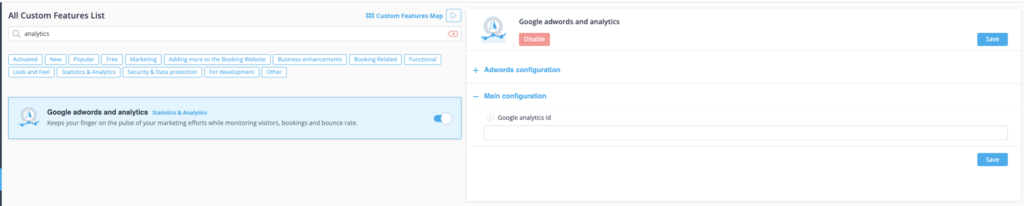
5: In your SimplyBook.me admin interface, access Custom Features, locate Google Adwords and Analytics in the list, and activate it. Then, paste the ID you saved from the previous step into the Main Configuration —> Google Analytics ID field.
If you already have a Google Analytics account but haven’t connected a SimplyBook.me Booking Website as a Data Stream, follow these steps to create one.
1. Click the gear icon in the sidebar navigation
2. Select Data streams
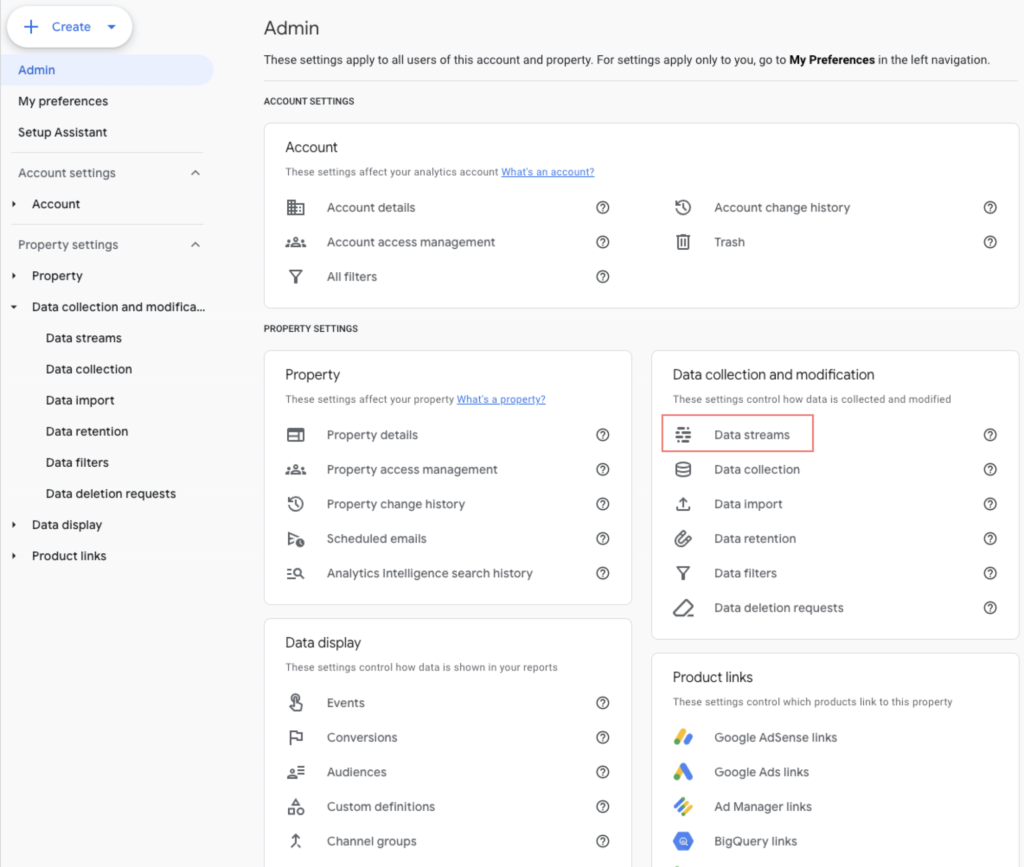
3. Click “Add stream” and select “Web”
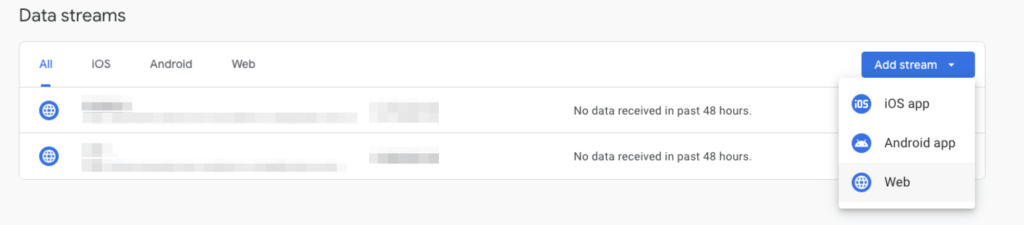
4. Include the website link and name for your data stream. After creating it, you will receive a measurement ID. Copy this ID and proceed to replicate “Step 5” from the instructions above.
Done. You have now linked your Google Analytics account with your SimplyBook.me website, and it will automatically transmit all the prepared events to your Google Analytics reports and real-time data. For details about these events, please refer to the next section.
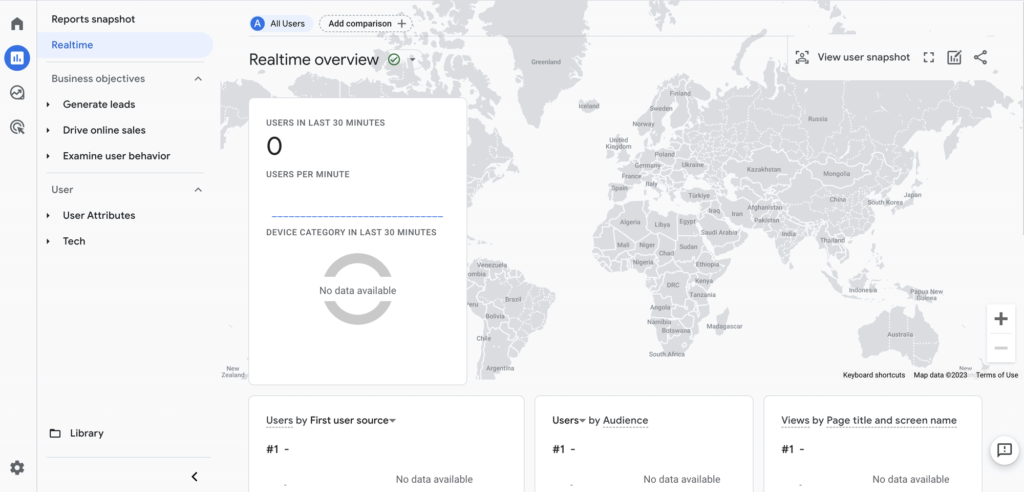
In order to see any changes in your analytics account, Google says to wait for 24 hours. On other side you can use real time section to view live data and live events firing on your page.
Events
SimplyBook.me triggers specific events whenever a user performs actions on your website. Here is a list of these events along with their descriptions.
| Event name | Description |
| page_view | This event is triggered every time a user navigates to different pages on your website. In the event data, you can access information about the page title and path to which the user navigates. |
| purchase | This event is triggered when a user: 1. Completes the booking of free service(s). 2. Completes the payment for paid service(s) or selects the “Pay later” option. |
| begin_checkout | This event is triggered when the user is on the step of selecting a payment method during the booking process. |
ℹ️ All of these events are tracked both on the booking website as a standalone page and within an iframe widget. We pass a special parameter that links the domain of the website where you’ve embedded the iframe, enabling the tracking of events for the SimplyBook.me booking page. It’s important to note that certain Chrome Extensions, such as ad blockers, can potentially block the proper functioning of your analytics, meaning that users with such extensions installed may have their actions not tracked by Google Analytics.
To view and confirm the firing and passing of events to analytics, you can use the Real-Time overview. Navigate to the Google Analytics dashboard, go to Reports, and select Realtime to gain real-time insights into the events being tracked. Browse through your booking website, create a test booking.
Google Tag Manager
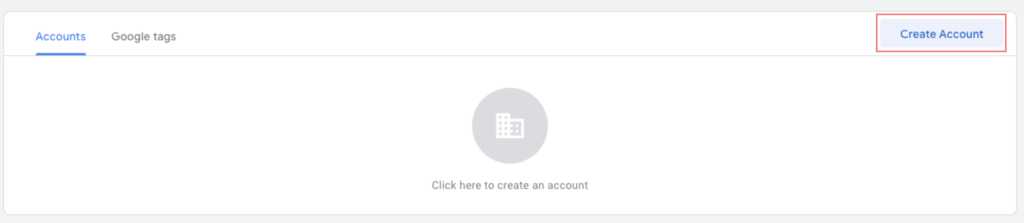
1: Go to tagmanager.google.com and register using the identical Google account you employed for Google Analytics.
2: Once you’ve logged in, select the Create Account.
3: Write down your account name, container name and select Web as target platform. Click Create button.

4: After successfully creating your new account, a tracking code similar to the one below will appear. Copy the highlighted ID and keep it for the next step.
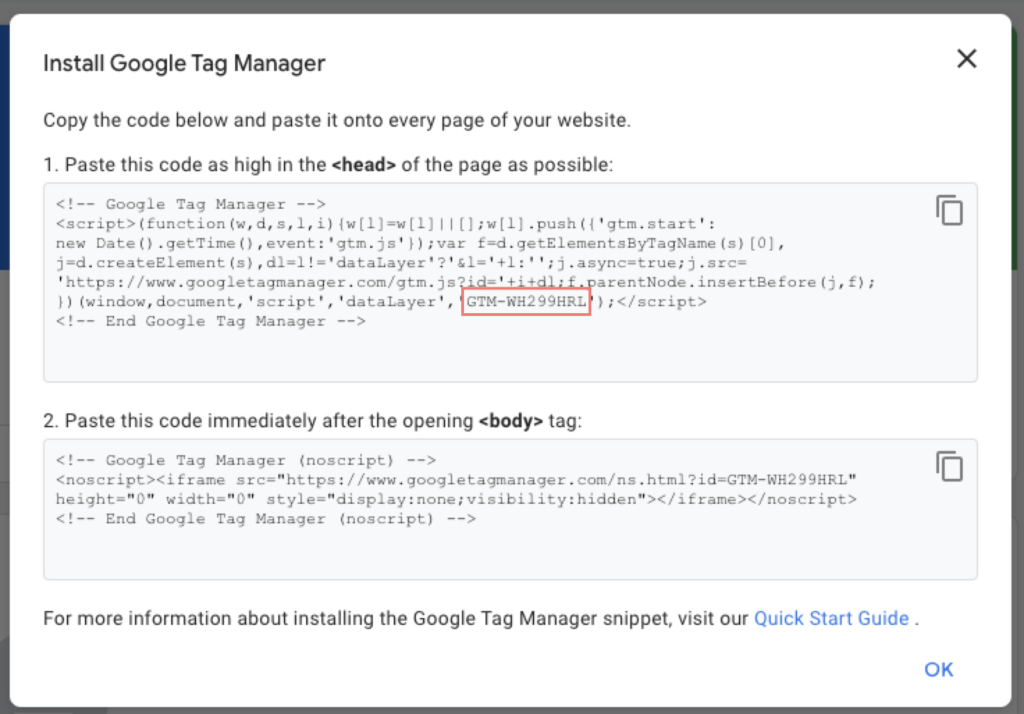
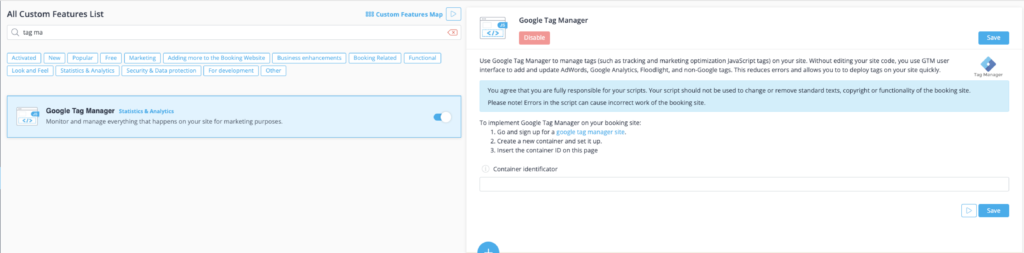
5: In your SimplyBook.me admin interface, access Custom Features locate Google Tag Manager in the list, and activate it. Then, paste the ID you saved from the previous step into the Container Identifier field.
Now, your Google Tag Manager is connected to the SimplyBook.me website and ready to be used. You can create new tags, triggers, variables, and build your own analytics tracking logic.
Tags
In Google Tag Manager, a tag is a code that transmits information to a third-party platform like Google Analytics. Implementing tags allows you to effortlessly send data to external systems, gaining valuable insights and making informed decisions based on analytics.
When creating a tag in Google Tag Manager, choose the tag type, such as Google Analytics or Meta (Facebook) Pixel. Configuration settings vary based on the selected tag.
You can also customize tags with triggers and variables. Triggers specify when and where to use the tag, and variables provide dynamic values for tag configuration.
Let’s create our first tag and configure it with Google Analytics. Follow the steps below to create a new tag.
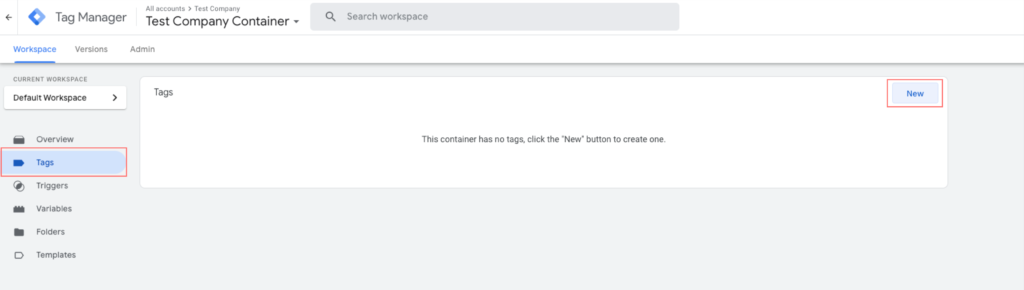
Step 1: Click Tags —> New
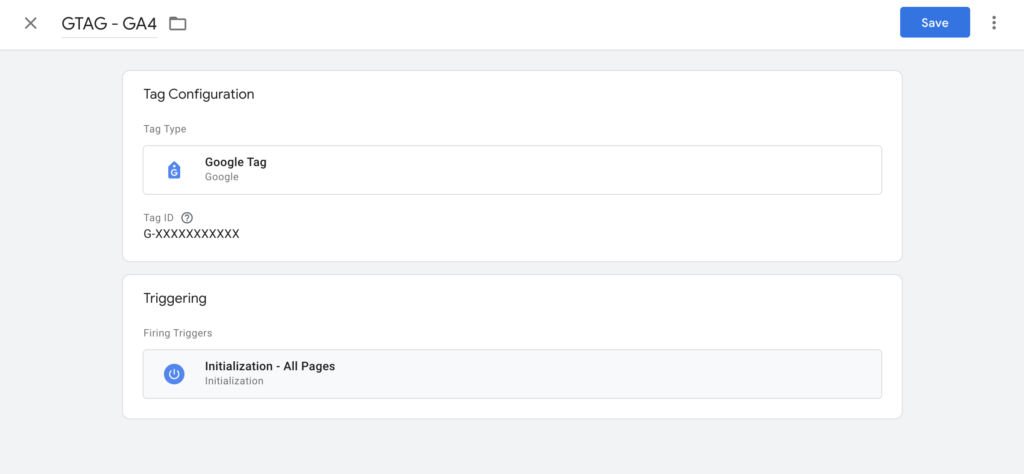
Step 2: Configure tag
- Give your tag a name
- Click Tag Configuration —> select Google Tag
- In the Tag ID field, paste your measurement ID from Google Analytics. To find your measurement ID, go to your Google Analytics account —> Settings —> navigate to Data Streams and select your previously configured data stream. Then, copy the Measurement ID.
- In Triggering select Initialization – All Pages. This will run tag as soon as possible.
Great! You’ve successfully created a new tag and connected your Google Analytics account with Google Tag Manager. To confirm that everything is functioning correctly, click on Preview. This action will initiate the Google Tag Manager Assistant and run your connected website in debug view, showing all configured tags depending on when they trigger. You can also use a separate Chrome Extension called Tag Assistant Companion. It runs the tag assistant instantly.
More on variables, tags and triggers at Google Support
Facebook Pixel (Meta Pixel)
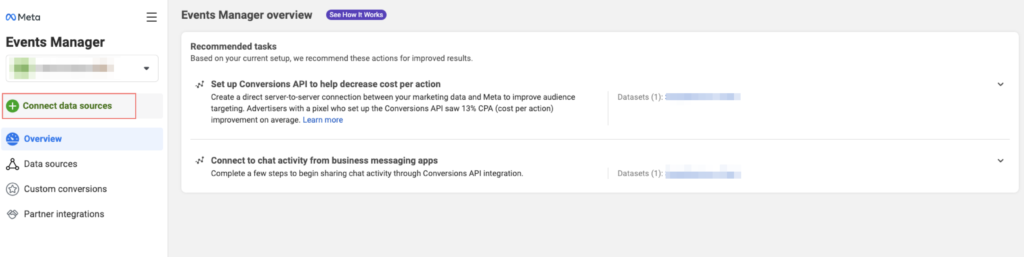
Step 1: Go to Meta Events Manager
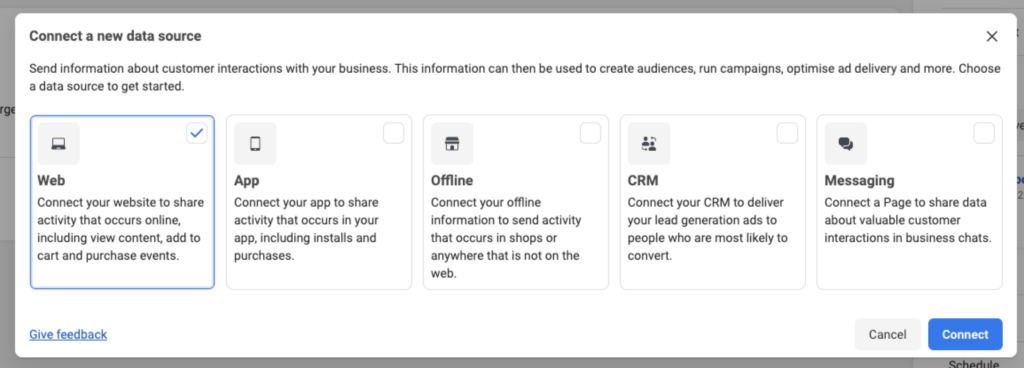
Step: 2: Click on Connect data sources and select Web.
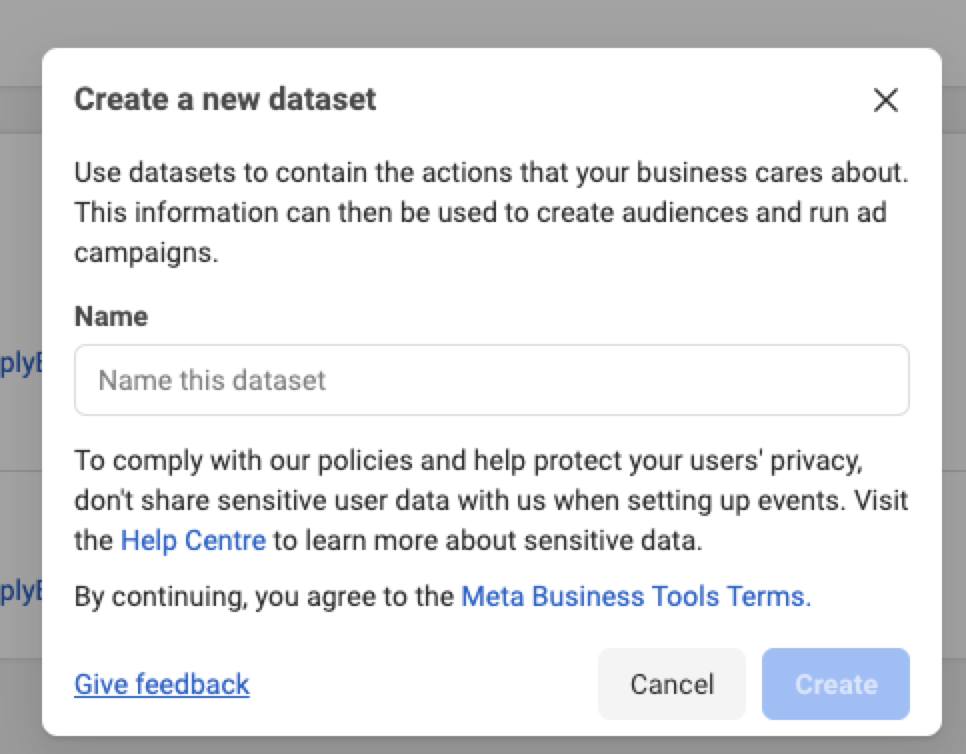
Step 3: Enter a name for your pixel and click Create pixel.
Step 4: Enter the URL of your SimplyBook.me website. Hit the “Check” button.
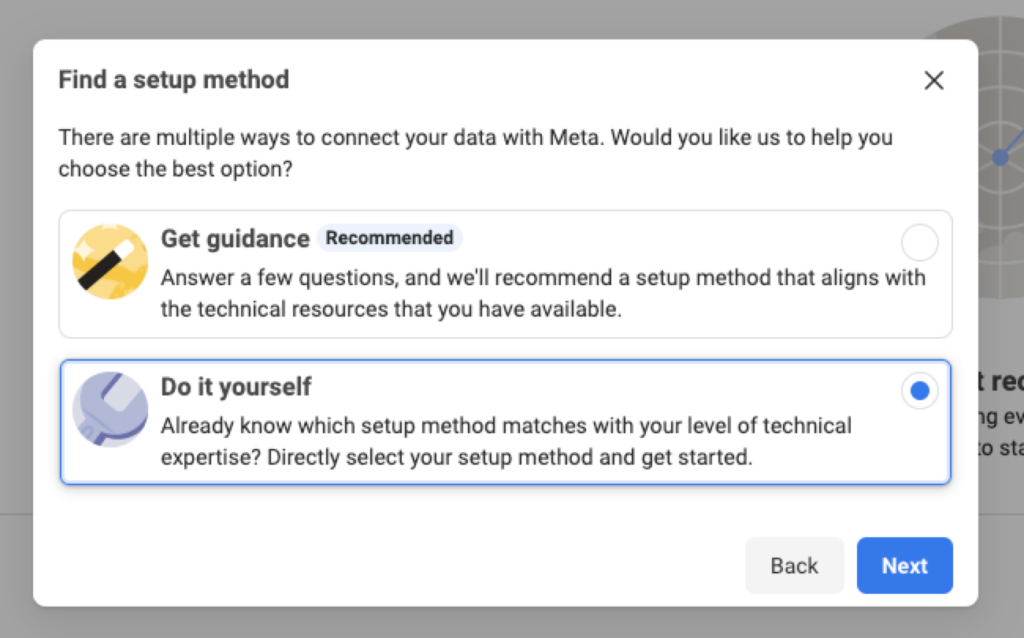
Step 5: Select “Do it yourself” setup method
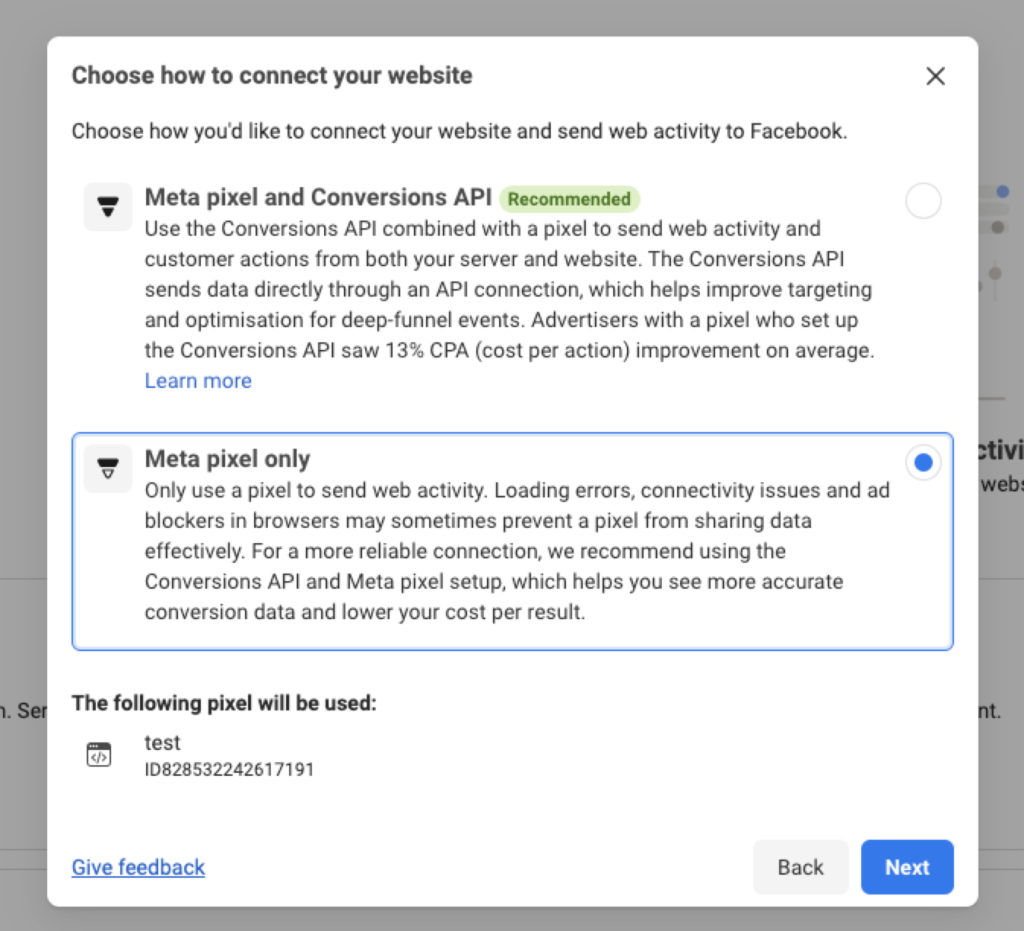
Step 6: Select Conversions API and Meta pixel or Meta pixel only as your setup option, then proceed by clicking Next.
If you choose Conversions API and Meta pixel, decide how you want to set up the Conversions API and pixel by selecting from options such as Set up with partner integration, Set up with Conversions API Gateway or Set up manually Follow the onscreen instructions to set up the pixel, Conversions API, and events based on your chosen method.
If you choose Meta pixel only, select the option to Install code manually.
Step 7: On the next step, simply close the popup window, as SimplyBook.me already has all the necessary code installed on the booking page. You only need to retrieve the “Pixel ID.”
Step 8: Once the Data Source has been successfully created, go to Settings and copy the Dataset ID (Pixel ID). You can also find the Pixel ID on Step 6 above at the bottom of the popup (just digits)
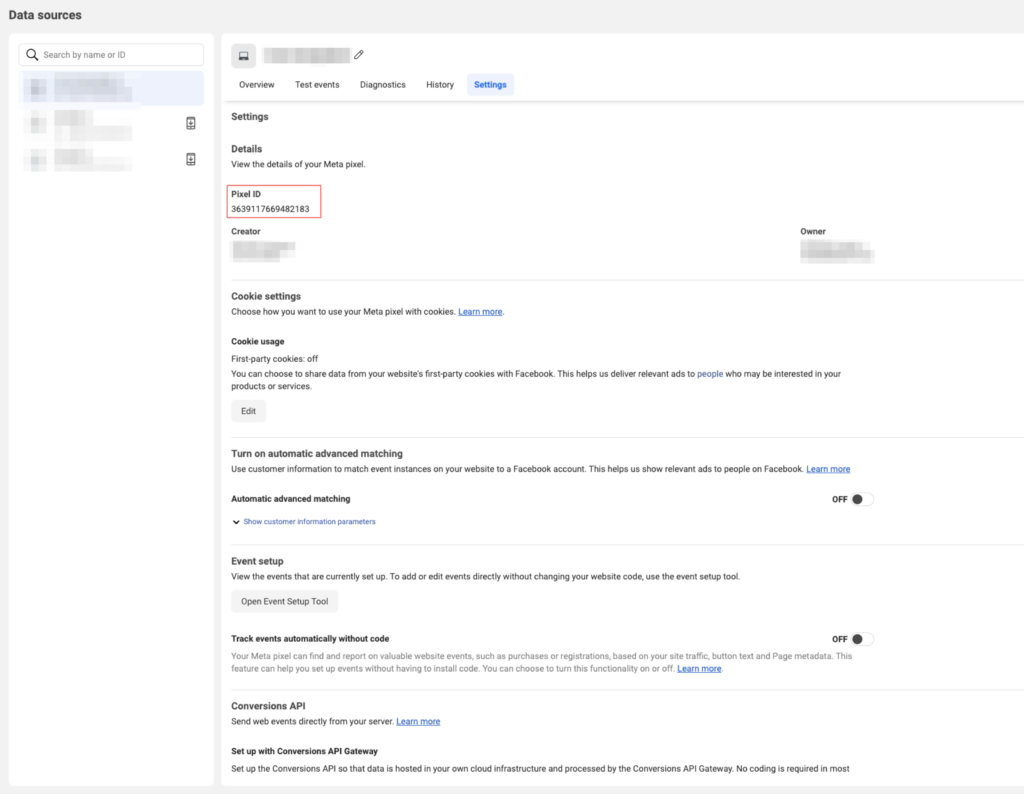
Step 9: Then, head to the SimplyBook.me admin interface, access Custom Features, locate the Facebook Pixel Feature, activate it, and paste the previously copied Pixel ID.

You have installed the Meta Pixel and are now all set to pass events to Meta analytics. Here’s a list of all events that SimplyBook.me sends to analytics along with their descriptions.
Events
SimplyBook.me triggers specific events whenever a user performs actions on your website. Here is a list of these events along with their descriptions. You can track them using Meta Pixel Helper on your booking website.
| Event name | Description |
|---|---|
| PageView | The event is triggered when a user opens any of the pages for the first time, signifying that the Meta Pixel has been initiated and is functioning correctly. (Default event triggered by Pixel) |
| ViewContent | The event is triggered when user navigates to different pages or booking process steps. We pass a special parameter called content_name which holds the name of the page which user navigates to |
| InitiateCheckout | This event is triggered when the user has started a checkout process on any kind of paid services. |
| Schedule | Triggered when the user completes booking of a free service |
| Purchase | This event is triggered when a user completes the payment for paid service(s) |
Useful Tools
Use these tools to enhance the debugging process and ensure that your analytics tools are functioning correctly.
Comments
0 commentsNo comments yet